
Prerequisites
You should be using a non-root user with sudo privileges as explained in Ubuntu 18.04 / 19.10 Initial Server Setup.
You should also have your LEMP stack (Nginx, MySQL and PHP) already installed before continuing with this guide. If you don’t have these installed yet, please see Installing a LEMP Stack (Nginx, MySQL, PHP) on Ubuntu 18.04 / 19.10.
1. Install phpMyAdmin
Let’s begin by updating the package lists and installing phpMyAdmin on Ubuntu 18.04 / 19.10. Below we have two commands separated by &&. The first command will update the package lists to ensure you get the latest version and dependencies for phpMyAdmin . The second command will then download and install phpMyAdmin. Press y and ENTER when asked to continue.
sudo apt update && sudo apt install phpmyadminThe order of the following screens in the phpMyAdmin Package configuration may vary depending on your setup.
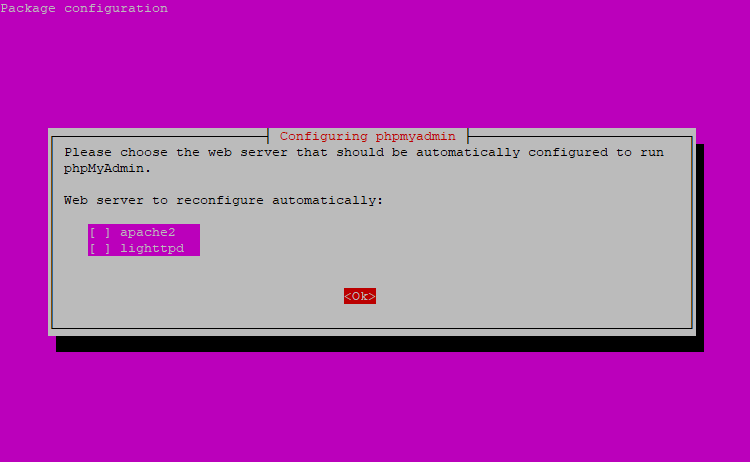
If you are prompted to choose a web server like below, as there is no option for Nginx, press TAB and then ENTER to continue without selecting a web server.
Select Yes and press ENTER to install and configure the database.

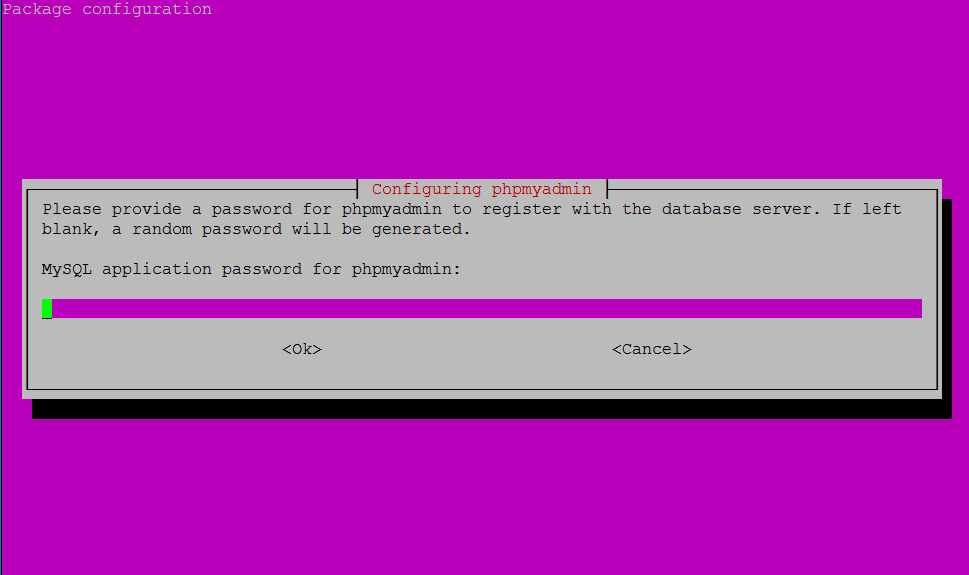
The MySQL application password is only used internally by phpMyAdmin to communicate with MySQL. You can leave this blank and a password will be generated automatically. Just press ENTER to continue.
2. Create Symbolic Link
In order for Nginx to serve the phpMyAdmin files correctly, we must create a symbolic link from the phpMyAdmin directory /usr/share/phpmyadmin to the Nginx document root directory.
The default location of the Nginx document root in Ubuntu 18.04 / 19.10 should be /var/www/html/, though it could be different depending on your setup. If you followed a previous guide for setting up multiple domains for Nginx, your document root may be located in somewhere like /var/www/example.com/public_html.
Once you have confirmed your document root, let’s create a symbolic link from the phpMyAdmin directory to your document root. Here we will assume your document root is /var/www/html/ and we will simply add phpmyadmin to the end of it. This will allow us to access phpMyAdmin at example.com/phpmyadmin.
sudo ln -s /usr/share/phpmyadmin /var/www/html/phpmyadmin3. Test phpMyAdmin
You should now be able to access the phpMyAdmin web interface by visiting your server’s domain name or public IP address followed by /phpmyadmin. e.g. http://example.com/phpmyadmin or http://192.168.1.10/phpmyadmin
If you don’t have a domain name yet and don’t know your IP, you can find out with:
ip a | grep -Eo 'inet (addr:)?([0-9]*\.){3}[0-9]*' | grep -Eo '([0-9]*\.){3}[0-9]*' | grep -v '127.0.0.1'
You will have set up the root user and password when installing MySQL for the first time. However, remote login might be disabled for root. If you get an error “Access denied for user ‘root’@’localhost'”, you should continue to Step 4 to create a superuser just for phpMyAdmin.
4. Create MySQL User
If you weren’t able to log in as root above, you can now create a superuser account just for phpMyAdmin.
In terminal, log into MySQL as root. You may have created a root password when you installed MySQL for the first time or the password could be blank, in which case you can just press ENTER when prompted for a password. If you have forgotten the root password, see: How to Reset the MySQL Root Password on Ubuntu.
sudo mysql -p -u rootNow add a new MySQL user with the username of your choice. In this example we are calling it pmauser (php my admin user). Make sure to replace password_here with your own (generate a password).
The % symbol tells MySQL to allow this user to log in from anywhere remotely. If you want heightened security, you could replace this with an IP address.
CREATE USER 'pmauser'@'%' IDENTIFIED BY 'password_here';Now we will grant superuser privileges to our new user pmauser.
GRANT ALL PRIVILEGES ON *.* TO 'pmauser'@'%';You should now be able to access phpMyAdmin using this new user account.
If you would like to set up some additional security for phpMyAdmin, continue to the next step.
5. Obscure phpMyAdmin URL
Bots and attackers continuously scan web servers for the phpMyAdmin login page, so it is recommended that you change the URL to something else.
In this example we are going to change it from example.com/phpmyadmin to example.com/pma_hidden, though you can change it to whatever you want.
In step 2, we created a symbolic link in the document root /var/www/html/phpmyadmin
All we need to do is to rename this symbolic link, in this example, to: pma_hidden. Make sure you enter the correct document root here. The default is /var/www/html though it may be something like /var/www/example.com/public_html/ on your server.
sudo mv /var/www/html/phpmyadmin /var/www/html/pma_hiddenYou should now be able to access phpMyAdmin at example.com/pma_hidden
6. Secure phpMyAdmin (Optional)
To provide an additional layer of security, we can set up authentication in Nginx.
Firstly, generate a strong password and keep it safe.
We will now install apache2-utils, which can generate the .htpasswd file that works with both Nginx and Apache.
sudo apt install apache2-utilsOnce installed, we can generate the .htpasswd file. Simply change username to whatever username you want. Generate a password and keep it safe.
sudo htpasswd -c /etc/nginx/.htpasswd usernameThere should now be a .htpasswd file containing your username and encrypted password. You can check with:
cat /etc/nginx/.htpasswdYou should see something like username:$apr1sdfsdf4435sdtskLfWmmg1sfdsdgg4
We now need to add two directives to our Nginx configuration file. The location of the config file may vary depending on your setup, though the default is usually in /etc/nginx/sites-available/default. If you set up multiple domains in a previous guide, your config file may be located in somewhere like /etc/nginx/sites-available/example.com
This this example, we will assume the config file is in /etc/nginx/sites-available/default. Open the file to edit.
sudo nano /etc/nginx/sites-available/defaultScroll down and look for the location block and paste in a new block underneath it with the name of your obscured phpMyAdmin folder, in this example pma_hidden. (Use the right mouse button to paste if using PuTTY for Windows)
location /pma_hidden {
        auth_basic "Restricted Access";
        auth_basic_user_file /etc/nginx/.htpasswd;
}
Save file and exit (press CTRL + X, press Y and then press ENTER).
Check that the Nginx config file is valid, otherwise the server could crash on restart.
sudo nginx -tIf valid, reload Nginx config.
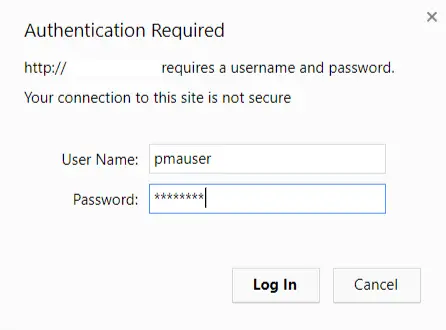
sudo service nginx reloadNow when visiting example.com/pma_hidden, you should be presented with an authentication window.
You’re all done!
What Next?
By now you will have successfully implemented your LEMP stack (Linux/MySQL/PHP) for Ubuntu 18.04 / 19.10 and can administer MySQL through phpMyAdmin.
You may now want to configure SSL for you domain or set up an FTP.
- Configuring Let’s Encrypt SSL Cert for Nginx on Ubuntu 18.04 / 19.10
- Installing an FTP server (vsftpd) on Ubuntu 18.04 / 19.10
Let me know if this helped. Follow me on Twitter, Facebook and YouTube, or 🍊 buy me a smoothie.
After Install phpMyAdmin. current PHP version change 7.2 to 8.0.5 my WP website Error
How install phpMYAdmin without change current PHP version?
I am running an Ubuntu 19.10 with a LEMP stack installed and working. and cannot follow this guide because there no phpmyadmin package available for 19.10. Any suggestions?
Hi Scott. Try installing phpMyAdmin manually using this guide
https://devanswe.rs/manually-upgrade-phpmyadmin/
Hello Dev,
I try to install 2 websites on Nginx Everything works perfectly but after apply this code
Domain 1:
sudo ln -s /usr/share/phpmyadmin /var/www/test1.com/public_html/phpmyadmin
Domain 2:
sudo ln -s /usr/share/phpmyadmin /var/www/test2.com/public_html/phpmyadmin
and try to login with http://test1.com/phpmyadmin “A file download automatically” I only can login to phpmyadmin on IP address
please help me to how i can login with my domain to phpmyadmin.
Thanks…
My PHP is
The mbstring extension is missing. Please check your PHP configuration.
why?
Works!
I get to section “2. Create a Symbolic Link” and create the link:
$ sudo ln -s /usr/share/phpmyadmin /var/www/mytest1.com/public_html/phpmyadmin
and then when I type into my browser my_IP_address/phpmyadmin I get “403 Error / nginx/1.14.0 (Ubuntu)”.
That was AWESOME!
Thanks…
this really works with me.
Thanks
I'm using AWS UBUNTU 18.04
On of the best guides ever, thanks for the great job 🙂
I installed ngnix on Ubuntu 18.04 on digitalocean. Then installed wordpress. After installing phpmyadmin. there is an error while uploadng mysql database in phpmyadmin the error is:
CREATE TABLE b2s_posts ( id int(11) NOT NULL, post_id int(11) NOT NULL, blog_user_id int(11) NOT NULL, last_edit_blog_user_id int(11) NOT NULL, user_timezone tinyint(4) NOT NULL DEFAULT '0', sched_details_id int(11) NOT NULL, sched_type tinyint(4) NOT NULL DEFAULT '0', sched_date datetime NOT NULL DEFAULT '0000-00-00 00:00:00', sched_date_utc datetime NOT NULL DEFAULT '0000-00-00 00:00:00', publish_date datetime NOT NULL DEFAULT '0000-00-00 00:00:00', publish_link varchar(255) NOT NULL, publish_error_code varchar(100) NOT NULL, network_details_id int(11) NOT NULL, post_for_relay tinyint(4) NOT NULL DEFAULT '0', post_for_approve tinyint(4) NOT NULL DEFAULT '0', relay_primary_post_id int(11) NOT NULL DEFAULT '0', relay_delay_min int(11) NOT NULL DEFAULT '0', hook_action tinyint(4) NOT NULL DEFAULT '0', hide tinyint(4) NOT NULL DEFAULT '0', v2_id int(11) NOT NULL DEFAULT '0' ) ENGINE=MyISAM DEFAULT CHARSHey, I successfully installed phpmyadmin on my ngnix server. while importing mysql database file to the phpmyadmin i get this warning message. how to solve it.
This is a compatibility issue with phpMyAdmin and PHP. You need to upgrade to the latest version of phpMyAdmin. Please see:
How to Manually Upgrade phpMyAdmin
Hi,
I am installing phpmyadmin on ubuntu 18.04 on windows. I have installed nginx and mysql and both are running. Did a symlink
sudo ln -s /usr/share/phpmyadmin /var/www/html/phpmyadmin
However in my browser http://localhost/phpmyadmin, I get loading of the page for 2 mins and stops with a blank page.
I ‘ll be grateful if someone can help. Thanks
Is there anything in the error log?
I did http://localhost/info.php and it keeps loading for a long time and stops. I think I am getting partial page. The logs shows error below
Make sure your Nginx config file is set up correctly.
See Guide: https://devanswe.rs/installing-php-nginx-ubuntu-18-04/
According to the docs in the link you have given above, there’s a section to sudo apt install libapache2-mod-php7.2. Is this a correct module to install for nginx? Anyway I did install it, but the problem persist. For localhost/info.php, there is still error in the logs, took a long time to load, sometimes I get full page and sometimes only partial. No page at all for phpmyadmin. Is it something to do with not installing mcrypt module?
You are correct,
libapache2-mod-php7.2is not needed for Nginx. I’ve removed that from the guide. However, it will not interfere with Nginx if installed.What happens if you run
sudo php-fpm7.2 -tDid you enter your IP or domain beside
server_namein your Nginx config?Also reboot the server.
server_name _;
I have commented out mcrypt.so in the extensions. I thought phpmyadmin need mcrypt. I tried to install but cannot find the package and also read somewhere that it’s being deprecated. Anyway from forums, tried to build it but probably didn’t quite finish the job.
No, you don’t need mcrypt. I’m guessing your LEMP stack got messed up along the way by installing the wrong libraries. Which guides did you follow? What I would suggest is removing your LEMP stack altogether and installing from scratch using the guides on this site. https://devanswe.rs/installing-nginx-mysql-php-lemp-stack-ubuntu-18-04/
I have installed ubuntu16.04 on windows and working just fine, able to access phpmyadmin
I have also installed ubuntu 18.04 because I need to install laravel and it uses php version >7.1. So at the moment doing laravel new my-app on 1804 and using 1604 phpmyadmin and ‘php artisan tinker’ to query the 1604 mysql.
I have tried to connect to 1804 mysql using php artisan migrate and cannot log in. I suspect php7.2-fpm not configured correctly on 1804 and that’s probably why phpmyadmin on 1804 do not completely load. Any advise please.
I have done a new install of ubuntu 18.04 on windows. Install mysql-server, but could not connect to the database using DataGrip. So I guess the problem is mysql setup. I could log in using the terminal.
Great guide! I just had to add the following lines to prevent error 403:
    location /pma {

    index index.php;

    }
Do you have any video tutorial installing multiple domain in 1 server? dont know how to do it..sorry im beginner.
Thanks For this Article. Very helpful
No probs! 🙂
We have two articles for installing multiple domains for both Apache and Nginx. If you check back in a few days we should have a video tutorial up as well.
Thank You! Every goes fine and smoothly
When in comes to making a symbolic link for phpmyadmin, I can really only do this once correct? I tried to do this for each of 3 domains root folders and only the first one actually works. When I try to so make the link the second time my text for “phpmyadmin” is red instead of the light blue like the first time I did it.
Yes, you need to create a separate symbolic link for each domain. Example:
Domain 1:
Domain 2:
Domain 3:
And they should all be light blue, not red.
Run
ls -lAnd it will show you the link
Make sure it’s correct!
Thank You
De nada 😉