Installing an FTP server (vsftpd) on Ubuntu 18.04

Installing an FTP server (vsftpd) on Ubuntu 18.04 / 18.10 / 19.04 / 19.10

Last updated on | 67 replies

vsftpd (Very Secure File Transfer Protocol Daemon) is a popular FTP server for Ubuntu. In this guide we will install and configure vsftpd on Ubuntu 18.04 / 18.10 / 19.04 / 19.10. We will also set up an FTP user and optionally configure SFTP for secure file transfers.

Before you begin…

It’s surprising how many web developers are still unaware of SFTP and the advantages over FTP/FTPS. SFTP comes with Linux Server preinstalled and works just like normal FTP, but is more secure and less hassle to set up. If your FTP client supports SFTP, you should use it!

1. Install vsftpd

Let’s begin by updating the package lists and installing vsftpd on Ubuntu 18.04 / 18.10 / 19.04 / 19.10.

Below we have two commands separated by &&. The first command will update the package lists to ensure you get the latest version and dependencies for vsftpd. The second command will then download and install vsftpd. Press y and ENTER when asked to continue.

sudo apt update && sudo apt install vsftpd

Once installed, check the status of vsftpd

sudo service vsftpd status
 vsftpd.service - vsftpd FTP server
   Loaded: loaded (/lib/systemd/system/vsftpd.service; enabled; vendor preset: enabled
   Active: active (running) since Tue 2018-04-17 15:23:22 UTC; 10s ago
 Main PID: 31602 (vsftpd)
   CGroup: /system.slice/vsftpd.service
           └─31602 /usr/sbin/vsftpd /etc/vsftpd.conf

Apr 17 15:23:22 myserver systemd[1]: Starting vsftpd FTP server...
Apr 17 15:23:22 myserver systemd[1]: Started vsftpd FTP server.

Above we can see our FTP server is now up and running.

2. Configure Firewall

If you haven’t already done so, it is recommended that you enable the ufw firewall for Ubuntu 18.04 / 18.10 / 19.04 / 19.10. Before enabling ufw firewall, make sure you add a rule for SSH, otherwise you may get locked out of your server if you’re connected remotely. If you don’t want to set up a firewall, skip to Step 3.

sudo ufw allow OpenSSH

Let’s open ports 20 and 21 for FTP, and ports 40000-50000 for passive FTP. We’ll also open port 990 for TLS, which we will set up later.

sudo ufw allow 20/tcp
sudo ufw allow 21/tcp
sudo ufw allow 40000:50000/tcp
sudo ufw allow 990/tcp

Now, enable the firewall if it isn’t already. Press y and ENTER if warned about disrupting the SSH connection.

sudo ufw enable

To check the status of the firewall, run:

sudo ufw status

If the firewall is running, you should see Status: active and the firewall rules we just added.

Status: active

To                         Action      From
--                         ------      ----
OpenSSH                    ALLOW       Anywhere
Apache Full                ALLOW       Anywhere
3306                       ALLOW       Anywhere
20/tcp                     ALLOW       Anywhere
21/tcp                     ALLOW       Anywhere
40000:50000/tcp            ALLOW       Anywhere
990/tcp                    ALLOW       Anywhere
OpenSSH (v6)               ALLOW       Anywhere (v6)
Apache Full (v6)           ALLOW       Anywhere (v6)
3306 (v6)                  ALLOW       Anywhere (v6)
20/tcp (v6)                ALLOW       Anywhere (v6)
21/tcp (v6)                ALLOW       Anywhere (v6)
40000:50000/tcp (v6)       ALLOW       Anywhere (v6)
990/tcp (v6)               ALLOW       Anywhere (v6)

3. Create FTP User

We will now create a new user that we will use to log into FTP. In this example, we will create a new user called ftpuser.

sudo adduser ftpuser

Generate a strong password and keep it safe.

You may also be asked to enter some contact information. You can just press ENTER to each of these.

If you only want ftpuser to log in via FTP, you should disable their SSH access by blacklisting their username in the SSH config file. Otherwise, skip to Step 4.

Open the SSH config in nano.

sudo nano /etc/ssh/sshd_config

Add the following to the bottom of the file replacing ftpuser with the user you want to deny SSH and SFTP access. You can add multiple users here separated by a single space. (To paste in nano, press the right mouse button).

/etc/ssh/sshd_config
DenyUsers ftpuser

To save file and exit, press CTRL + X, press Y and then press ENTER.

Restart the SSH service.

sudo service sshd restart

4. Directory Permissions

You now need to decide where this new FTP user is allowed to view and upload files.

vsftpd uses chroot jails to restrict users to their home directories and requires that the home directory is not writable. For that reason, we have to set up some directories and permissions.

If you plan on using this FTP user account to upload files to a web server, continue to Step 4.1. If you just want to upload to a home folder, skip to Step 4.2.

4.1. Upload to a Web Server

In many cases, you want to be able to upload files to the document root on the web server.

If you followed a previous guide here for setting up multiple domains, your document root may be located in somewhere like /var/www/test1.com/public_html – in that case, you would need to set the home folder for ftpuser to the folder above the document root: /var/www/test1.com (substituting test1.com for your own domain).

If you are not using multiple domains, we will assume you are using the default document root /var/www/html for both Apache and Nginx in Ubuntu 18.04 / 18.10 / 19.04 / 19.10. In this scenario, we have to make /var/www/ the home directory for our user ftpuser.

Let’s set the folder above the document root as the home directory for ftpuser.

sudo usermod -d /var/www ftpuser

Now set ownership of the document root directory to ftpuser. (The default is /var/www/html, though it may be /var/www/test1.com/public_html on your server.)

This will allow our FTP user to write and alter files in the document root directory.

sudo chown ftpuser:ftpuser /var/www/html

Now skip to Step 5 to configure vsftpd.

4.2 Upload to a Home Folder

If instead you want this user to upload files to the home directory, create a new directory called ftp in the user’s home directory and another within it called files. In this example below our user is called ftpuser.

sudo mkdir /home/ftpuser/ftp

Set the ownership of the ftp directory to no nobody:nogroup.

sudo chown nobody:nogroup /home/ftpuser/ftp

Set permissions for the ftp directory using chmod so that it is not writable by anyone, otherwise vsftpd will not allow you to log in.  a-w means  a = all/everyone  - = remove  w = write permission, so, remove write permissions for everyone.

sudo chmod a-w /home/ftpuser/ftp

Next we will create a new directory within /ftp where the user can view and upload files.

sudo mkdir /home/ftpuser/ftp/files

Assign ownership of this directory to our new FTP user otherwise they will not be able to write to it.

sudo chown ftpuser:ftpuser /home/ftpuser/ftp/files

5. Configure vsftpd

There are a few changes we have to make to the vsftpd configuration file before you can start using FTP on Ubuntu 18.04 / 18.10 / 19.04 / 19.10.

Before editing the config file, create a backup.

sudo cp /etc/vsftpd.conf /etc/vsftpd.conf.bak

Now, open the config file in nano editor.

sudo nano /etc/vsftpd.conf

This is quite a large file but it’s mostly filled with comments to help you along.

You need to go down the file and make sure that the settings match those below. Note: you can search in nano using CTRL + W

Look for #write_enable=YES and uncomment it by removing the # sign. This will allow FTP users to write files to the server.

etc/vsftpd.conf
write_enable=YES

Look for #chroot_local_user=YES and uncomment it by removing the # sign. This will prevent FTP users from browsing outside their own directory.

etc/vsftpd.conf
chroot_local_user=YES

Look for #local_umask=022 and uncomment it by removing the # sign. This will give uploaded files and folders the correct permissions.

etc/vsftpd.conf
local_umask=022

We now need to add some directives that don’t exist in the file.

Since Linux doesn’t show files beginning with a dot, files like .htaccess will not be visible in FTP. This may be a problem if you intend to use Apache and want to work with .htaccess.

To force vsftpd to show file names that begin with a dot, paste the following to the bottom of the file. (To paste in nano, press the right mouse button)

etc/vsftpd.conf
force_dot_files=YES

Lastly, let’s add some port ranges for passive FTP to make sure enough connections are available. Paste the following to the bottom of the file. (To paste in nano, press the right mouse button)

etc/vsftpd.conf
pasv_min_port=40000
pasv_max_port=50000

If you followed Step 4.2 previously and only want this user to upload files to the home folder, we must tell vsftpd that the local_root is the /ftp folder we created earlier.

Don’t add these two lines if you want the user to upload to the web document root!

etc/vsftpd.conf
user_sub_token=$USER
local_root=/home/$USER/ftp

We are done with vsftpd.conf for the moment but will return in later steps to set up security and SSL.

To save file and exit, press CTRL + X, press Y and then press ENTER.

Restart vsftpd.

sudo systemctl restart vsftpd

6. Test FTP

We can now test vsftpd to see if we can log in as the user we created earlier. We recommend FileZilla, which works on Windows, Mac and Linux.

Enter your server’s IP, your FTP username and password you created earlier, and click Quickconnect.

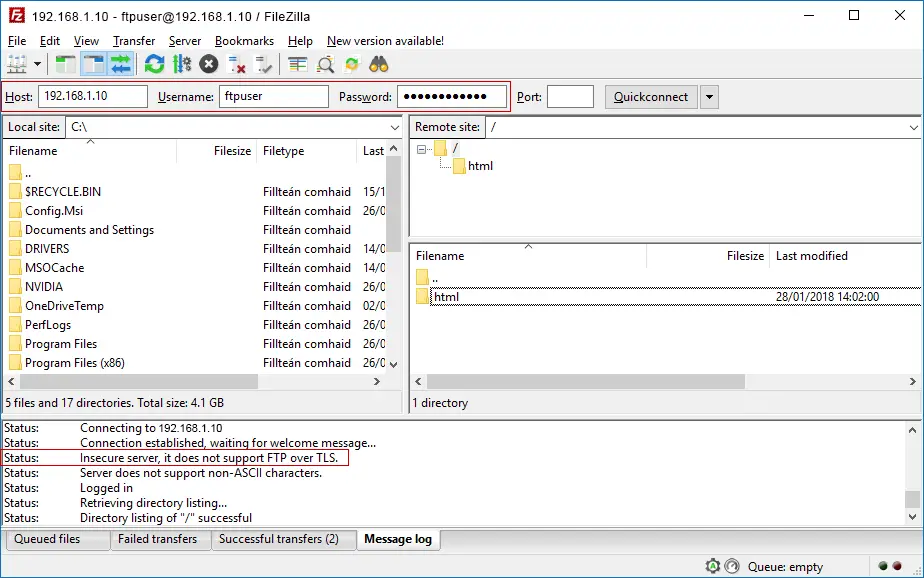
Above we can see we have connected successfully and the web root directory html is displayed, though this may be different on your server.

Try uploading, creating and editing folders and files within the web root directory to ensure permissions are working correctly.

You will notice we have a warning in FileZilla “Status: Insecure server, it does not support FTP over TLS.” It is highly recommended that you now configure TLS so that login credentials and traffic are encrypted over the FTP connection.

If you are having problems logging in to the FTP server, try checking the vsftpd log. To view the last 200 entries using tail:

sudo tail /var/log/vsftpd.log -n 200

7. Secure FTP with TLS (optional)

It’s important to keep a few things in mind when using FTP – it is not encrypted by default meaning your credentials and files that you send are vulnerable to interception. To address this you should connect to vsftpd using FTPS (FTP over SSL/TLS).

Let’s begin by creating a new certificate with the openssl tool.

sudo openssl req -x509 -nodes -days 365 -newkey rsa:2048 -keyout /etc/ssl/private/vsftpd.pem -out /etc/ssl/private/vsftpd.pem

You will be asked to enter some details like country, etc. You don’t have to fill these in. You can just press ENTER for defaults.

Now that your private key has been created, there are a few changes we have to make to the vsftpd configuration file.

Open the config file in nano editor.

sudo nano /etc/vsftpd.conf

Find the following line: (Note: you can search in nano using CTRL + W)

etc/vsftpd.conf
ssl_enable=NO

Change it to:

etc/vsftpd.conf
ssl_enable=YES

Paste in the following beneath it.

etc/vsftpd.conf
rsa_cert_file=/etc/ssl/private/vsftpd.pem
rsa_private_key_file=/etc/ssl/private/vsftpd.pem
allow_anon_ssl=NO
force_local_data_ssl=YES
force_local_logins_ssl=YES
ssl_tlsv1=YES
ssl_sslv2=NO
ssl_sslv3=NO
require_ssl_reuse=NO
ssl_ciphers=HIGH
pasv_min_port=40000
pasv_max_port=50000

Save file and exit (press CTRL + X, press Y and then press ENTER).

Restart vsftpd.

sudo systemctl restart vsftpd

8. Testing TLS with FileZilla

We can now test TLS. We recommend FileZilla, which works on Windows, Mac and Linux.

Enter your server’s IP, your FTP username and password you created earlier, and click Quickconnect.

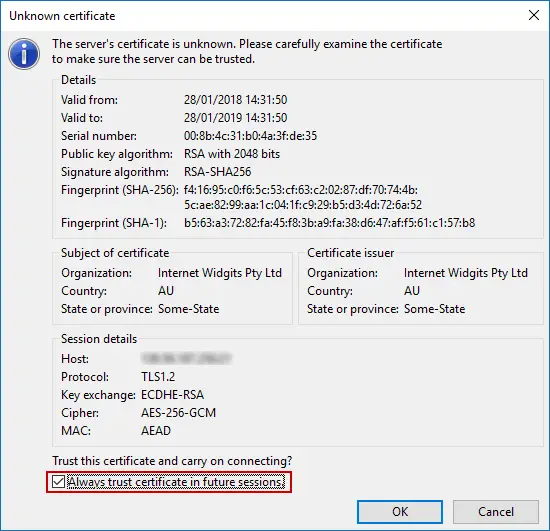
You may be presented with an Unknown Certificate warning. Click Always trust this certificate in future sessions and click OK.

If you are connected over TLS, it will tell you in the connection log. You will also see a padlock in the bottom right corner.
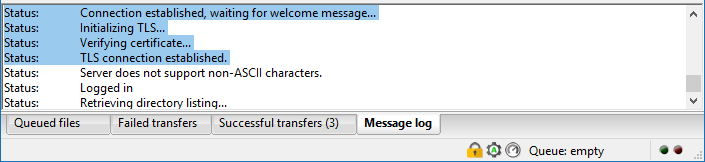
You’re all done!

Let me know if this helped. Follow me on Twitter, Facebook and YouTube, or 🍊 buy me a smoothie.

67 replies

Leave a reply

Your email address will not be published. Required fields are marked *

  1. Little word of advice, if you are taking the webserver option DO NOT uncomment chroot_local_user=YES

    IF YOU DO THIS YOU WILL GET THE Filezilla Error 500 OOPS: cannot change directory
    The author forgot to put a disclaimer on this part for those users taking the webserver option.

  2. This page has proven to be the most useful and informative page I have found for getting Filezilla to work with a vsftpd server. I have spent hours trying to make things work and kept getting “permission denied,” whenever I tried to upload a file from an Ubuntu client Filezilla to a Linux Mint server. Thanks so much!

  3. Would it not be better add the user the www-data group instead of changing ownership of the document root?

  4. Here where are in 2021 and i`m 2Hours trying to solve this error bellow
    Error: Failed to retrieve directory listing
    Whithout this the Error change to:
    Error: GnuTLS error -15 in gnutls_record_recv: An unexpected TLS packet was received.
    Error: Could not read from socket: ECONNABORTED – Connection aborted
    Error: Could not connect to server
    After change this line>chrchroot_local_user=NO
    Error above disapear , Retrieve directory listing persist, I want /home/www/ to be show on ftp to edit some web files and uploads too…
    unfortunally I`ve done the step 4.2 before the read warning about www folder, and I have no idea how to undo it.

    1. I had the same problem, I solved the issue with
      rm -r /home/ftpuser/ftp.
      Just had to delete it and that’s it

  5. Great Work but I am having issues. I am not able to connect to FTP. I am using WinSCP software on windows. It says “Authentication failed” when I use port 22. When I use port 21 its just timeout detected error.

    I have enabled port TCP 20- TCP 21 and TCP 40000-50000 from security groups in AWS console. But it does not work.
    Then I enabled all TCP port 0-65535 its also does not work.

  6. Thanks for a great walkthrough. I’m almost up and running with everything I need, however…

    I’ve got to this point and despite changing the password and trying again, still get this:

    Status: Connecting to 3..**.*6:21…
    Status: Connection established, waiting for welcome message…
    Response: 220 (vsFTPd 3.0.3)
    Command: USER fxxxxp
    Response: 331 Please specify the password.
    Command: PASS ********
    Response: 530 Login incorrect.

    The password is the same that I’ve typed on the console, have even tried changing it again using sudo passwd fxxxxp.

    I’m using AWC EC2 if that makes any difference. Have added custom TCP rules for 20 – 21.

    Cheers

    1. I’ve had this error before and it wasn’t to do with the password. It was because I had the chroot and/or permissions set up incorrectly. Is it a home folder or web doc root you are FTPing to?

      1. I’m using the same web doc root as in the example above:

        sudo usermod -d /var/www fxxxxp
        sudo chown fxxxxp:fxxxxp /var/www/html

        I’ve done some fiddling and now getting the following, it’s connecting, showing folders etc, but not files:

        Status: Connection established, waiting for welcome message…
        Status: Server does not support non-ASCII characters.
        Status: Logged in
        Status: Retrieving directory listing…
        Status: Server sent passive reply with unroutable address. Passive mode failed.
        Command: PORT 192,168,0,107,215,26
        Response: 500 Illegal PORT command.
        Error: Failed to retrieve directory listing

  7. Hello everyone, I can connect to my FTP server however, I’m getting an error when attempt to transfer files with filezilla. This is the log:

    Command: STOR vsftpd_bkp.conf

    Response: 553 Could not create file.

    Error: Critical file transfer error

    I created an ftpuser (ftpubuntu in my case), and I have this permitions setup:

    felix@Ubuntu18:/home$ ls -l

    dr-xr-xr-x 3 ftpubuntu ftpubuntu 4096 wrz 16 21:45 ftpubuntu

    felix@Ubuntu18:/home$ ls -l ftpubuntu/

    dr-xr-xr-x 3 nobody nogroup 4096 wrz 16 21:31 ftp

    felix@Ubuntu18:/home$ ls -l ftpubuntu/ftp/

    dr-xr-xr-x 2 ftpubuntu ftpubuntu 4096 wrz 16 21:31 files

    My question is, are ok my permitions and owners. The tutorial doesn’t say how should I setup permitions for ‘files‘ folder.

    Any hint is highly appreciate.

    Kind regards,

    Felix

    1. make sure you apply ownership of the folder you are trying to upload into to your ftp user.
      sudo chown ftpuser:ftpuser /var/www/yourdomain.com/public_html

  8. Hi! When i’m trying to loged in to my Server i have this error : 500 oops: vsftpd: refusing to run with writable root inside chroot(). I fixed that with chmod a-w /var/www/mydomain but now i can connect but filezilla can’t retrieve directory listing

  9. Thank you so much for this tutorial. For the most part, this worked perfectly for my setup. However, I have several virtual host sites that I added in addition to the default one. For example, I have the following additional hosts…
    /var/www/web1/public_html
    /var/www/web2/public_html
    /var/www/web3/public_html
    Upon completion of the tutorial, I was expecting to see each one of these populate the Remote site side of FileZilla.
    The only thing I get is I think the default website, and NOTHING from the virtual hosts.
    The format looks correct, but I would love to be able to access each sites folders from Filezilla and not just the ONE default one.
    Did I forget something?
    Again, thank you for putting together a great tutorial.

    Best,Mike

    1. I’m not sure this is possible with your current folder structure because in order to access /var/www/ via FTP, you would have to set /var/ as the home folder for your FTP user, which is terrible security and I’m not sure if even possible.

      Have you considered SFTP instead? How to configure SFTP for a web server document root

      If you have to use vsftpd, then I would move all my vhosts into /var/www/html/ and reconfigure my Apache vhosts to point to the new directory. So your folder structure would look like:

      /var/www/html/web1/public_html
      /var/www/html/web2/public_html
      /var/www/html/web3/public_html
      

      Then follow Step 4.1 above as normal, setting /var/www/ as the FTP user’s home folder and giving it ownership to /var/www/html. Then when you log in to FTP, you will see all vhosts.

      1. Thank you so much for that recommendation. It sounds very logical and something that I will attempt on my next day off from the J.O.B.
        Also, if you wouldn’t mind, could you share the advantages/disadvantages of the 2 different ftp packages sftp and vsftp? Quite frankly, the reason I’m looking at this ftp scenario is because of issues I’m having with shared folders between Windows10 and Samba/Linux. At this point in time, I’m pumped about this Filezilla/Linux config as I have previously used Filezilla and like its capabilities.
        Again, thank you for your recommendations and I hope you have a wonderful day.

        1. I would only use vsftpd if I was running a web hosting service and wanted to provide FTP to many users. But if you’re just wanting FTP access for yourself and a few other users, go with SFTP.

          SFTP is basically FTP over SSH. FileZilla and all modern FTP clients support it. Most, if not all, distributions of Linux support it so you don’t have to go through the tedious task of installing vsftpd and configuring TLS anymore. All you need to do is configure the file /etc/ssh/sshd_config. Give it a try!

          https://devanswe.rs/configure-sftp-web-server-document-root/

          1. Thank you for your suggestion to try sftp. After a couple attempts to install with some failures in route, I decided to go back and try vsftpd.
            Where before I was able to connect using your tutorial, I cannot connect now. I get the following error
            Command: USER ftpuser
            Response: 331 Please specify the password.
            Command: PASS ******
            Error: GnuTLS error -15 in gnutls_record_recv: An unexpected TLS packet was received.
            Error: Could not read from socket: ECONNABORTED – Connection aborted
            Error: Could not connect to server.
            Before, I didn’t configure the security at Step 7, so I’m wondering if there is something going on there (I remarked out this section to see if anything changed and it did not) Also, I changed my folder structure in Linux to put my vhosts under
            /var/www/html/web1/public_html
            /var/www/html/web2/public_html
            I set /var/www as my root folder by entering the command
            sudo chown ftpuser:ftpuser /var/www/html
            Is it OK that the ownership of the /var/www now belongs to ftpuser, BUT ownership of the html directory and sub-directories are now assigned to the root user? I would have thought that ownership would be recursive down into all the directories.
            This demonstrates my lack of knowledge with Linux (I want to learn the best I can), so please throw me a bone if willing, lol.

            Thank you very much.

          2. Usually you get that error if there’s a permissions problem.

            /var/www/ should be the home folder of ftpuser (probably already done)

            sudo usermod -d /var/www ftpuser    
            

            I think /var/www owner should be root.

            sudo chown root:root /var/www
            

            /var/www/html and all contents should be owned by ftpuser. Run this command recursively to set ownership for all contents:

            sudo chown -R ftpuser:ftpuser /var/www/html    
            

            Then see if you can connect again.

  10. Status: Resolving address of example.com Status: Connecting to 13.127.76.245:21… Status: Connection established, waiting for welcome message… Response: 220 (vsFTPd 3.0.3) Command: AUTH TLS Error: Could not connect to server How can i solve this problem..?

  11. And i had this error:

    Jun 25 12:13:14 jacob vsftpd[29514]: pam_unix(vsftpd:auth): check pass; user unknown
    Jun 25 12:13:14 jacob vsftpd[29514]: pam_unix(vsftpd:auth): authentication failure; logname= uid=0 euid=0 tty=ftp ruser=instam
    Jun 25 12:13:22 jacob vsftpd[29516]: pam_unix(vsftpd:auth): check pass; user unknown
    Jun 25 12:13:22 jacob vsftpd[29516]: pam_unix(vsftpd:auth): authentication failure; logname= uid=0 euid=0 tty=ftp ruser=instam
    Jun 25 12:13:31 jacob vsftpd[29519]: pam_unix(vsftpd:auth): check pass; user unknown
    Jun 25 12:13:31 jacob vsftpd[29519]: pam_unix(vsftpd:auth): authentication failure; logname= uid=0 euid=0 tty=ftp ruser=instam

    So, how can i back to use sftp for easily ?

  12. Hi there
    I often use sftp before. I had this error when try to use ftp for server.
    Please help me solve it.

    Tue Jun 25 12:13:31 2019 [pid 29520] CONNECT: Client "::ffff:1.52.108.209"
    Tue Jun 25 12:13:33 2019 [pid 29519] [instamoz] FAIL LOGIN: Client "::ffff:1.52.108.209"

    Thank you

  13. Hi,
    I followed this excellent guide step by step and managed to test the ftp server perfectly, both locally and remotely. Everything worked without problems; but only the first time.
    In all subsequent attempts I found this error:

    “Status: Connection established, waiting for welcome message…
    Status: Initializing TLS…
    Status: Verifying certificate…
    Status: TLS connection established.
    Status: Server does not support non-ASCII characters.
    Status: Logged in
    Status: Retrieving directory listing of “/”…
    Status: Server sent passive reply with unroutable address. Using server address instead.
    Command: LIST
    Error: The data connection could not be established: ECONNREFUSED – Connection refused by server
    Error: Connection timed out after 20 seconds of inactivity
    Error: Failed to retrieve directory listing”

  14. Vielen Dank für die tollen Infos. So deutlich, klar und verständlich erklärt, das auch ich als lernender Anfänger verstehe worum es geht. Es ist kaum zu glauben, aber nachdem ich diese Webside zufällig fand und den Anweisungen folgte, funktionierte alles einwandfrei.
    Herzlichen Dank dafür!

  15. sudo openssl req -x509 -nodes -days 365 -newkey rsa:2048 -keyout /etc/ssl/private/vsftpd.pem -out /etc/ssl/private/vsftpd.pem

    Shouldn’t it keyout to a key file instead of a pem one? or it doesn’t matter?

  16. Thank you very much. I have had gave up already to install sftp access to /www/var and the web is full of trouble about that. Your receipe worked though I stored the rsa cert in the /etc/ssl/certs directory (typo?)

  17. I can`t understand why do I remove the permissions to myself (as ftpuser) by using this command:

    chown nobody:nogroup /home/ftpuser/ftp

    Why this is needed?

    1. Because the folder above the folder you want to upload to should not be writable.

      FTP is generally more secure when users are restricted to a specific directory. vsftpd accomplishes this with chroot jails. When chroot is enabled for local users, they are restricted to their home directory by default. However, because of the way vsftpd secures the directory, it must not be writable by the user. This is fine for a new user who should only connect via FTP, but an existing user may need to write to their home folder if they also have shell access. Rather than removing write privileges from the home directory, we create an ftp directory (/home/ftpuser/ftp) to serve as the chroot and a writable files directory (/home/ftpuser/ftp/files) to hold the actual files.

  18. I got mine running but I get an error 550. It says “an error occurred opening the folder on the ftp server. Make sure you have permission to access the folder” but I should have access right?

    1. Let me correct what happened. when copying files to the server it said “make sure have permission to put files on the server.”
      —200swithing to binary mode—
      —227entering passive mode—
      —550premission denied—

    1. Did you add local_root=/home/$USER/ftp to etc/vsftpd.conf?

      You can also configure a default remote directory in your FTP client.

  19. Your blog has got me up and running. i can ftp with local ip address but not externally. Is there a setting for this? My main problem is a blank landing page (script im using) but admin works.

  20. Hi thank this will help, but then I got an error. When I tried to login using filezilla ..
    Response: 234 Proceed with negotiation.
    Status: Initializing TLS…
    Status: Verifying certificate…
    Status: TLS connection established.
    Command: USER ftpuser1
    Response: 331 Please specify the password.
    Command: PASS ********
    Error: GnuTLS error -15: An unexpected TLS packet was received.
    Error: Could not connect to server

    1. If you’re certain the password is correct, this can happen if the user’s root directory is writable, which isn’t allowed when using chroot restrictions. To test, add allow_writeable_chroot=YES to /etc/vsftpd.conf and restart vsftpd sudo systemctl restart vsftpd

      If it works, then you know it’s a folder permission problem.