Prerequisites
You should be using a non-root user with sudo privileges as explained in Ubuntu 18.04 / 19.10 Initial Server Setup.
You should also have Nginx already installed and serving web pages before continuing with this guide. Please see Installing Nginx on Ubuntu 18.04 / 19.10.
Cloudflare Users: Note that you may not need Let’s Encrypt and can instead use Cloudflare’s own shared Universal SSL certificate and an Origin CA. If you want to keep Cloudflare and also use Let’s Encrypt, you must Pause Cloudflare now, otherwise it will interfere with certificate deployment. Once the Let’s Encrypt cert is deployed, you must unpause and set SSL to Full (Strict) in the Cloudflare crypto settings, otherwise you may get a redirect loop error. Be warned that when Let’s Encrypt tries to auto renew after 90 days, it will fail if you have Cloudflare enabled.
1. Install Let’s Encrypt client (Certbot)
Let’s begin by updating the package lists and installing software-properties-common. Commands separated by && will run in succession.
sudo apt-get update && sudo apt-get install software-properties-commonNow add the repositories universe and certbot.
sudo add-apt-repository universe && sudo add-apt-repository ppa:certbot/certbotPress ENTER if prompted.
Update the package lists again and install certbot for Nginx. This is the Let’s Encrypt client.
sudo apt-get update && sudo apt-get install certbot python-certbot-nginxPress y and ENTER when prompted to continue.
2. Configure the Firewall
If you haven’t already done so, it is recommended that you enable the ufw firewall and add a rule for Nginx. Before enabling ufw firewall, make sure you add a rule for SSH, otherwise you may get locked out of your server if you are logged in remotely.
sudo ufw allow OpenSSHNow add the “Nginx Full” profile and then delete the redundant “Nginx HTTP” profile if it exists.
sudo ufw allow 'Nginx Full'sudo ufw delete allow 'Nginx HTTP'You can check the current firewall rules with:
sudo ufw statusWe should now see our SSH and Nginx rules:
Status: active

To                         Action      From
--                         ------      ----
OpenSSH                    ALLOW       Anywhere
Nginx Full                 ALLOW       Anywhere
OpenSSH (v6)               ALLOW       Anywhere (v6)
Nginx Full (v6)            ALLOW       Anywhere (v6)
3. Get an SSL Certificate
We will now obtain a cert for our test domain example.com. Certbot has an Nginx plugin, which automates the certificate installation.
sudo certbot --nginxEnter email address (used for urgent renewal and security notices) (Enter 'c' to
cancel):Enter an email address where you can be contacted in case of urgent renewal and security notices.
Please read the Terms of Service at
https://letsencrypt.org/documents/LE-SA-v1.2-November-15-2017.pdf. You must
agree in order to register with the ACME server at
https://acme-v02.api.letsencrypt.org/directory
-------------------------------------------------------------------------------
(A)gree/(C)ancel:
Press a and ENTER to agree to the Terms of Service.
Would you be willing to share your email address with the Electronic Frontier
Foundation, a founding partner of the Let's Encrypt project and the non-profit
organization that develops Certbot? We'd like to send you email about EFF and
our work to encrypt the web, protect its users and defend digital rights.
-------------------------------------------------------------------------------
(Y)es/(N)o:
Press n and ENTER to not share your email address with EFF.
Which names would you like to activate HTTPS for?
- - - - - - - - - - - - - - - - - - - - - - - - - - - - - - - - - - - - - - - -
1: example.com
2: www.example.com
- - - - - - - - - - - - - - - - - - - - - - - - - - - - - - - - - - - - - - - -
Select the appropriate numbers separated by commas and/or spaces, or leave input
blank to select all options shown (Enter 'c' to cancel):
If you have multiple domains already configured on your server, you will see a list of them here. In this example, we only have one domain example.com and its www. prefix.
Select option 1 if you don’t want to use the www. prefix in your website address, otherwise select option 2.
Obtaining a new certificate
Performing the following challenges:
http-01 challenge for example.com
Waiting for verification...
Cleaning up challenges
Deploying Certificate to VirtualHost /etc/nginx/sites-enabled/example.com

Please choose whether or not to redirect HTTP traffic to HTTPS, removing HTTP access.
- - - - - - - - - - - - - - - - - - - - - - - - - - - - - - - - - - - - - - - -
1: No redirect - Make no further changes to the webserver configuration.
2: Redirect - Make all requests redirect to secure HTTPS access. Choose this for
new sites, or if you're confident your site works on HTTPS. You can undo this
change by editing your web server's configuration.
- - - - - - - - - - - - - - - - - - - - - - - - - - - - - - - - - - - - - - - -
Select the appropriate number [1-2] then [enter] (press 'c' to cancel):
Press 2 and ENTER to redirect all traffic to HTTPS.
Congratulations! You have successfully enabled https://example.com

You should test your configuration at:
https://www.ssllabs.com/ssltest/analyze.html?d=example.com
- - - - - - - - - - - - - - - - - - - - - - - - - - - - - - - - - - - - - - - -
You’re done!
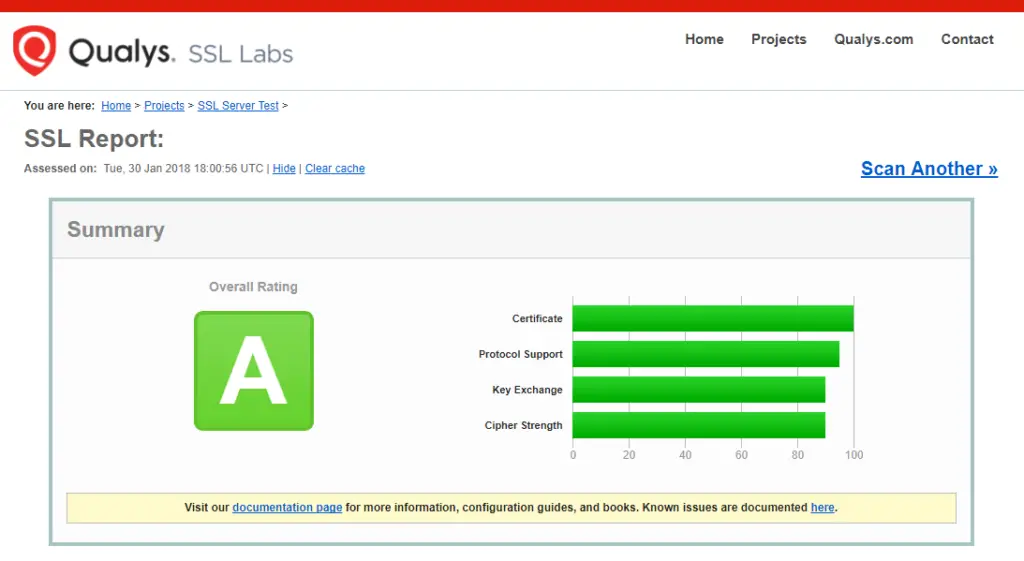
4. Test SSL
You can now go to ssllabs.com/ssltest/ and run an SSL test on your domain.
A successful test should receive an A rating.
5. Auto Renewal
As Let’s Encrypt certs expire after 90 days, they need to be checked for renewal periodically. Certbot will automatically run twice a day and renew any certificate that is within thirty days of expiration.
To test that this renewal process is working correctly, you can run:
sudo certbot renew --dry-runCloudflare Users
Please ensure your Cloudflare SSL settings are correct. Log in to Cloudflare, go to Crypto and make sure SSL is set to Full (Strict).
Be warned that when Let’s Encrypt tries to auto renew after 90 days, it will fail if you have Cloudflare enabled.
Let me know if this helped. Follow me on Twitter, Facebook and YouTube, or 🍊 buy me a smoothie.
Woww. very helpful (as the nginx tutorial)..
Thank you
Flawless information. Before this, I found some other pages with a lot of information which did not work for me. Following your guide solved it in 2 minutes.
It was helpful. Thank you.
Can you make a tutorial to use wild cards?
After installing this for all three of my sites, none of them pass the SSL test, and none of them will load anymore. Did I do something wrong? I copied each line of code here, and pasted it into Terminal, only changing the domain names. Everything “seemed” to work fine, until the end test.
I figured it out. Have to forward port 443 on router to server. Everything works now. Thanks for this tutorial. 🙂
Great 🙂
tengo el mismo problema me muestras como lo solucionaste