Prerequisites
You should already have your Apache server configured and serving web pages for your domain. We have several guides to help you set up an Apache web server from scratch on Ubuntu 20.04 / 18.04 / 19.10.
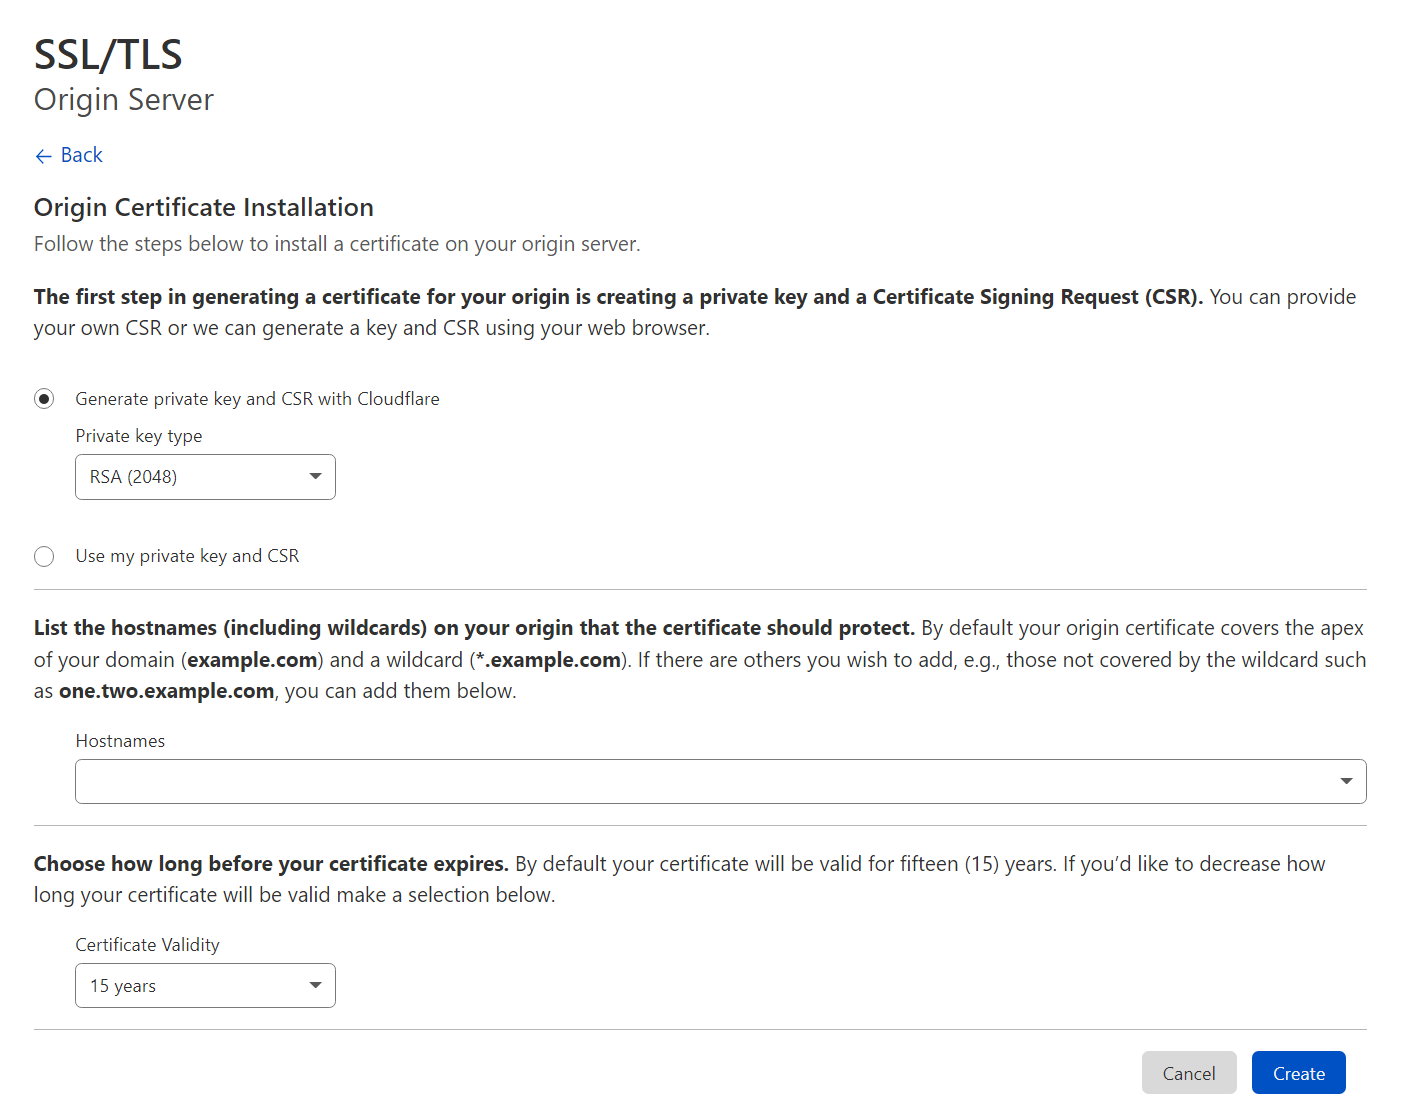
1. Generate Cert and Private Key
Log in to Cloudflare and navigate to the SSL/TLS page.
Click Origin Server and then click Create Certificate.

In Origin Certificate Installation, the defaults should be Private Key Type: RSA with 15 years validity. Click Create.
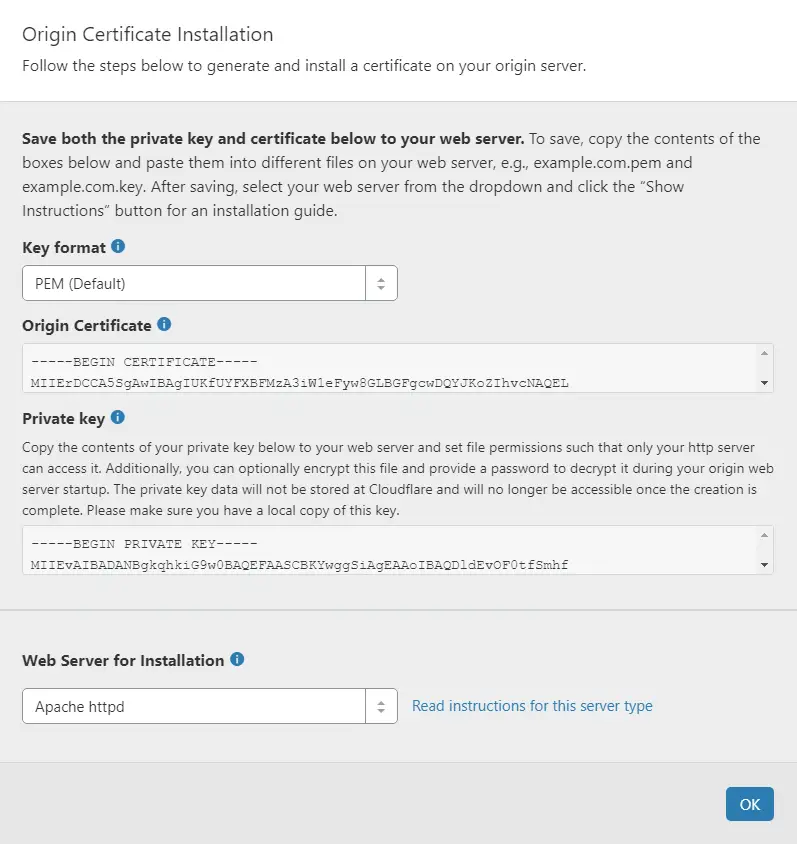
In the next screen, the Key format should be PEM (default) and Web Server for Installation: Apache httpd.
Copy your Origin Certificate and Private Key to a text editor for later. We will need to paste these into Linux.
Finally, click OK to close.
2. Copy Cert and Key to Server
Create a new directory where our Cert and Key will reside.
sudo mkdir -p /etc/cloudflare/Using nano text editor, create a new file example.com.pem (where example.com is your own domain).
sudo nano /etc/cloudflare/example.com.pemNow paste in your Origin Certificate from Cloudflare. Save file and exit. (Press CTRL + X, press Y and then press ENTER)
Create a new file example.com.key (where example.com is your own domain).
sudo nano /etc/cloudflare/example.com.keyPaste in your Private Key from Cloudflare. Save file and exit. (Press CTRL + X, press Y and then press ENTER)
3. Configure Apache
Firstly, make sure you have the SSL module enabled for Apache by running:
sudo a2enmod sslOpen the Apache configuration file for your domain. This is usually located in /etc/apache2/sites-available/
sudo nano /etc/apache2/sites-available/example.com.confThere should already be a block for <VirtualHost *:80>. You need to add a new block underneath it for SSL port 443. You can also add a rewrite condition in your port 80 block to redirect all requests to https.
Below is an example.
<VirtualHost *:80>

    ServerAdmin [email protected]
    ServerName example.com
    ServerAlias www.example.com
    DocumentRoot /var/www/example.com/public_html
    ErrorLog ${APACHE_LOG_DIR}/error.log
    CustomLog ${APACHE_LOG_DIR}/access.log combined

    RewriteEngine on
    RewriteCond %{SERVER_NAME} =example.com [OR]
    RewriteCond %{SERVER_NAME} =www.example.com
    RewriteRule ^ https://%{SERVER_NAME}%{REQUEST_URI} [END,NE,R=permanent]

</VirtualHost>

<VirtualHost *:443>

    ServerAdmin webmaster@example.com
    ServerName example.com
    ServerAlias www.example.com
    DocumentRoot /var/www/example.com/public_html
    ErrorLog ${APACHE_LOG_DIR}/error.log
    CustomLog ${APACHE_LOG_DIR}/access.log combined

    SSLEngine on
    SSLCertificateFile /etc/cloudflare/example.com.pem
    SSLCertificateKeyFile /etc/cloudflare/example.com.key

</VirtualHost>
Save file and exit. (Press CTRL + X, press Y and then press ENTER)
Test the configuration syntax for errors.
apachectl configtestYou can ignore any errors that say Could not reliably determine the server’s fully qualified domain name
If you see Syntax OK, restart Apache.
sudo systemctl restart apache2Note, it can take 5 or 10 minutes for Cloudflare to deploy certs.
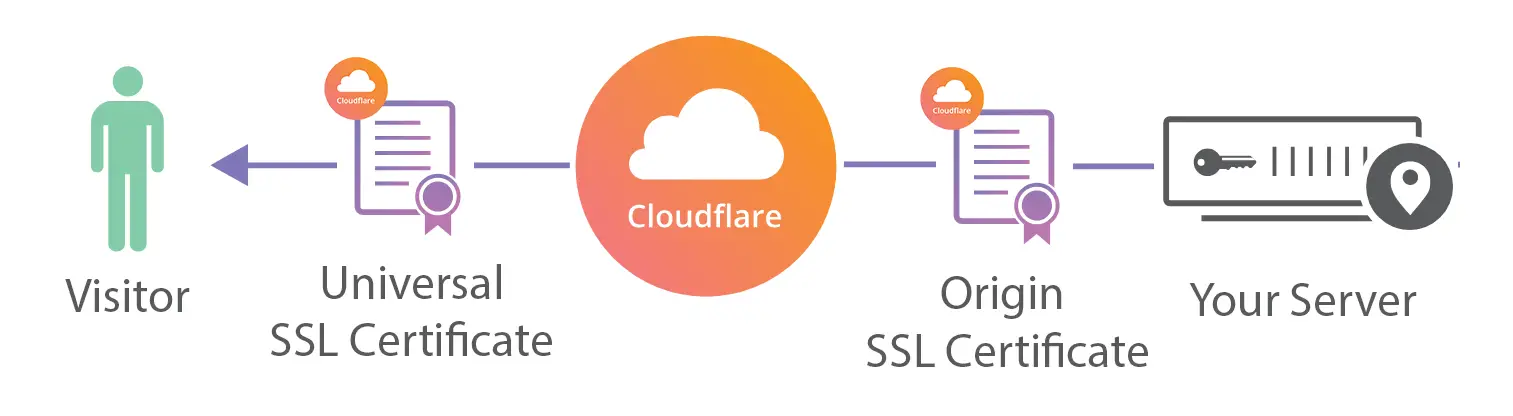
Important: Make sure that SSL in Cloudflare is set to Full (Strict). This will ensure that data between Cloudflare and your server is always encrypted.
Getting the Real Client IP Address from Cloudflare in Apache
While you’re still here.. I recently wrote an article which may be of interest to you.
As may or may not know, when you enable Cloudflare on your site, the IP address that appears in your Apache access and error logs is that of the Cloudflare proxy and not the real client’s IP. As you can imagine, this is a security concern should you ever need to audit your logs or use IP restrictions with .htaccess.
Thankfully, Cloudflare sends the real client IP in the HTTP headers as CF-Connecting-IP, and you can configure Apache to use this IP in your logs instead of Cloudflare’s proxy IP.
Let me know if this helped. Follow me on Twitter, Facebook and YouTube, or 🍊 buy me a smoothie.

Excellent guide Clear, concise and specific. Thank you.👍👌🤩
a2enmod rewrite
systemctl restart apache2
ill echo Seb’s feelings – been killing myself trying to get this done and this was so painless. I was in a rabbit hole of atrocious cloudflare documentation. Where’s the customer service? Link upon link within links – a never ending blackhole of links. I must have had 30 tabs open, by the end of it all I forgot what I was doing.
What really killed me was the link to a paid ssl service…really?
Thank for this!
I can finally stop beating my head against the brick wall over and over and over, THANK YOU! That was starting to hurt.
Hi! I followed your very clear and helpful instructions however I still get a 522 error. I’ve already configured ufw to allow CF servers through. Any advice would be greatly appreciated.
I completed the steps you outlined. But I am getting the below ERR_CERT_AUTHORITY_INVALID error for my site. What am I missing?
Your connection is not private
Attackers might be trying to steal your information (for example, passwords, messages, or credit cards). Learn more
NET::ERR_CERT_AUTHORITY_INVALID
Hi,
Great Tutorial (as always).
For a person with very limited technical understanding of Unix based VPS configurations, your step by step LEMP stack configuration for Ubuntu 20.04 droplet made the entire process a cakewalk for me and in the process taught many features/ aspects that i could not have learned even after watching many youtube tutorails/ reading blogs.
My heartfelt gratitude and sincere appreciation for the very comprehensive (& precise) posts. Keep it up.
Also, two requests
1) Post on Cloudflare configuration steps for Nginx
2) If you also cover wordpress then posts on wordpress migration from shared hosting to Digitalocean and troubleshooting etc.
Many thanks for the comment!
Thanks a lot for your work and support.
I have an additional question: the certificate between Cloudflare and my server is valid 15 years but the certificate between Cloudflare and a user browser is valid 1 year. What will happen when this year will gone? The certificate will be automatically renew or will I have to do someting to renew it?
Cloudflare should renew that for you automatically.
how can I test if it is working?
sudo tail /var/log/apache2/access.log -fTrès très très bien, trop facile ! Merci
(Very very very good, too easy !)
I have a problem. I’ve got handshake error, and i dont know where to check the error.
anyone know how to include the root origin cert? how do we use it when cloudflare already generated the normal certificate.
do we add it to the end of that file ? any help much appreciated
i’m looking for it. you found answer ?
AH00526: Syntax error on line 26 of /etc/apache2/sites-enabled/example.conf:
Invalid command ‘SSLEngine’, perhaps misspelled or defined by a module not included in the server configuration
Action ‘configtest’ failed.
Run
sudo a2enmod sslI get as far as the virtual host bit and when I type the command it opens nano and it is blank..anybody help or know why..
Thanks
i occured error 525 ssl handshake failed
i have open 433 port how can i resolve this!?
Hi, I ran into the same problem. I had to run “a2ensite xxx.conf” (the conf file you edited). It enables the VirtualHost, and also creates a conf file in the “sites-enabled” directory. After just that, boom, worked.
Thank you so much for helping sir
Great walkthrough. On the final step I was running into a “Invalid command ‘SSLEngine'” error, needed to run “sudo a2enmod ssl” to fix this.
Great, thanks for that.