In this article we are going to configure Postfix to relay mail through Gmail’s SMTP server on Ubuntu 20.10 – 19.10. If you want to use a SMTP server other than Gmail, please see How to configure Postfix to use an External SMTP Server.
Prerequisites
If your Gmail account uses 2-Step Verification, you must create an application specific password.
If you’re not using 2-Step Verification, please ensure that your Gmail account is configured to allow less secures apps.
1. Install Postfix
If you’ve already installed Postfix, skip to step 2.
Let’s update the package database first.
sudo apt-get updateInstall mailutils, which will automatically install Postfix.
sudo apt install -y mailutilsIf you see the Postfix welcome screen, select OK by pressing TAB and ENTER
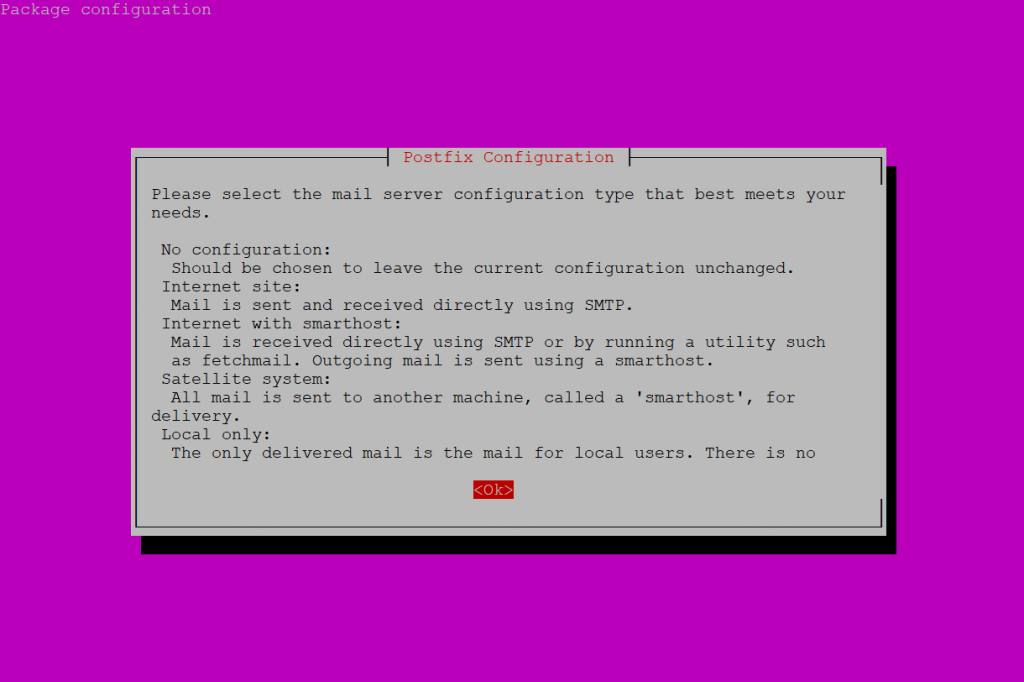
Select Internet Site and press ENTER.

System mail name should be your domain name eg. example.com, press ENTER.

Package should now be installed.
2. Configure Postfix
Edit the Postfix configuration file.
sudo nano /etc/postfix/main.cfFind the following line relayhost = about 6 lines up from the bottom of the file and delete it.
Add the following to the end of the file.
relayhost = [smtp.gmail.com]:587
smtp_sasl_auth_enable = yes
smtp_sasl_password_maps = hash:/etc/postfix/sasl_passwd
smtp_sasl_security_options = noanonymous
smtp_tls_CAfile = /etc/postfix/cacert.pem
smtp_use_tls = yes
Save file and exit. (Press CTRL + X, press Y and then press ENTER)
3. Create Password and DB Files
Create the sasl_passwd file which will store our credentials.
sudo nano /etc/postfix/sasl_passwdInsert the following:
[smtp.gmail.com]:587 [email protected]:passwordReplace username and password with your own.
Save file and exit. (Press CTRL + X, press Y and then press ENTER)
Create a hash database file for Postfix with the postmap command.
sudo postmap /etc/postfix/sasl_passwdThere should now be a file called sasl_passwd.db in the /etc/postfix/ directory.
For added security, we will only allow root user to read and write to sasl_passwd and sasl_passwd.db
sudo chown root:root /etc/postfix/sasl_passwd /etc/postfix/sasl_passwd.dbsudo chmod 0600 /etc/postfix/sasl_passwd /etc/postfix/sasl_passwd.db4. Sign Certificate
Change to certs directory.
cd /etc/ssl/certsDownload Thawte cert.
sudo wget https://www.thawte.com/roots/thawte_Primary_Root_CA.pemNow we are going to create the certificate.
cat /etc/ssl/certs/thawte_Primary_Root_CA.pem | sudo tee -a /etc/postfix/cacert.pemThere should now be a certificate file called cacert.pem in /etc/postfix
5. Send a Test Mail
We’ll now send a test email message. Make sure to replace [email protected] with your own email address.
echo "Test Email message body" | mail -s "Email test subject" [email protected]Don’t forget to check your spam folder.
If you still haven’t received any mail, check the mail error log.
sudo tail /var/log/mail.logIf you see an error here “This message does not have authentication information or fails to 550-5.7.26 pass authentication checks”, please read this article.
If the mail log is empty or doesn’t exist, try parsing the syslog. This will return the last 50 entries for postfix.
sudo tail -f -n 50 /var/log/syslog | grep postfixIf the syslog is empty and you still haven’t received any test email, it’s possible that the test email was rejected by the recipient server. You should check to see if anything has bounced back to your mail folder.
sudo less /var/mail/$(whoami)Press uppercase G to scroll to the bottom of the file and lowercase q to quit. The $(whoami) variable returns the currently logged in user.
6. Allow Less Secure Apps
If Gmail is not allowing postfix to connect via SMTP, you may need to enable “Allow Less Secure Apps” on your Gmail account.
Please see: Allow less secure apps to access your Gmail account
Note: Sending Mail to Your Own Domain
If you ever intend to send email from postfix to your own domain, [email protected] for example, postfix may need some further configuration. Please see article Can’t send mail to own domain. Postfix: status=bounced (unknown user: “user”)
Let me know if this helped. Follow me on Twitter, Facebook and YouTube, or 🍊 buy me a smoothie.
Seems article is outdated as noted “Last updated on November 11th, 2022 | 17 replies”. Google no longer allows less secures apps since May 30, 2022. Although, this does not apply to Google Workspace or Google Cloud Identity customers.
In addition, the application specific password did not work for me. Mail gets kicked back with authentication error and link from Google. Need to further troubleshoot the issue but figure to note that less secures apps is not possible anymore.
P.S. Setup previously followed worked until I noticed recently mail was not getting sent. Noticed Google details on less secure apps disabled. Most likely issues facing are on Google. My Server: CentOS 7
Made right now – Feb 17, 2023. It works.
Possible issue of this article – in the end of step “4. Sign Certificate” we should run:
`sudo systemctl restart postfix`
It’s alive!
Thank you. Just as @The_Ben said in the comment, need one step more:
cd /etc/ssl/certs
sudo wget https://www.thawte.com/roots/thawte_Primary_Root_CA.pem
my server
ubuntu 20.04.
Thanks @Ifsaar ahmad. After days messing around with Postfix and services like Amazon SES, all I got were failures, bounces and blocked mails having followed instructions that were like jumping through hoops. I picked up from after having had Postfix already installed and the only hitch was when I used my regular gmail email and had to generate an app password.
This should work until I get around to needing an SMTP relay service.
Thanks Man
worked well
Thanks for this guide on setting up mail.
I’m on Ubuntu 20.10 and everything seemed to be going fine until traied to install the certificate and got: cat: /etc/ssl/certs/thawte_Primary_Root_CA.pem: No such file or directory. That cert is not listed in the directory. Should I have got one? I’m using Let’s Encrypt.
Thanks for guidance.
Same thing here.
I downloaded the certificate from thawte.com/roots/
Thanks, worked for me downloading the certificate from their websites.
cd /etc/ssl/certs
sudo wget https://www.thawte.com/roots/thawte_Primary_Root_CA.pem
will be the correct step to add.
Error ->
cat: invalide option — ‘a’
any idea ???
Rather than install mailutils (which also installs MySQL, which I do NOT want on these servers), I simply installed postfix first, then installed bsd-mailx. Everything is working! Since this is only to send me alerts from monit, fail2ban, cron, etc., I didn’t need anything more. I have this page bookmarked. Thanks!
sudo: postmap: command not found
any ideas? mailutils is installed.
I am hoping to do something like:
1- Use postfix to get my ‘inbox’ from gmail,
2 – Use dovecot to serve my local mailbox to my client,
3 – Use thunderbird as my mail client.
Why? I would like to store all my email on my Ubuntu server, to take advantage of offline storage, improved filters, improved security. Sorry if this is out of scope for this page, but it looked so promising. Perhaps somebody can send me to a page in that direction.
I can successfully send mail from the command line on my 17.04 Ubuntu server.
Sounds interesting. I haven’t used Dovecot before though it’s certainly on the list of guides to do here. If you have Postfix working you’re halfway there. I recommend getting started on the excellent DigitalOcean guide: How To Set Up a Postfix E-Mail Server with Dovecot. You may also consider registering your own domain and forwarding your Gmail there. Best of luck!
for me didnt work i never receive the email
Are you using G-Suite? Any errors in
mail.log?Sep 17 10:31:11 ubuntu postfix/local[4540]: 0AAEE5606B6: to=, relay=local, delay=0.89, delays=0.57/0.01/0/0.31, dsn=5.1.1, status=bounced (unknown user: "irvanmaulana338") Sep 17 10:31:11 ubuntu postfix/cleanup[4538]: A5DFA5606C1: message-id=<20190917033111.A5DFA5606C1@ubuntu> Sep 17 10:31:11 ubuntu postfix/bounce[4541]: 0AAEE5606B6: sender non-delivery notification: A5DFA5606C1 Sep 17 10:31:11 ubuntu postfix/qmgr[4308]: A5DFA5606C1: from=<>, size=2046, nrcpt=1 (queue active) Sep 17 10:31:11 ubuntu postfix/qmgr[4308]: 0AAEE5606B6: removed Sep 17 10:31:12 ubuntu postfix/local[4540]: A5DFA5606C1: to=<root@ubuntu>, relay=local, delay=0.54, delays=0.27/0/0/0.27, dsn=2.0.0, status=sent (delivered to mailbox) Sep 17 10:31:12 ubuntu postfix/qmgr[4308]: A5DFA5606C1: removedI got this, why is bounced?
It works ?. One thing, I think mailutils install steps have changed in the new version, you might want to update the post.
Updated.