Windows Command Prompt
Firstly, make sure that all PuTTY windows are closed.
We can use Windows Command Prompt in administrative mode to easily export keys from the Windows Registry.
In Windows 10, open the Start Menu and type cmd, then right-click on the Command Prompt icon and click Run as Administrator.

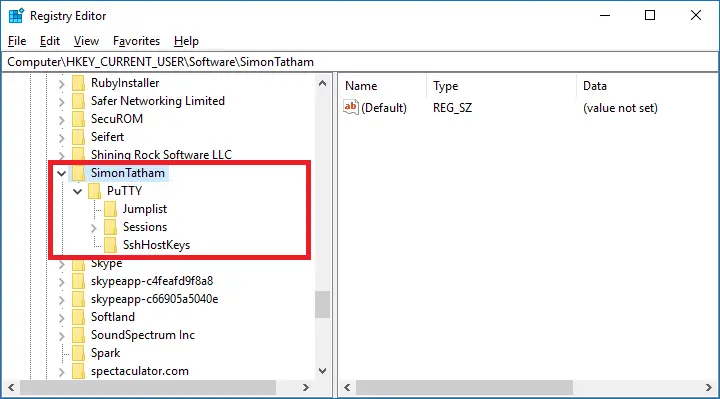
Export PuTTY Settings and Sessions
If you want to export all PuTTY settings including sessions, run:
regedit /e "%USERPROFILE%\Desktop\putty.reg" HKEY_CURRENT_USER\Software\SimonTathamA file putty.reg should now be on your Desktop.
Export PuTTY Sessions Only
If you only want to export PuTTY sessions, run:
regedit /e "%USERPROFILE%\Desktop\putty-sessions.reg" HKEY_CURRENT_USER\Software\SimonTatham\PuTTY\SessionsA file putty-sessions.reg should now be on your Desktop. (Note that SSH keys are not stored in the registry so you will have to copy these manually if you have any).
Importing PuTTY Settings and Sessions to Another PC
Make sure that PuTTY is closed before importing registry keys.
Simply double-click the .reg file to import it into your registry. It’s that simple!
While You’re Still Here..
I’ve written a few articles and guides related to PuTTY that might be of interest.
Tired of having to enter your Linux password every time you log in via PuTTY? See:
- Saving your PuTTY username and password in a Windows Shortcut
- PuTTY and SSH Key-Based Authentication
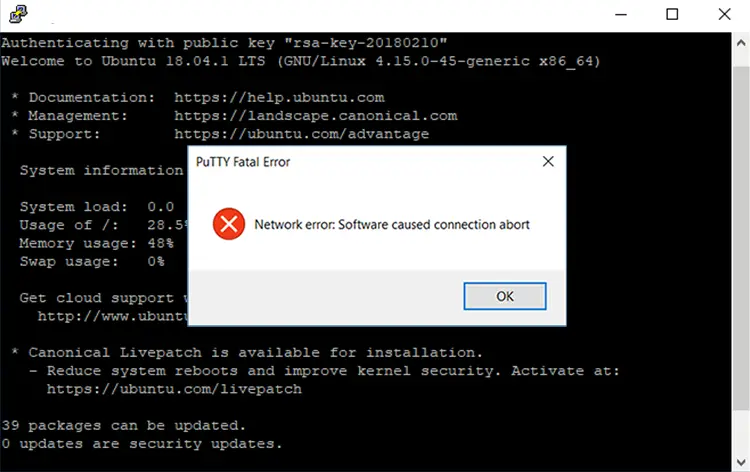
Do you ever get than annoying error “Network Error: Software caused connection abort”. Well, there is a solution!
Did you know you can use PuTTY to set up an SSH tunnel and then connection to your server with VNC?

Let me know if this helped. Follow me on Twitter, Facebook and YouTube, or 🍊 buy me a smoothie.
great guide !
do you happen to have a small script or bat file that could live in a folder and when I double click it will do the backup/export of the settings ?
or what would that script look like ?
cheers !
A helpful reminder one where to find the Putty values. One tip: use a normal, NON-administrative command prompt to export values from the HKEY_CURRENT_USER hive. If like me, you must use a different username to elevate privileges, you’ll be exporting the hive of that user–which in my case was empty. Similarly, import without elevation.
Great tip.
Just to clarify for other readers: When you run this in a regular (non-admin) command prompt, Windows will pop up a graphical dialog requesting permission to proceed. (Tested in Win 10.)
In addition to Mark’s point about the identity of the current user, this approach is technically a better security practice than doing things at an admin prompt when not required.
For Kitty, the Putty fork, the Windows registry name changes from SimonTatham to 9bis. The rest of the how-to remains the same.
Ah. Thanks a lot. Was looking for that.
Outstanding guide! Thanks for taking the time to put this together and share it with others!
I needed info on putty saved session only migration. worked a treat. Thank you!
I hope you can help….I have been using version .53b for quite some time. However I recently had to download version 73 for use on a Linux server which needed specific puTTY settings. So both versions are now running on my laptop. I also have all sessions running on both versions. HOWEVER…on .53b, using the more command. the file contents are simply displayed on the screen, I press ‘Enter’ and I am returned to the UNIX prompt leaving the file contents displayed. On .73, I connect to same server, type same ‘more’ command for same small file, first the screen is cleared, contents are displayed, I press ‘Enter’, then screen is cleared again and I am returned to UNIX prompt, but contents are not visible anymore.
Just the ‘more’ command syntax I typed. Which setting within .73 controls that?
Or can I transfer all .53b settings over to .73 version?
I think this is probably an artifact of the TERMCAP entry, but I am not sure. If you connect with both and do an ‘echo $TERM’ do they match? If not, can you set the .73 connection to the same as the .53b and see if that makes the problem better. ie: ‘export TERM=xterm’ or whatever the .53b version has.
In either case, your version of more might actually be using less under the hood. You can control both of their behavior about clearing the terminal on exit using “export LESS=’-X'” in your .bashrc or whatever login profile you use. There are some other behaviors to more and less you might want to read the man pages for each and see what additional default options you want.
Bottom line, if the termcap entry is sufficient for you, you can control that using the putty settings, but I don’t know exactly how for the .53b version