
Prerequisites
You should use a non-root user account with sudo privileges.
Please see
- Initial Server Setup for Ubuntu 20.04
- Initial Server Setup for Ubuntu 18.04 / 19.10
- Initial Server Setup for Ubuntu 16.04 / 17.10 for more details.
You will also need to download and install a VNC client for your OS. We recommend the following:
Windows VNC Clients
- VNC Viewer (RealVNC), TightVNC or UltraVNC
- For Windows users, you will also need the PuTTY client in order to create an SSH tunnel
MacOS VNC Clients
- VNC Viewer (RealVNC) or you can use the inbuilt screen sharing utility for Mac.
Linux VNC Clients
- Ubuntu Desktop comes preloaded with a VNC-capable client called Remmina
- VNC Viewer (RealVNC), TightVNC, vinagre, krdc
1. Install Xfce and VNC
Begin by updating the package lists.
sudo apt updateNow install Xfce4 and VNC server. Press y and ENTER if prompted to install.
sudo apt install xfce4 xfce4-goodies tightvncserver2. Configure VNC Server
Run vncserver.
vncserverYou will be asked to enter a password. Generate a password 8 chars long, any longer and it will be truncated.
You will also be asked if you want a view-only password where the user can only view and not control the remote server. You can skip this if you don’t require it.
VNC Server should now be running.
xauth: file /home/john/.Xauthority does not exist

New 'X' desktop is ubuntu_server:1

Creating default startup script /home/john/.vnc/xstartup
Starting applications specified in /home/john/.vnc/xstartup
Log file is /home/john/.vnc/ubuntu_server:1.log
We now need to edit the xstartup file. Before doing so, kill VNC service.
vncserver -kill :1Back up xstartup file.
cp ~/.vnc/xstartup ~/.vnc/xstartup.bakEdit xstartup file.
nano ~/.vnc/xstartupAdd the following to the bottom of the file.
startxfce4 &This will tell VNC to start the Xfce desktop environment when VNC starts.
Save and close. (press CTRL + X, press Y and then press ENTER)
Make the xstartup file executable.
sudo chmod +x ~/.vnc/xstartupNow start vncserver again.
vncserverNew 'X' desktop is ubuntu_server:1 Starting applications specified in /home/john/.vnc/xstartup Log file is /home/john/.vnc/ubuntu_server:1.log
3. Create SSH Tunnel
VNC server is now running, but in order to encrypt communications between the VNC client and server, we must create an SSH tunnel and connect through it. We can do this by binding port 5901 of the remote connection to port 5901 on your local machine.
Linux and Mac
You can create an SSH tunnel easily using terminal. Replace john with your non-root username and your_server_ip with your server IP.
ssh -L 5901:127.0.0.1:5901 -C -N -l john your_server_ipEnter your Linux password (not your VNC password) and skip to Step 4 below.
Windows
You will need the PuTTY client to create an SSH Tunnel.
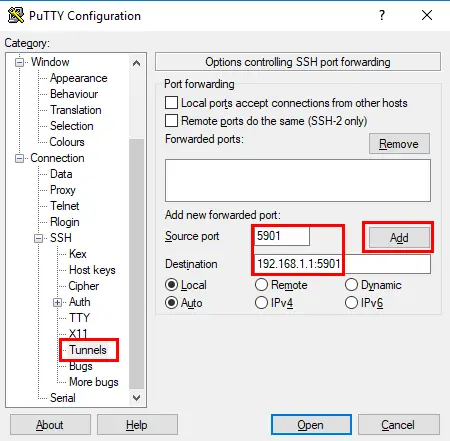
In PuTTY, select Connection > SSH > Tunnels.
In Source Port, enter 5901
In Destination, add your_ip:5901
Click Add.
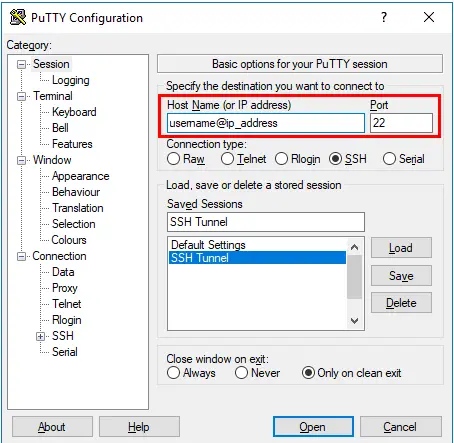
In the left-hand category menu, go to Session.
In Host Name, enter your non-root Linux username and IP (e.g, [email protected]).
In Saved Sessions, enter “SSH Tunnel” (you can call this whatever you like).
Click Save and then click Open to start the connection.
When prompted, enter your Linux password to log in (not your VNC password).
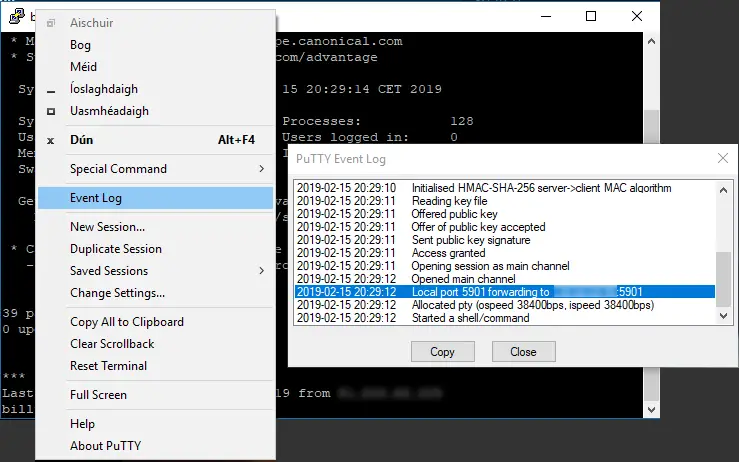
Once logged in, to check if the SSH tunnel is up, right-click the PuTTY title bar to invoke the context menu, then click Event Log.
If the tunnel is up, at the bottom of the log, you should see Local port 5901 forwarding to ip_address:5901
You can now continue to the next step to connect to the VNC server using your VNC client.
4. Connect to VNC
Port 5901 of the remote connection should now be bound to port 5901 on your local machine, creating a secure SSH tunnel. You should now be able to connect to the VNC server using locahost:5509 with your VNC client of choice.
VNC Viewer on Windows and MacOS
There are many different VNC viewers for Windows and MacOS, but in this guide we are using VNC Viewer (RealVNC).
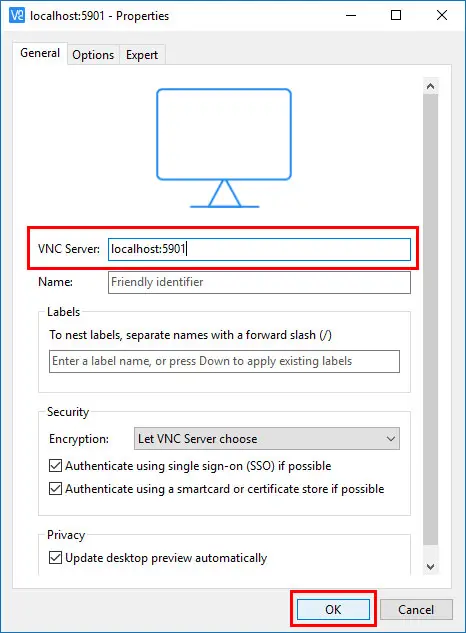
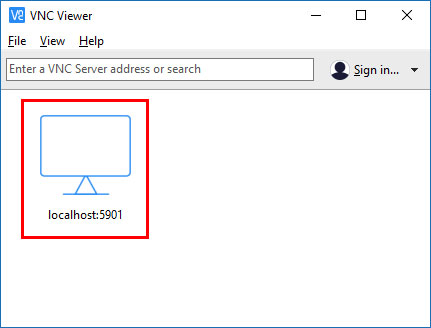
Run VNC Viewer, click File and click New Connection.
In the VNC Server field, enter localhost:5901 and click OK.
Double-click localhost:5901.
When prompted for a password, enter the VNC password you created earlier, check Remember Password, and click OK.
If you see a warning about Unencrypted connection, ignore it and click Continue. (VNC Viewer is not aware that we are using an encrypted SSH tunnel)
If VNC connects successfully, you should see the default Xfce desktop.
Click Use default config if prompted.

Linux
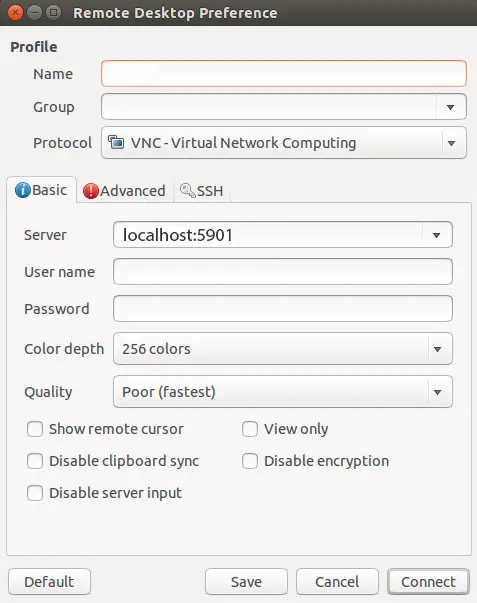
If you are using Ubuntu Desktop, it comes preloaded with a VNC-capable client called Remmina. Just type “VNC” or “remmina” in the dash to start it.
In the Name field, Enter a profile name of your choice.
In the Server field, enter localhost::5901.
In the Password, field, enter your VNC password your created earlier.
Click Connect.
If VNC connects successfully, you should see the default Xfce desktop.
Click Use default config if prompted.
5. Run VNC as a Service
You should now make VNC a service so that it starts automatically should you ever reboot your server.
Create a new unit file for VNC. A unit file encodes information about a service
sudo nano /etc/systemd/system/[email protected]Paste in the following, replacing john with your own user name. You can also change 1280x800 to your desired resolution.
[Unit]
Description=Start TightVNC server at startup
After=syslog.target network.target

[Service]
Type=forking
User=john
Group=john
WorkingDirectory=/home/john

PIDFile=/home/john/.vnc/%H:%i.pid
ExecStartPre=-/usr/bin/vncserver -kill :%i > /dev/null 2>&1
ExecStart=/usr/bin/vncserver -depth 24 -geometry 1280x800 :%i
ExecStop=/usr/bin/vncserver -kill :%i

[Install]
WantedBy=multi-user.target
Save and close. (press CTRL + X, press Y and then press ENTER)
Reload systemd manager configuration.
sudo systemctl daemon-reloadEnable the unit file you just created.
sudo systemctl enable [email protected]Kill vncserver.
vncserver -kill :1Start vncserver again.
sudo systemctl start vncserver@1Ensure service is running.
sudo systemctl status vncserver@1If the vncserver is running, you should see:
● [email protected] - Start TightVNC server at startup
Loaded: loaded (/etc/systemd/system/[email protected]; indirect; vendor preset: enabled)
Active: active (running) since Sat 2019-02-16 18:14:22 CET; 6s ago
Process: 31449 ExecStart=/usr/bin/vncserver -depth 24 -geometry 1280x800 :1 (code=exited, status=0/SUCCESS)
Process: 31436 ExecStartPre=/usr/bin/vncserver -kill :1 > /dev/null 2>&1 (code=exited, status=2)
Main PID: 31461 (Xtightvnc)
Tasks: 57 (limit: 1152)
CGroup: /system.slice/system-vncserver.slice/[email protected]
Now if you ever reboot your server, the VNC Server service should start automatically.
To connect to VNC again, don’t forget to start your SSH tunnel in Step 3.
Let me know if this helped. Follow me on Twitter, Facebook and YouTube, or 🍊 buy me a smoothie.
it works perfect but whenever i started the VNC on my PC, the classic ubuntu desktop won’t show althouth i removed the Xfce desktop. It should be fine but whenever i use terminal it would show on my other screen and not the actual vnc screen. Any suggestions, why is this happening
When i get to step 3 and enter “ssh -L 5901:127.0.0.1:5901 -C -N -l (my username and ip)”, its asks for my password. I input my password and hit enter. Command line hangs forever (unless I ctl+c). When i enter ” lsof -ti:5901″, it returns empty.
I solve it myself by following command.
sudo apt-get install -y xfonts-75dpi xfonts-100dpi
touch /home/maint/.cache/sessions/xfce4-session-
hostnametouch /home/jonh/.Xresources
chmod 777 /home/maint/.cache/sessions/xfce4-session-
hostnamechmod 777 /home/jonh/.Xresources
sudo vi /etc/ssh/sshd_config
set PasswordAuthentication from no to yes
Hello there,
I am getting following error from VNC viewer.
“The connection closed unexpectedly.”
It seems VNC viewer is sending request “SYN_SENT” to the server.
But, it dose not show anything on the VNC viewer.
The vncserver is up and running on ubuntu as well as SSH Tunnel on windows 10.
Here is my environment information.
・Client side.
VNC Viewer(realVNC)
WIndows 10
・Server side
Ubuntu 20.04
Do you have any suggestion for this?
I followed your tutorial, but I am still running into issues with with VNC Viewer not being able to connect to the Ubuntu 18.04 VNC server. The encrypted tunnel is created & connected, but when I do the RealVNC set up as indicated I get this error: ‘channel 2: open failed: connect failed: Connection refused’ in the terminal with the active encrypted tunnel. Any advice on how to fix this? Cheers.
I love your articles and have started to follow them.
I have one problem with this article;
When I run VNC Viewer the windows in linux dont have the minimize, maximize, close button in the top right of windows. If open my laptop and log in i see the buttons.
Also how can i stop from loading directly into the GUI login screen on my laptop. I want the text based login on laptop but still have the desktop through SSH Tunnel.
Thank,
Tommy
Thank you. Great article. Works perfectly. All steps are very easy to follow.
Hi, where did you give command below,
ssh -L 5901:127.0.0.1:5901 -C -N -l john your_server_ip
in the server side? or in the client side?
it’s not clear in this article. (I’ve never done this thing before so I’m asking..)
Excellent…very simple explanation…Thanks a lot
Maybe, you can help me, I followed your tutorial, but it doesn’t work for me. I’m connected through a VPN, I can connected using ssh to VNC server. If i started a VNC client from the VNC server using MobaXterm ssh terminal (Xwindows export application), I can connect to the VNC server. However, if I started the VNC client from my local computer, I cannot connect to the VNC server.
Do you have an advice for me?
I had the same issue. I figured that the vncserver was not running on the server after I had shut down and restarted the system. So, if you work your way thru the tutorial, you will have to make sure you do it without interruption.
Try to start vncserver on the server and reconnect. Then automate the service so that vncserver starts automatically upon boot.
Great guide, i was able to connect and i’m glad i finally found a working article.
At first ufw was not enabled, so i double checked the guide and found out your initial setup guide and that fixed the connection problem.
Then i had grey screen after successfully connected. I googled for that too and found a solution like
sudo apt-get install gnome-panel gnome-settings-daemon metacity nautilus gnome-terminal
and added the lines below to ~/.vnc/xstartup:
gnome-panel &

gnome-settings-daemon &

metacity &

nautilus &
thank you this config.. works on a fresh Ubuntu 18.04 .. now! I can see just one Window the files one… how I can see the menu bar?? thank you
Excellent explanation, and the one that works, unlike many other copy-pasted clickbait.
really works on 18.04, with some small error, but it starts-up, the error could be because of other tutorials that didnt work…
thank you guys!!!
how about samba tutoria to work with graphical gui on lubuntu?
regards from PowerPC G5 running lubuntu with 16 gigs of ram and 18 users for server ;)))