1. Create User with Sudo Privileges
If you already have a non-root account with sudo privileges or know what you’re doing and want to set this up for the root account, skip to Step 2. Otherwise, read on.
The root user is the administrative user in a Linux environment that has heightened privileges and you are discouraged from using it on a regular basis. It is recommended that you set up an alternative superuser account.
To set up this account, you will need to access your Linux box via SSH. If you are using DigitalOcean or similar cloud hosting, you should have SSH access via the control panel. If not, you can try logging into your Linux box from Windows.
Once in terminal, create a new user. In this example we are adding a user called john.
adduser johnEnter a password. You will also be asked to enter contact details, just press ENTER for defaults.
Once the user is created, give it superuser privileges.
usermod -aG sudo johnNow that our new user is set up, we can log out of Linux and return to Windows.
logout2. Download and Install PuTTY
PuTTY is an SSH and telnet client for the Windows platform. You can download from http://www.putty.org
When you install the PuTTY client, it will also install the PuTTYgen utility, which you will use to generate your SSH keys.
3. Generate a Key Pair with PuTTYgen
You should see PuTTYgen in the start menu. You can also find it in C:\Program Files\PuTTY\puttygen.exe or C:\Program Files (x86)\PuTTY\puttygen.exe
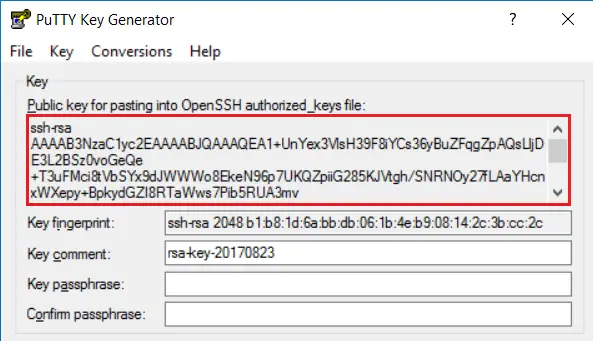
Click Generate and start moving the mouse within the Window. Putty uses mouse movements to collect randomness.
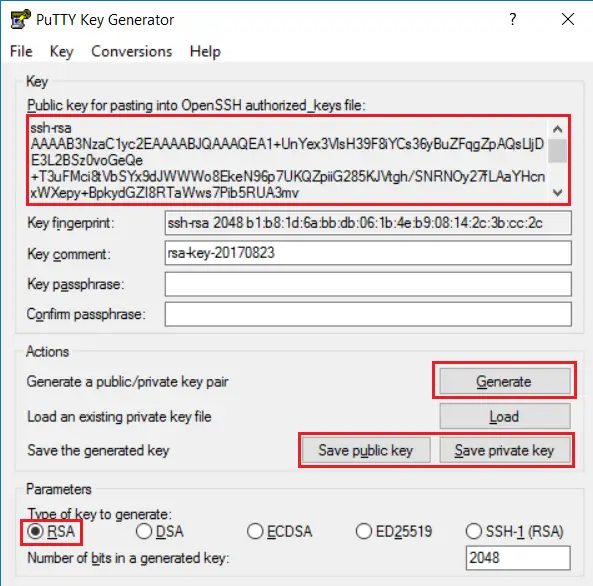
Copy your Public key to clipboard as we will paste this into terminal later. (Right-click the key and click Select All, then right-click again and click Copy)
Also save both your Public and Private keys somewhere safe. When saving the Private key, you will be prompted for a passphrase to secure the key. You can leave this blank if you want to just connect into SSH without having to type a password every time.
Note: If you plan to use this private key to connect over SFTP from your SFTP client, you should export the key as OpenSSH format by clicking Conversions dropdown and Export OpenSSH Key.
4. Install Key On Server
You now need to paste this public key into the authorized_keys file. Log in via SSH using the account you created in Step 1 (or if you skipped step 1, log in either using your account with sudo privileges or the root account).
If you are using DigitalOcean Droplet or similar cloud service, you should be able to access your terminal via the control panel. Alternatively, you can access your server using PuTTY.
Once in terminal, create a new directory called .ssh:
sudo mkdir ~/.sshNote that ~/ is shorthand for the currently logged in user’s home directory, usually in /home/username/
Restrict its permissions:
sudo chmod 700 ~/.sshUsing the nano text editor, create a new file in this folder called authorized_keys.
sudo nano ~/.ssh/authorized_keysnano will open a blank file. Make sure you have your public key in your clipboard, which you copied from step 3.
Paste the public key into nano by clicking the right mouse button once anywhere in the nano program.
Once the key is pasted, you can use the left arrow on your keyboard to move the cursor back to make sure it has pasted in the entire key.
Save and close (Press CTRL + X, then press y and ENTER to confirm save)
Now restrict the permissions of the authorized_keys file:
sudo chmod 600 ~/.ssh/authorized_keysYou must also make sure that the user and not root owns both /.ssh and /.ssh/authorized_keys. This command will recursively set the owner. The $(whoami) variable returns the currently logged in user.
sudo chown -R $(whoami):$(whoami) ~/.ssh/You’re done! If you want to add keys for other users, simply log in as that user and repeat Steps 3 and 4. Or, if you’re sudo, you can just replace ~/ with the user’s home directory, eg. /home/username and replace $(whoami) with their username.
Finally, log out.
logout5. Configure PuTTY Connection
In Windows, open up PuTTY from the start menu. You can also find it in C:\Program Files\PuTTY\putty.exe or C:\Program Files (x86)\PuTTY\putty.exe
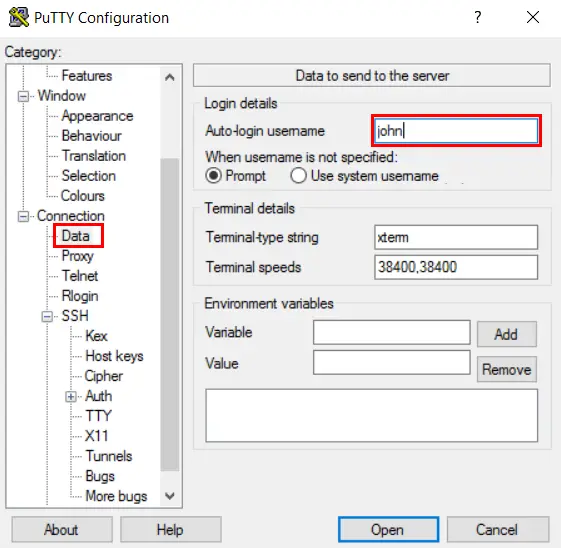
Click Connection > Data in the left-hand navigation pane and enter your username in the Auto-login username field.
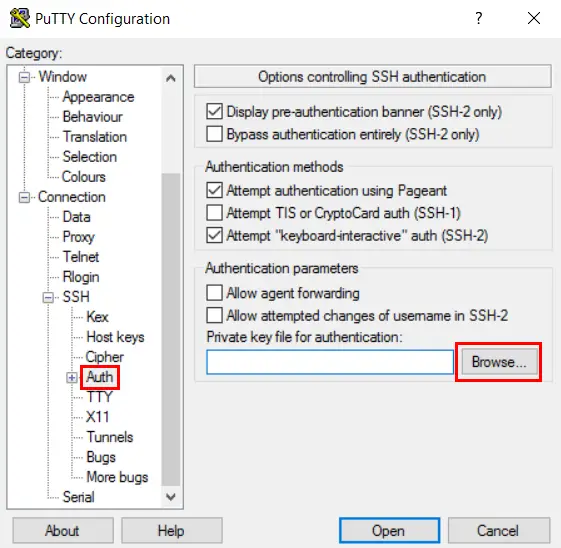
Click Connection > SSH > Auth in the left-hand navigation pane and Browse for the Private key you saved earlier.
Click Session in the left-hand navigation pane and enter your server’s IP address.
Enter a name for your stored session (e.g. “LinuxServer”) and click Save.
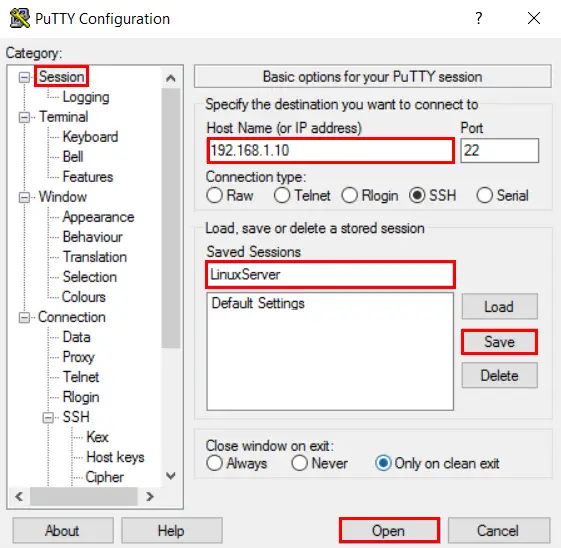
Finally, click Open to connect to your server.
If you saved your key with a passphrase earlier, you will be prompted to enter that passphrase.
Using username "john".
Authenticating with public key "rsa-key-20170825"
Welcome to Ubuntu 16.04.3 LTS (GNU/Linux 4.4.0-92-generic x86_64)

Last login: Fri Aug 25 08:20:29 2017 from 192.168.1.10
john@linuxserver:~$
If you see Authenticating with public key, you have configured SSH key-based authentication correctly. Well done!
Recommended: Disable Password Authentication on your Server
If you can login to your account using SSH without a password, you have successfully set up SSH key-based authentication. However, password-based authentication is still active so your server is still exposed to brute-force attacks.
Log into your remote server as root or with an account with sudo privileges.
Open the SSH daemon’s config file:
sudo nano /etc/ssh/sshd_configPress CTRL + W and search for PasswordAuthentication.
Set the value to no. If the line is commented out, delete the # sign.
PasswordAuthentication noThis will disable the ability to log in through SSH using passwords. Note that this will not affect SFTP logins.
Save file and exit. (Press CTRL + X, press Y and then press ENTER).
For the changes to take effect, you must restart the service.
sudo service ssh restartOptional: Disable Sudo Password Prompt or Extend Timeout in Linux
Every time you issue a sudo command, Linux asks for your user password after a certain inactivity timeout, usually 5 minutes. This is the recommended behaviour to prevent unauthorised commands being run by someone or a malicious script in your absence. However, this requirement can be disabled per session or you can extend the inactivity timeout permanently.
See: Disable Sudo Password Prompt or Extend Timeout in Linux
Let me know if this helped. Follow me on Twitter, Facebook and YouTube, or 🍊 buy me a smoothie.

Shoot, I should also note that I followed your reply with the line of code above with a sudo user who is not root.
When I log in it say “Server refused our key”
OK, so I have been scratching my head with this one for a while because I also got that error when going through the guide again.
It turns out the problem is that the ownership of both
/.sshand/.ssh/authorized_keyswas set toroot. You must make sure that the user owns these and not root.This command will recursively set the ownership of the directory. The
$(whoami)variable returns the currently logged in user.sudo chown -R $(whoami):$(whoami) ~/.ssh/More info: https://superuser.com/questions/215504/permissions-on-private-key-in-ssh-folder
Hi, I’ve been stuck on this for awhile now.
Following these steps, I was getting the error of ‘Connection refused’. So, I found elsewhere to created a bridge connection with Ethernet & Wi-fi. Then, using that IP, I was able to get the ‘Using username: ‘ message, along with ‘Server refused our key’, and then asked for a password. The one I created with the original IP didn’t work, I get the message ‘Access denied’.
I’m also UNABLE to connect in this tutorial: https://devanswe.rs/log-linux-windows-using-putty/ using the bridge connection IP – I get ‘Access denied’.
Please help!