In this guide we will install and configure phpMyAdmin to work with Nginx on Ubuntu 16.04 / 17.10.
Prerequisites
You should be using a non-root user with sudo privileges as explained in Ubuntu 16.04 / 17.10 Initial Server Setup.
You should also have your LEMP stack (Nginx, MySQL and PHP) already installed before continuing with this guide. If you don’t have these installed yet, please see Installing a LEMP Stack (Nginx, MySQL, PHP) on Ubuntu 16.04 / 17.10
1. Install phpMyAdmin
Let’s begin by updating the list of available packages and installing phpMyAdmin.
sudo apt-get updatesudo apt-get install phpmyadmin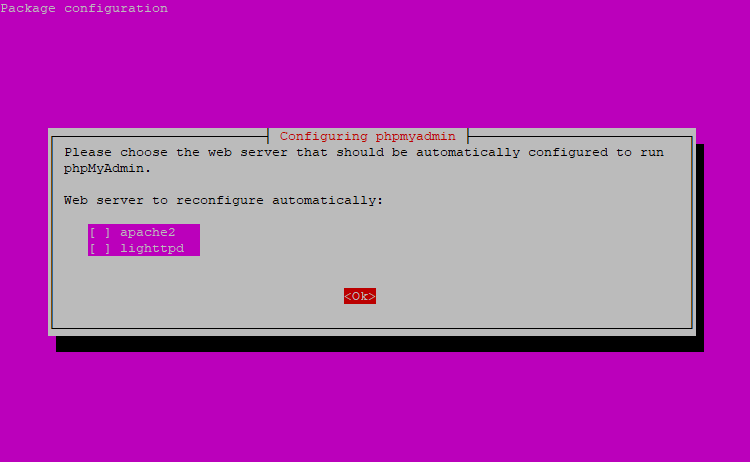
As there is no option for Nginx here, press TAB and then ENTER to continue without selecting a web server.

Select Yes and press ENTER to install and configure the database.
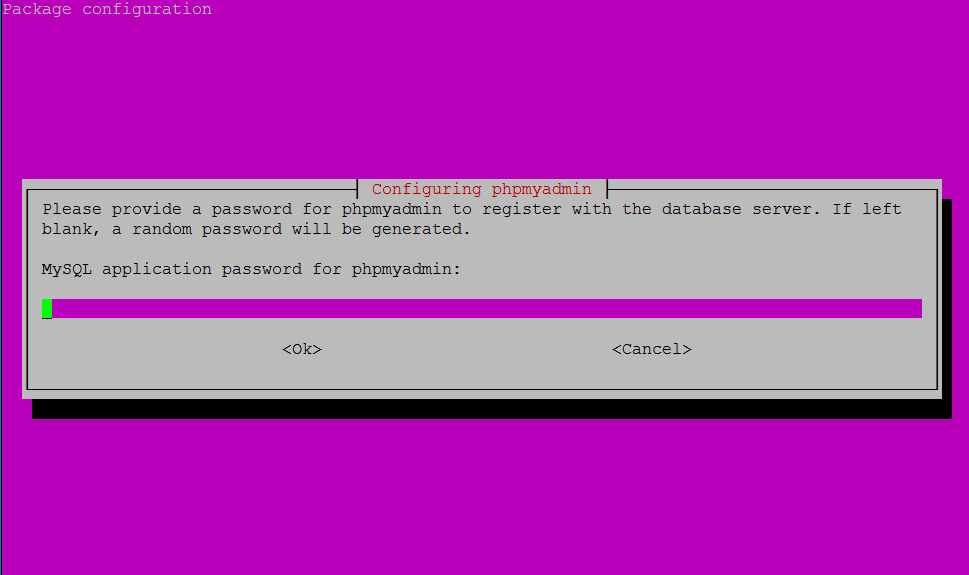
The MySQL application password is only used internally by phpMyAdmin to communicate with MySQL. You can leave this blank and a password will be generated automatically.
2. Create Symbolic Link
In order for Nginx to serve the phpMyAdmin files correctly, we must create a symbolic link from the phpMyAdmin directory /usr/share/phpmyadmin to the Nginx document root directory.
The default location of the Nginx document root should be /var/www/html/, though it could be different depending on your setup. If you followed a previous guide for setting up multiple domains, your document root may be located in somewhere like /var/www/example.com/public_html.
Let’s create a symbolic link from the phpMyAdmin directory to your document root. Here we will assume your document root is /var/www/html/ and we will simply add phpmyadmin to the end of it. This will allow us to access phpMyAdmin at example.com/phpmyadmin.
sudo ln -s /usr/share/phpmyadmin /var/www/html/phpmyadmin3. Test phpMyAdmin
You should now be able to access the phpMyAdmin web interface by visiting your server’s domain name or public IP address followed by /phpmyadmin. e.g. http://example.com/phpmyadmin or http://192.168.1.10/phpmyadmin
If you don’t have a domain name yet or don’t know your IP, you can find out with:
ip addr show eth0 | grep inet | awk '{ print $2; }' | sed 's/\/.*$//'
You can now log in with the user root. You will have set up this root user and password when installing MySQL for the first time.
You’re done! If you would like to set up some additional security for phpMyAdmin, continue to Step 4 and Step 5.
4. Obscure URL (Optional)
Bots and attackers continuously scan web servers for the phpMyAdmin login page, so it is recommended that you change the URL to something else.
In this example we are going to change it from example.com/phpmyadmin to example.com/pma_hidden.
In step 2, we created a symbolic link in the document root /var/www/html/phpmyadmin
All we need to do is to rename this symbolic link, in this example, to: pma_hidden. Make sure you enter the correct document root here. The default is /var/www/html though it may be something like /var/www/example.com/public_html/ on your server.
sudo mv /var/www/html/phpmyadmin /var/www/html/pma_hiddenYou should now be able to access phpMyAdmin at example.com/pma_hidden
5. Secure phpMyAdmin (Optional)
To provide an additional layer of security, we can set up authentication in Nginx.
Firstly, generate a strong password and keep it safe.
We will now install apache2-utils, which can generate the .htpasswd file that works with both Nginx and Apache.
sudo apt-get install apache2-utilsOnce installed, we can generate the .htpasswd file. Simply change username to the username you require. Generate a password and keep it safe.
sudo htpasswd -c /etc/nginx/.htpasswd usernameThere should now be a .htpasswd file containing your username and encrypted password. You can check with:
cat /etc/nginx/.htpasswdWe now need to add two directives to our Nginx configuration file. The location of the config file may vary depending on your setup, though the default is usually in /etc/nginx/sites-available/default. If you set up multiple domains in a previous guide, your config file may be located in somewhere like /etc/nginx/sites-available/example.com
This this example, we will assume the config file is in /etc/nginx/sites-available/default. Open the file to edit.
sudo nano /etc/nginx/sites-available/defaultScroll down and look for the location block and paste in a new block underneath it with the name of your obscured phpMyAdmin folder, in this example pma_hidden. (Use the right mouse button to paste)
. . .
location /pma_hidden {
        auth_basic "Restricted Access";
        auth_basic_user_file /etc/nginx/.htpasswd;
}
. . .
Save file and exit (press CTRL + X, press Y and then press ENTER).
Check that the Nginx config file is valid.
sudo nginx -tIf valid, reload Nginx config.
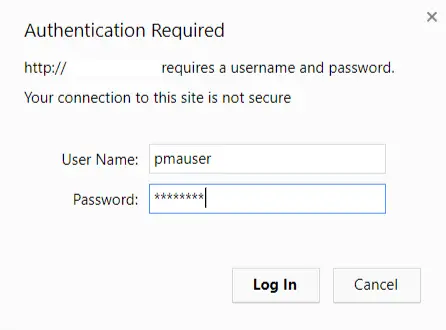
sudo service nginx reloadNow when visiting example.com/pma_hidden, you should be presented with an authentication window.
You’re all done!
Let me know if this helped. Follow me on Twitter, Facebook and YouTube, or 🍊 buy me a smoothie.
I had strange issues at first step, and it turned out it was because generated MySQL password (from https://passgen.co) that had
'inside of it 🙂It was even “escaped” since it was
abc**\'**123It’s good that I somehow noticed it, so for anyone reading, just check you password doesn’t contain
'or".Well spotted. There’s also an option on that site to “Exclude ambiguous symbols” so you can avoid that issue.
Hi. I have follewed your guide. But when i test my server with “http://my_server_name_or_ip/phpmyadmin” i am getting 403 forbidden page.
What am i missing?
I am using ubuntu 16.06 lts, installed mysql, php, phpmyadmin.
Could be a number of things. Were you able to access phpMyAdmin in Step 3? If you didn’t get that far, check your document root
ls /var/www/html– do you see the symbolic linkphpmyadminin cyan?I think I know what your problem is because the same happened to me. It was because I didn’t have PHP configured correctly.
You need to make some changes to the Nginx config as outlined in Step 3 of this article. https://devanswe.rs/installing-php-nginx-ubuntu-16-04-17-04/
You’re meant to have PHP installed and working before installing phpMyAdmin. Did you do that?
Thats a beatutiful guide.
@Chhy Riden, you have to update
$cfg['PmaAbsoluteUri']1. open config
sudo nano /var/lib/phpmyadmin/config.inc.php2. put your url
<?php$cfg['PmaAbsoluteUri'] = 'http:///pma_hidden/';
3. Retry
Thanks for this. Nice guide.
However, when I run step 6 and 7, I keep getting a 403. Without the extra security I can access phpMyAdmin.
Another problem I have, is that my user “phpmyadmin”, using a password, isn’t allowed to create new databases. In the Databases tab it says “No priviliges” and when executing a query I get the following error:
#1044 – Access denied for user ‘phpmyadmin’@’localhost’ to database ‘database_name’ (where database_name is a placeholder ofcourse)
P.S. My phpMyAdmin is installed on a remote server.
P.P.S. I also don’t see the “User accounts” tab. It seems the phpmyadmin user is lacking priviliges. Any way to grant them?
This guide has since been updated.
You need to log into phpMyAdmin using the MySQL
rootaccount, which has the privileges needed to create new dbs and set up user accounts.I believe the
phpmyadminaccount is used for the controluser to connect to MySQL (the controluser is an administrative user phpMyAdmin uses to handle some advanced features like bookmarked queries, relation view, and user-level permissions). You don’t normally need to use that account or anything. It’s just a system-level thing used for the applications to communicate.After I enter my phpmyadmin username and password, it auto redirect me to mydomain.com/index.php?token=randomkey instead of mydomain.com/pma_hidden/index.php?token=randomkey.
Please help me 🙁
Hi Chhy. Were you able to access phpMyAdmin at
example.com/phpmyadminin Step 5 before continuing to Step 6 and 7?If so, go back into your Nginx config file and comment out the changes you made to see if you can regain access to phpMyAdmin.
For some unknown reason when you go to phpMyAdmin site and log in, it redirects you to index page and not phpMyAdmin page. A possible fix:
sudo nano /etc/phpmyadmin/config.inc.php
add this to the bottom:
$cfg['PmaAbsoluteUri'] = $_SERVER[HTTP_HOST].dirname($_SERVER[SCRIPT_NAME]);
Thanks for the feedback.