Before you begin…
If you are using Ubuntu 18.04, please see:
Note on SFTP: It’s surprising how many devs are still unaware of SFTP and the advantages over FTP/FTPS. If your FTP client supports SFTP, you should use it!
1. Install vsftpd
Let’s begin by updating the list of available packages and installing vsftpd.
sudo apt-get updatesudo apt-get install vsftpdTo check the status of vsftpd, run
sudo service vsftpd status● vsftpd.service - vsftpd FTP server
Loaded: loaded (/lib/systemd/system/vsftpd.service; enabled; vendor preset: e
Active: active (running) since Sat 2018-02-03 23:59:12 UTC; 16s ago
Main PID: 31602 (vsftpd)
CGroup: /system.slice/vsftpd.service
└─31602 /usr/sbin/vsftpd /etc/vsftpd.conf
Feb 03 23:59:12 myserver systemd[1]: Starting vsftpd FTP server...
Feb 03 23:59:12 myserver systemd[1]: Started vsftpd FTP server.Above we can see our FTP server is now up and running.
2. Configure Firewall
If you haven’t already done so, it is recommended that you enable the ufw firewall. Before enabling ufw firewall, make sure you add a rule for SSH, otherwise you may get locked out of your server. If you don’t want to set up a firewall, skip to Step 3.
sudo ufw allow OpenSSHLet’s open ports 20 and 21 for FTP, and ports 40000-50000 for passive FTP. We’ll also open port 990 for TLS, which we will set up later.
sudo ufw allow 20/tcpsudo ufw allow 21/tcpsudo ufw allow 40000:50000/tcpsudo ufw allow 990/tcpNow, enable the firewall if it isn’t already
sudo ufw enableTo check the status of the firewall, run:
sudo ufw status3. Create an FTP User
In this example, we will create a new user called ftpuser.
sudo adduser ftpuserGenerate a strong password and keep it safe.
You may also be asked to enter some contact information. You can just press ENTER to each of these.
If you only want ftpuser to log in using FTP, you can disable their SSH/SFTP access by adding their username to the SSH config file. Otherwise, skip to Step 4.
Open the SSH config in nano.
sudo nano /etc/ssh/sshd_configAdd the following to the bottom of the file replacing ftpuser with the user you want to deny SSH and SFTP access. You can add multiple users here separated by a single space. (To paste in nano, press the right mouse button).
DenyUsers ftpuserTo save file and exit, press CTRL + X, press Y and then press ENTER.
Restart the SSH service.
sudo service sshd restart4. Directory Permissions
You now need to decide where this FTP user is allowed to view and upload files.
If you followed our other guide for setting up multiple domains, your document root may be located in /var/www/test1.com/public_html – in that case, you would need to set the home folder for ftpuser to the folder above the document root: /var/www/test1.com, substituting test1.com for your own domain.
In this guide we will assume you are using the default document root in Ubuntu. We are going to give the user ftpuser FTP access to the document root /var/www/html, which is the default document root for both Apache and Nginx.
You will need to set the folder above the document root as the home directory for ftpuser.
sudo usermod -d /var/www ftpuserNow set ownership of the document root directory to ftpuser. (The default is /var/www/html, though it may be /var/www/test1.com/public_html on your server.)
This will allow our FTP user to write and alter files in the document root directory.
sudo chown ftpuser:ftpuser /var/www/html5. Configure vsftpd
There are a few changes we have to make to the vsftpd configuration file. If you just want a working config file to paste in yourself, we have created one here for your convenience.
Before editing the config file, create a backup.
sudo cp /etc/vsftpd.conf /etc/vsftpd.conf.bakNow, open the config file.
sudo nano /etc/vsftpd.confThis is quite a large file but it’s mostly filled with comments to help you along.
You need to go down the file and make sure that the settings match those below. Note: you can search in nano using CTRL + W
Look for #write_enable=YES and uncomment it by removing the # sign. This will allow FTP users to write files to the server.
write_enable=YESLook for #chroot_local_user=YES and uncomment it by removing the # sign. This will prevent FTP users from browsing outside their own directory.
chroot_local_user=YESLook for #local_umask=022 and uncomment it by removing the # sign. This will give uploaded files and folders the correct permissions.
local_umask=022We now need to add some directives that don’t exist in the file.
Since Linux doesn’t show files beginning with a dot, files like .htaccess will not be visible in FTP. This may be a problem if you intend to use Apache and want to work with .htaccess.
To force vsftpd to show file names that begin with a dot, paste the following to the bottom of the file. (To paste in nano, press the right mouse button)
force_dot_files=YESLastly, let’s add some port ranges for passive FTP to make sure enough connections are available. Paste the following to the bottom of the file. (To paste in nano, press the right mouse button)
pasv_min_port=40000
pasv_max_port=50000
We are done with vsftpd.conf for the moment but will return in later steps to set up security and SSL.
To save file and exit, press CTRL + X, press Y and then press ENTER.
Restart vsftpd.
sudo systemctl restart vsftpd6. Test FTP
We can now test vsftpd to see if we can log in as the user we created earlier. We recommend FileZilla, which works on Windows, Mac and Linux.
Enter your server’s IP, your FTP username and password you created earlier, and click Quickconnect.
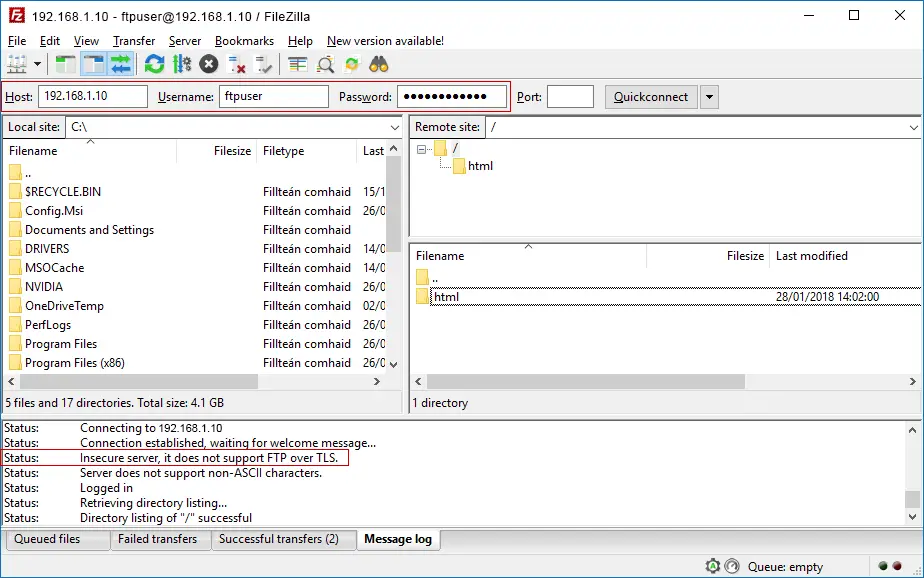
Above we can see we have connected successfully and the web root directory html is displayed, though this may be different on your server.
Try uploading, creating and editing folders and files within the web root directory to ensure permissions are working correctly.
You will notice we have a warning in FileZilla “Status: Insecure server, it does not support FTP over TLS.” It is highly recommended that you now configure TLS so that login credentials and traffic are encrypted over the FTP connection.
If you are having problems logging in to the FTP server, try checking the vsftpd log. To view the last 200 entries using tail:
sudo tail /var/log/vsftpd.log -n 2007. Secure FTP with TLS (optional)
It’s important to keep a few things in mind when using FTP – it is not encrypted by default meaning your credentials and content that you send are sent in the clear so are vulnerable to interception. To address this you should connect to vsftpd using FTPS (FTP over SSL/TLS).
We are going to use openssl to create a new certificate.
sudo openssl req -x509 -nodes -days 365 -newkey rsa:2048 -keyout /etc/ssl/private/vsftpd.pem -out /etc/ssl/private/vsftpd.pemYou will be asked to enter some details like country, etc. You can just press ENTER for all of these.
Now that you private key has been created, there are a few changes we have to make to the vsftpd configuration file. If you just want a working config file to paste in yourself, we have created one here for your convenience.
Open the config file in nano editor.
sudo nano /etc/vsftpd.confFind the following directive: (Note: you can search in nano using CTRL + W)
ssl_enable=NOChange it to:
ssl_enable=YESPaste in the following to end of the config file.
rsa_cert_file=/etc/ssl/private/vsftpd.pem
rsa_private_key_file=/etc/ssl/private/vsftpd.pem
allow_anon_ssl=NO
force_local_data_ssl=YES
force_local_logins_ssl=YES
ssl_tlsv1=YES
ssl_sslv2=NO
ssl_sslv3=NO
require_ssl_reuse=NO
ssl_ciphers=HIGH
pasv_min_port=40000
pasv_max_port=50000
Save file and exit (press CTRL + X, press Y and then press ENTER).
Restart vsftpd.
sudo systemctl restart vsftpd8. Testing TLS with FileZilla
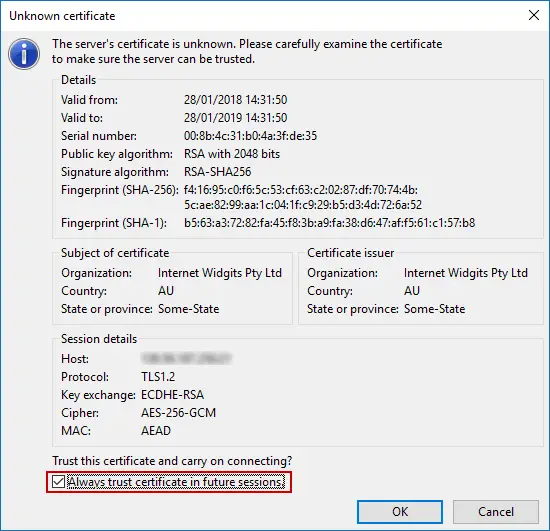
We can now test TLS. We recommend FileZilla, which works on Windows, Mac and Linux.
Enter your server’s IP, your FTP username and password you created earlier, and click Quickconnect.
You may be presented with an Unknown Certificate warning. Click Always trust this certificate in future sessions and click OK.
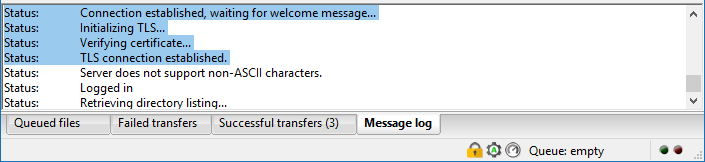
If you are connected over TLS, it will tell you in the connection log. You will also see a padlock in the bottom right corner.
You’re all done!
Let me know if this helped. Follow me on Twitter, Facebook and YouTube, or 🍊 buy me a smoothie.
thanks a lot for this tutorial. it helped me so much!
Thank you for this tutorial. work it perfectly.
When you’re following the tutorial, don’t forget to enable http/https via the ufw, because if you’re following this tutorial to the letter, http won’t work anymore.
sudo ufw allow 80
sudo ufw allow 443
That’s REALLY helpful!! THANKS!!!
btw, where and when did this tutorial close these port?
SSL port is 443
http port is 80
ftp port is 21
so if you chose to Secure FTP with TLS it will 443
From a cloud server, I have enabled FTP access with TLS, but I receive the error on the Certificate details screen, “My cloud server address:21 – Hostname does not match certificate”
How would I go about fixing this?
What FTP client are you using? You should be able skip certificate warnings.
how to remove the ftp user from ubuntu?
sudo userdel -r ftpuserI had to change the following in /etc/vsftpd.conf
from:
pam_service_name=vsftpd
to:
pam_service_name=ftp
in order to login. Otherwise, I get “530 Login incorrect”
Never mind. That was because I was using “root” and “root” is listed in /etc/ftpusers (which is disallowed)
I had the same error: “530 Login incorrect”
In the log file, I found this log:
Thu Jan 20 18:23:47 2022 [pid 18127] CONNECT: Client “::ffff:192.241.***.***”
Thu Jan 20 18:41:07 2022 [pid 18218] CONNECT: Client “::ffff:93.65.***.***”
Thu Jan 20 18:41:10 2022 [pid 18217] [fmpFtpUser] FAIL LOGIN: Client “::ffff:93.65.***.***”
Thu Jan 20 18:41:11 2022 [pid 18218] DEBUG: Client “::ffff:93.65.***.***”, “Control connection terminated without SSL shutdown.”
Then I changed as you did:
pam_service_name=ftpd
Then filezilla managed to connect.
Before this, I had always this output from filezilla:
Stato: Connessione a 45.148.***.***:21…
Stato: Connessione stabilita, in attesa del messaggio di benvenuto…
Stato: Inizializzazione TLS…
Stato: Connessione TLS stabilita.
Comando: USER ++++++
Risposta: 331 Please specify the password.
Comando: PASS ********
Risposta: 530 Login incorrect.
Anyway, now, after some navigation in my ftp server (I managed also to upload a file) and some time inactive, filezilla has disconnected with the following message (translated):
Errore: Errore GnuTLS -15 in gnutls_record_recv: An unexpected TLS packet was received.
Errore: Unable to read from the socket: ECONNABORTED – Connection aborted.
Errore: Disconnected from the server
I followed the above step but when connecting to filezilla I got this error:
Status: Connection established, waiting for welcome message…
Error: Connection timed out after 20 seconds of inactivity
Error: Could not connect to server
I got the same error 🙁
Using fileZilla.
Server is Ubuntu 16.04
Thank you so much! I have tried more than a dozen tutorials to set up FTP on my debian machine, and this is the only tutorial I have found that works. Even though it’s Ubuntu.. lol
Thank you for this. work perfectly.
Great!
Hi, Followed the same however after implementing SSL ftp session is not established. Can you pls help me with this.
FIleZilla status
Retrieving directory listing…..
and exits with error.. any clue why?
What does the log say?
experiencing same issue
and in log its showing:
Sun Sep 9 10:41:51 2018 [pid 1411] CONNECT: Client “::ffff:...”
Sun Sep 9 10:41:54 2018 [pid 1410] [ftpuser] OK LOGIN: Client “::ffff:...”
did u solved this problem bro, I faced this too
When I try log in with TLS I get “GnuTLS error -15: An unexpected TLS packet was received.”
This can happen if the user’s root directory is writable, which isn’t allowed when using chroot restrictions. To test, add
allow_writeable_chroot=YESto/etc/vsftpd.confand restart vsftpdsudo systemctl restart vsftpd