Introduction
This guide shows you how to manually upgrade phpMyAdmin on most major Linux distributions (e.g., Ubuntu, Debian, CentOS, Fedora). While tested on Ubuntu 24.04 running PHP 8, the steps are similar on other distros—just be sure to adjust file paths and package-manager commands if needed. If you have any issues, let me know in the comments.
Alternative Upgrade Methods (Package Managers, Control Panels, Docker)
While this guide focuses on manually upgrading phpMyAdmin by downloading the source files, you may not need these steps if:
- Package Managers (e.g., apt, yum, dnf, brew): If you installed phpMyAdmin with
apt-get(Debian/Ubuntu) oryum/dnf(CentOS/Fedora), simply run:sudo apt-get update && sudo apt-get upgrade phpmyadmin
or
sudo yum update phpMyAdmin(CentOS/Fedora).
Note that some distributions may lag behind the latest release. - Hosting Control Panels (e.g., cPanel, Plesk): In many shared hosting environments, phpMyAdmin is updated automatically through the control panel, so manual upgrades might break existing integrations.
- Docker/Container Environments: If you are running phpMyAdmin as a container, you can pull the latest Docker image (
docker pull phpmyadmin) and recreate your container instead of manually downloading tarballs.
If you still prefer or need the latest release straight from source (for instance, your package repositories are outdated), then the steps below are the correct way to manually upgrade your phpMyAdmin installation.
1. Back Up phpMyAdmin
If you followed this guide before, make sure to delete any previous backup directory you created.
sudo rm -rf /usr/share/phpmyadmin.bakNext, back up your current phpMyAdmin folder by renaming it:
sudo mv /usr/share/phpmyadmin/ /usr/share/phpmyadmin.bakCreate a new phpMyAdmin folder (adjust this path if your distro or setup uses a different location, such as /var/www/html/phpmyadmin):
sudo mkdir /usr/share/phpmyadmin/Then change directory:
cd /usr/share/phpmyadmin/2. Download and Extract phpMyAdmin
phpMyAdmin 5.2.2 (released Jan 2025) requires PHP 7.2 or newer and MySQL/MariaDB 5.5 or newer. To find your PHP version via the command line, run php -v. If you need to upgrade PHP, check out this guide: How to Upgrade from PHP 7.x to PHP 8 on Ubuntu.
- For PHP 7.2 or newer, download phpMyAdmin 5.2.2.
- For PHP 7.1, download phpMyAdmin 5.1.4.
- For PHP 5.5 to PHP 7.4, download phpMyAdmin-4.9.11.
Visit the phpMyAdmin download page and locate the .tar.gz URL. In this guide, we’re using version 5.2.2 (released Jan 2025). If a later version is available, be sure to change the commands accordingly (and let me know in the comments so I can update the guide!).
Download phpMyAdmin (Note: you can also verify checksums from the official site or use GPG signatures to ensure file integrity):
sudo wget https://files.phpmyadmin.net/phpMyAdmin/5.2.2/phpMyAdmin-5.2.2-all-languages.tar.gzExtract the archive:
sudo tar xzf phpMyAdmin-5.2.2-all-languages.tar.gzOnce extracted, list the folder contents:
lsYou should see a folder named phpMyAdmin-5.2.2-all-languages. Move its contents to /usr/share/phpmyadmin (or /var/www/html/phpmyadmin, if that’s where your existing install is):
sudo mv phpMyAdmin-5.2.2-all-languages/* /usr/share/phpmyadminLog into phpMyAdmin to confirm the upgrade. You may see two errors:

3. Fixing Common phpMyAdmin Errors
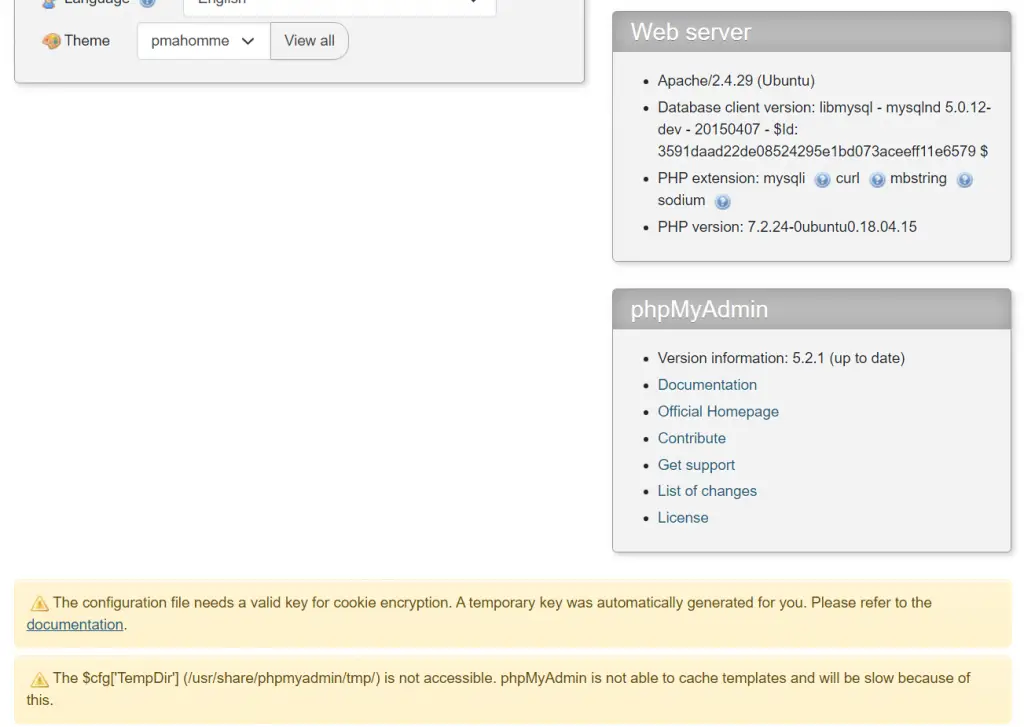
3.1. “The configuration file needs a valid key for cookie encryption” error
You may see the error The configuration file needs a valid key for cookie encryption. A temporary key was automatically generated for you. Please refer to the documentation.
This means you should create a unique key for your phpMyAdmin install. phpMyAdmin first loads /usr/share/phpmyadmin/libraries/config.default.php and then overrides those values with anything found in /usr/share/phpmyadmin/config.inc.php. If you had custom settings before, make sure to merge them into your new config file instead of starting completely over.
Create config.inc.php (again, adjust directory paths if you placed phpMyAdmin elsewhere):
sudo nano /usr/share/phpmyadmin/config.inc.phpGenerate your own 32-character blowfish secret (e.g., using this generator) and paste it into config.inc.php:
<?php
// Use here a value of your choice 32 chars long
$cfg['blowfish_secret'] = 'PASTE__32__CHAR__BLOWFISH_SECRET';

$i=0;
$i++;
$cfg['Servers'][$i]['auth_type'] = 'cookie';
Save and exit (press CTRL + X, press Y, then press ENTER)
Log out and back in to phpMyAdmin to confirm the error is gone.
3.2. “$cfg[‘TempDir’] (/usr/share/phpmyadmin/tmp/) is not accessible” error
If you see The $cfg[‘TempDir’] (/usr/share/phpmyadmin/tmp/) is not accessible. phpMyAdmin is not able to cache templates and will be slow because of this.
You need to create this directory and make it writable:
sudo mkdir /usr/share/phpmyadmin/tmp
sudo chown -R www-data:www-data /usr/share/phpmyadmin/tmp
sudo chmod 750 /usr/share/phpmyadmin/tmp
Again, log out and log back in to confirm the error is resolved.
4. Clean Up
You can now delete the tar.gz file and the empty folder:
sudo rm /usr/share/phpmyadmin/phpMyAdmin-5.2.2-all-languages.tar.gz
sudo rm -rf /usr/share/phpmyadmin/phpMyAdmin-5.2.2-all-languages
If you’re certain your new phpMyAdmin install is working correctly, you can delete the backup folder as well:
sudo rm -rf /usr/share/phpmyadmin.bakThat’s all! Enjoy your updated phpMyAdmin installation.
Let me know if this helped. Follow me on Twitter, Facebook and YouTube, or 🍊 buy me a smoothie.

Thank you very much.
This tutorial is very helpful with all the details and commands we need to fix the problem.
Hello .. I am Using Google Cloud..I Just Updated Php Version to 7.3 and followed your process but after doing that when i try to log in phpmyadmin it says..PHP 7.1.3+ is required.
Currently installed version is: 7.0.33-0+deb9u7….But When i check through SSH It says 7.3 ..Please Help what to do..
You may have updated the CLI PHP version that runs in command line only. Ensure you have also updated PHP for Apache or Nginx.
To find out which PHP version the web server is using, create a new PHP file in your document root called
info.phpwith the following:Load that in the browser and it will report which PHP version you are using.
thank you!
thanks a lot, it works
Thank you so much !!
Wonder Full, hardly a 5 min job. Thanks A TON!
This is perfect! But if you’re running NGINX or Apache2 and you assign these services to a user, you’ll need to change the ownership of /var/lib/phpmyadmin/tmp && /var/lib/phpmyadmin/blowfish_secret.inc.php && /var/lib/phpmyadmin/config.inc.php to your user.
Where user == Your User Name
Perfect Tutorial!
Upgraded in a couple of minutes.
Thanks!
A solução mais simples e rápida que encontrei até agora. Parabéns.
E, para quem se interessar e tiver o mesmo problema, utilizao Ubuntu 18.04 em WSL (Windows 10 Home), PHP 7.4, Apache2 e Mysql.
Muito obrigado e sucesso!
Receba um abraço deste brasileiro.
Luiz Vidaum
São Paulo/Brasil
Perfect tutorial. I have upgraded in 2 minutes. No issues at all. I didnt get that blowfish warning too.
Fantastic. Thanks you very nuch
Uhll! I think I’m close! 90% of my bugs disappeard. The only issue (new one) is “Failed to read configuration file!”
define('CONFIG_FILE', '/etc/phpmyadmin/');I was trying to find a solution before reaching you. The problem is that there is a message “This usually means there is a syntax error in it, please check any errors shown below.”, but the field bellow is empty. Any idea what could be? Thx in advance.
Hi, after doing everything you told me to do, I still got the exact same two errors… can you help me?
Can you copy and paste me the information under “Web server” and “phpMyAdmin” on this page?
Génial…bravo et merci…
Djimel
Fantastic!
Very good! Thanks man…
Great!! Thank you…
Hi sorry for this, everything works and I can clearly see the latest 5.0.2 version, but I have the issue that if I run “apt update” it tells me that my installed version is 4.6.6 and fails to upgrade to the proposed 4.9.5. Is there a way to fix my apt in a way that it will understand that my version is now 5.0.2? many thanks
Yes, I have exactly the same issues here. After manually updating PMA to 5.0.4 I was surprised to see that it was downgraded to 4.6.6deb5ubuntu0.5 again.
There is a new update that overwrites /usr/share/phpmyadmin
https://ubuntu.pkgs.org/18.04/ubuntu-updates-universe-arm64/phpmyadmin_4.6.6-5ubuntu0.5_all.deb.html
2020-11-17 – Mike Salvatore
phpmyadmin (4:4.6.6-5ubuntu0.5) bionic-security; urgency=medium
thank you so much!
hello i have this error which is displayed at the bottom of my page how to fix it please
$cfg[‘TempDir’] (/var/lib/phpmyadmin/temp/) is not accessible. phpMyAdmin is unable to cache models and therefore will be slow.
The directory is /tmp, not /temp.
Thanks you very mush!
thanks!
It worked like a charm! Many thanks. Great post and great site!
Superb – you anticipated all the hiccups I would find. I never had to look anywhere else for once! lol
Thanks mate.
Hello… Many thanks for this, it help perfectly. Very good job.