Introduction
This guide shows you how to manually upgrade phpMyAdmin on most major Linux distributions (e.g., Ubuntu, Debian, CentOS, Fedora). While tested on Ubuntu 24.04 running PHP 8, the steps are similar on other distros—just be sure to adjust file paths and package-manager commands if needed. If you have any issues, let me know in the comments.
Alternative Upgrade Methods (Package Managers, Control Panels, Docker)
While this guide focuses on manually upgrading phpMyAdmin by downloading the source files, you may not need these steps if:
- Package Managers (e.g., apt, yum, dnf, brew): If you installed phpMyAdmin with
apt-get(Debian/Ubuntu) oryum/dnf(CentOS/Fedora), simply run:sudo apt-get update && sudo apt-get upgrade phpmyadmin
or
sudo yum update phpMyAdmin(CentOS/Fedora).
Note that some distributions may lag behind the latest release. - Hosting Control Panels (e.g., cPanel, Plesk): In many shared hosting environments, phpMyAdmin is updated automatically through the control panel, so manual upgrades might break existing integrations.
- Docker/Container Environments: If you are running phpMyAdmin as a container, you can pull the latest Docker image (
docker pull phpmyadmin) and recreate your container instead of manually downloading tarballs.
If you still prefer or need the latest release straight from source (for instance, your package repositories are outdated), then the steps below are the correct way to manually upgrade your phpMyAdmin installation.
1. Back Up phpMyAdmin
If you followed this guide before, make sure to delete any previous backup directory you created.
sudo rm -rf /usr/share/phpmyadmin.bakNext, back up your current phpMyAdmin folder by renaming it:
sudo mv /usr/share/phpmyadmin/ /usr/share/phpmyadmin.bakCreate a new phpMyAdmin folder (adjust this path if your distro or setup uses a different location, such as /var/www/html/phpmyadmin):
sudo mkdir /usr/share/phpmyadmin/Then change directory:
cd /usr/share/phpmyadmin/2. Download and Extract phpMyAdmin
phpMyAdmin 5.2.2 (released Jan 2025) requires PHP 7.2 or newer and MySQL/MariaDB 5.5 or newer. To find your PHP version via the command line, run php -v. If you need to upgrade PHP, check out this guide: How to Upgrade from PHP 7.x to PHP 8 on Ubuntu.
- For PHP 7.2 or newer, download phpMyAdmin 5.2.2.
- For PHP 7.1, download phpMyAdmin 5.1.4.
- For PHP 5.5 to PHP 7.4, download phpMyAdmin-4.9.11.
Visit the phpMyAdmin download page and locate the .tar.gz URL. In this guide, we’re using version 5.2.2 (released Jan 2025). If a later version is available, be sure to change the commands accordingly (and let me know in the comments so I can update the guide!).
Download phpMyAdmin (Note: you can also verify checksums from the official site or use GPG signatures to ensure file integrity):
sudo wget https://files.phpmyadmin.net/phpMyAdmin/5.2.2/phpMyAdmin-5.2.2-all-languages.tar.gzExtract the archive:
sudo tar xzf phpMyAdmin-5.2.2-all-languages.tar.gzOnce extracted, list the folder contents:
lsYou should see a folder named phpMyAdmin-5.2.2-all-languages. Move its contents to /usr/share/phpmyadmin (or /var/www/html/phpmyadmin, if that’s where your existing install is):
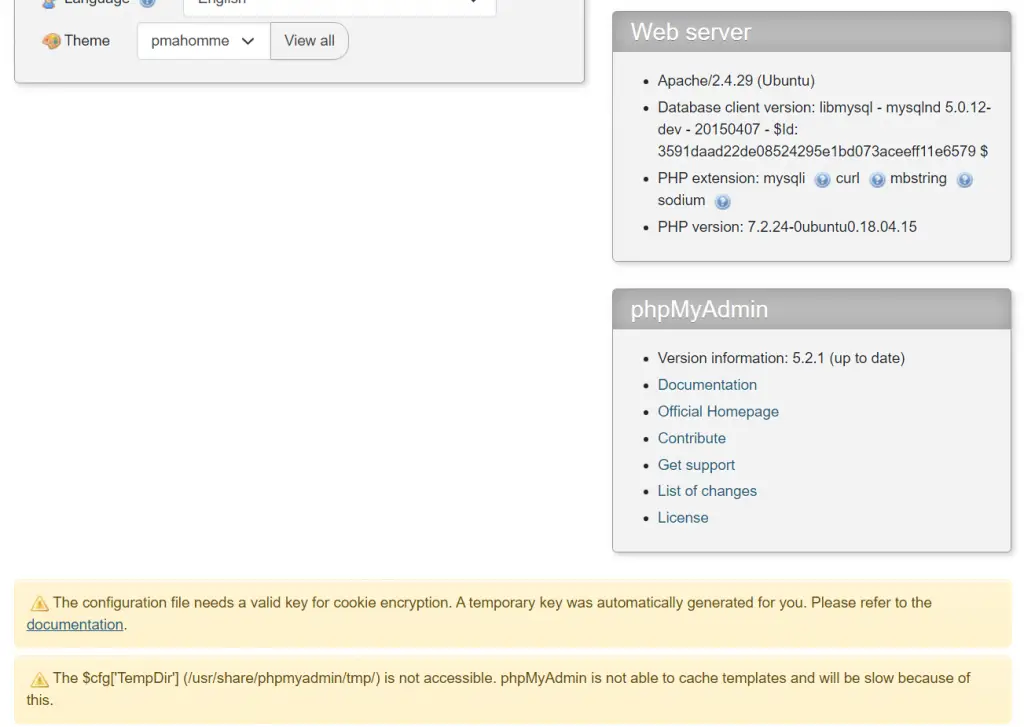
sudo mv phpMyAdmin-5.2.2-all-languages/* /usr/share/phpmyadminLog into phpMyAdmin to confirm the upgrade. You may see two errors:

3. Fixing Common phpMyAdmin Errors
3.1. “The configuration file needs a valid key for cookie encryption” error
You may see the error The configuration file needs a valid key for cookie encryption. A temporary key was automatically generated for you. Please refer to the documentation.
This means you should create a unique key for your phpMyAdmin install. phpMyAdmin first loads /usr/share/phpmyadmin/libraries/config.default.php and then overrides those values with anything found in /usr/share/phpmyadmin/config.inc.php. If you had custom settings before, make sure to merge them into your new config file instead of starting completely over.
Create config.inc.php (again, adjust directory paths if you placed phpMyAdmin elsewhere):
sudo nano /usr/share/phpmyadmin/config.inc.phpGenerate your own 32-character blowfish secret (e.g., using this generator) and paste it into config.inc.php:
<?php
// Use here a value of your choice 32 chars long
$cfg['blowfish_secret'] = 'PASTE__32__CHAR__BLOWFISH_SECRET';

$i=0;
$i++;
$cfg['Servers'][$i]['auth_type'] = 'cookie';
Save and exit (press CTRL + X, press Y, then press ENTER)
Log out and back in to phpMyAdmin to confirm the error is gone.
3.2. “$cfg[‘TempDir’] (/usr/share/phpmyadmin/tmp/) is not accessible” error
If you see The $cfg[‘TempDir’] (/usr/share/phpmyadmin/tmp/) is not accessible. phpMyAdmin is not able to cache templates and will be slow because of this.
You need to create this directory and make it writable:
sudo mkdir /usr/share/phpmyadmin/tmp
sudo chown -R www-data:www-data /usr/share/phpmyadmin/tmp
sudo chmod 750 /usr/share/phpmyadmin/tmp
Again, log out and log back in to confirm the error is resolved.
4. Clean Up
You can now delete the tar.gz file and the empty folder:
sudo rm /usr/share/phpmyadmin/phpMyAdmin-5.2.2-all-languages.tar.gz
sudo rm -rf /usr/share/phpmyadmin/phpMyAdmin-5.2.2-all-languages
If you’re certain your new phpMyAdmin install is working correctly, you can delete the backup folder as well:
sudo rm -rf /usr/share/phpmyadmin.bakThat’s all! Enjoy your updated phpMyAdmin installation.
Let me know if this helped. Follow me on Twitter, Facebook and YouTube, or 🍊 buy me a smoothie.

Perfect! Thanks for sharing this!
thanks alot, I was about to go back to selling drugs….. but then again it happens with every bump in the way
Thank you! This saved me a lot of grief
I’ve installer Php FPM 7, 7.1 , 7.2, 7.3 but phpmyadmin still uses php5.6 so I can’t upgrad to v5.xx . How can I change the version of php that phpmyadmin uses? Thanks
Is it Nginx? You might need to change your server block to use the PHP7 socket.
This article might be of use: Installing PHP for Nginx
Thank you sir!
If possible suggest to audience to wget to a different directory, maybe home but not /usr/share/phpmyadmin.
Well done. I appreciate this!
Thank you. Sorted out my Raspberry Pi install. Nice easy to follow instructions.
Appreciated.
Thanks a lot for your support!.
Regards!
Small correction is about caps.
On CentOS, phpmyadmin = phpMyAdmin on all folders.
sudo mkdir /var/lib/phpMyAdmin/tmp/
sudo chown -R apache:apache /var/lib/phpMyAdmin/tmp
sudo chmod -R 0755 /var/lib/phpMyAdmin/tmp/
All working great
Many thanks for this. The guide has been tested on Debian distributions but not CentOS.
Thank you so much
Hi, I update to phpmyadmin-5.0.1 in centos 8, but the 2 errors doesn’t disappear… this dir /etc/phpmyadmin/ don’t exist and my server can’t create it..
cd /var/lib/phpmyadmin/tmp/
-bash: cd: /var/lib/phpmyadmin/tmp/: No such file or directory
sudo mkdir /var/lib/phpmyadmin/tmp/
mkdir: cannot create directory ‘/var/lib/phpmyadmin/tmp/’: No such file or directory
what can I do?
I think the default phpMyAdmin directories are different on CentOS. Try searching for the directories.
find / -type d -name 'phpmyadmin'
You may have to manually list some directories until you find
/tmp/and the install directory.Very Well!!!
Thanks, it worked, eh fixed the error
Thank You
You have saved me countless hours. Thank you.
Thank you 🙂
Thank you devanswe.rs!
Honestly, The Best Tutorial about Ubuntu I’ve seen before , Specially for beginners . Thanks for this beginner friendly How To .
muchas gracias por el aporte
Perfect Tut! Thx!
thanks alot, works like a charm
nice,perfect,thank you very much.
the count() error was really frustrating. Thank for great help.
Thanks a lot, works like a charm.
Awesome – thank you!
Very cool. All that red was annoying.