Introduction
This guide has been tested on Ubuntu 22.04 & 20.04 running PHP 8. It may also work for older configurations. If you have any issues, please let me know in the comments.
1. Back up phpMyAdmin
Firstly, if you followed this guide before, make sure to delete the backup directory you created.
sudo rm -rf /usr/share/phpmyadmin.bak
Back up your current phpMyAdmin folder by renaming it.
sudo mv /usr/share/phpmyadmin/ /usr/share/phpmyadmin.bak
Create a new phpMyAdmin folder.
sudo mkdir /usr/share/phpmyadmin/
CD to directory.
cd /usr/share/phpmyadmin/
2. Download and Extract phpMyAdmin
phpMyAdmin 5.2.1 (released Feb 2023) requires PHP 7.2 or newer. To find out your PHP version in command line, run php -v
. If you need to upgrade PHP, see guide: How to Upgrade from PHP 7.x to PHP 8 on Ubuntu.
- For PHP 7.2 or newer, download phpMyAdmin 5.2.1
- For PHP 7.1, download phpMyAdmin 5.1.4
- For PHP 5.5 to PHP 7.4, download phpMyAdmin-4.9.11
Visit the phpMyAdmin download page and look for the .tar.gz URL and download it using wget
. In this guide we are using version 5.2.1, released Feb 2023. If a later version is now available, make sure to change the commands below to match (and let me know in the comments so I can update the guide π).
Download phpMyAdmin.
sudo wget https://files.phpmyadmin.net/phpMyAdmin/5.2.1/phpMyAdmin-5.2.1-all-languages.tar.gz
Now extract.
sudo tar xzf phpMyAdmin-5.2.1-all-languages.tar.gz
Once extracted, list folder.
ls
You should see a new folder phpMyAdmin-5.2.1-all-languages
We want to move the contents of this folder to /usr/share/phpmyadmin
sudo mv phpMyAdmin-5.2.1-all-languages/* /usr/share/phpmyadmin
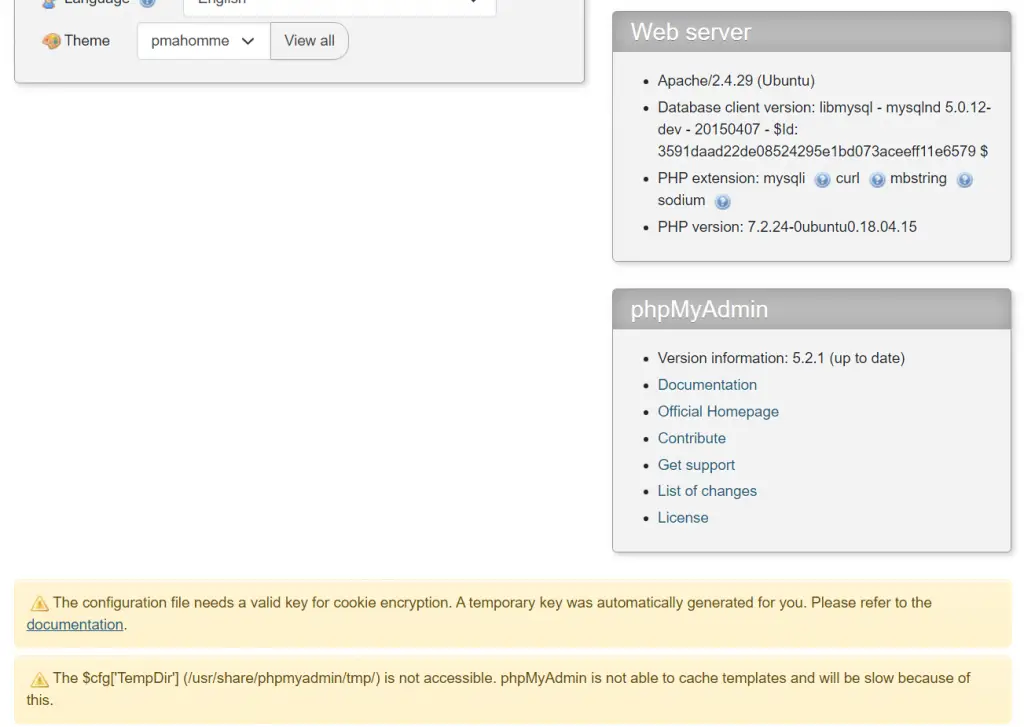
You can now log back into phpMyAdmin and check the current version. You may also see two errors:
3. Fixing phpMyAdmin Errors
3.1. “The configuration file needs a valid key for cookie encryption” error
You may see an error The configuration file needs a valid key for cookie encryption. A temporary key was automatically generated for you. Please refer to the documentation.
You should create a key unique to your phpMyAdmin install.
phpMyAdmin first loads /usr/share/phpmyadmin/libraries/config.default.php
and then overrides those values with anything found in /usr/share/phpmyadmin/config.inc.php
.
Create config.inc.php
.
sudo nano /usr/share/phpmyadmin/config.inc.php
Your file should look something like below. Generate your own 32-character blowfish secret and paste it below.
<?php
// use here a value of your choice 32 chars long
$cfg['blowfish_secret'] = 'PASTE__32__CHAR__BLOWFISH_SECRET';
$i=0;
$i++;
$cfg['Servers'][$i]['auth_type'] = 'cookie';
Save and exit (press CTRL
+ X
, press Y
and then press ENTER
)
Log back into phpMyAdmin and check that the error is gone.
3.2. $cfg[‘TempDir’] (/usr/share/phpmyadmin/tmp/) is not accessible error
If you are seeing an error The $cfg[‘TempDir’] (/usr/share/phpmyadmin/tmp/) is not accessible. phpMyAdmin is not able to cache templates and will be slow because of this.
You need to create this directory and make it writable.
sudo mkdir /usr/share/phpmyadmin/tmp && sudo chmod 777 /usr/share/phpmyadmin/tmp
Log back into phpMyAdmin and check that the error is gone.
4. Cleanup
You can now delete the tar.gz file and the empty folder.
sudo rm /usr/share/phpmyadmin/phpMyAdmin-5.2.1-all-languages.tar.gz
sudo rm -rf /usr/share/phpmyadmin/phpMyAdmin-5.2.1-all-languages
And if you’re certain your new phpMyAdmin install is working correctly you can delete the backup folder.
sudo rm -rf /usr/share/phpmyadmin.bak
Hurrah!
Let me know if this helped. Follow me on Twitter, Facebook and YouTube, or π buy me a smoothie.
The tutorial works like charm thanks
thank u bro its working
Hi, I think than better than giving 777 to the tmp folder, you could change the owner to the apache user (usually www-data) with something like:
sudo chown www-data /usr/share/phpmyadmin/tmp/
I had followed this guide and read your comment afterwards. I agree with you so now I want to change the permissions back to their original/default but do not know what those are? Could you tell me/do you know?
Man, such a beautiful tutorial
Here’s a PHP script to facilitate the above steps.
Please read through it and never run scripts blindly without understanding what they do.
Tutorial worked great, thank you very much !!
Followed your beautifully clear instructions, /usr/share/phpmyadmin directory contains 5.2.1, bak contains the old one.
After reboot, to restart anything necessary, and refreshing the phpMyAdmin web page I still see the old version:
“A newer version of phpMyAdmin is available and you should consider upgrading. The newest version is 5.2.1, released on 2023-02-08.”
Is there another location where the old version might be running from?
Raspberry Pi OS (updated) (Debian-based, like Ubuntu), PHP 7.3, Apache/2.4.54 (Raspbian)
Thanks for this excellent tutorial!!! Worked perfekt!! I wish, all tutorials would be as great as yours!
I followed all the instructions which are beautifully clear, and it all appeared to work – when I look in /usr/share/phpmyadmin I see 5.2.1, and all directories are dated 8/2/2023.
But when I opened phpMyAdmin, I still see “A newer version of phpMyAdmin is available and you should consider upgrading. The newest version is 5.2.1, released on 2023-02-08.”
I restarted apache2 and mysql but that made no difference, so rebooted the server. Reopened the phpMyAdmin webpage but still it shows 5.1.0
I ran a find on phpmyadmin
sudo find / -name phpmyadmin
find: β/run/user/1000/gvfsβ: Permission denied
/etc/phpmyadmin
/usr/share/phpmyadmin
/usr/share/phpmyadmin/vendor/phpmyadmin
/usr/share/dbconfig-common/scripts/phpmyadmin
/usr/share/dbconfig-common/data/phpmyadmin
/usr/share/doc-base/phpmyadmin
/usr/share/doc/phpmyadmin
/usr/share/lintian/overrides/phpmyadmin
/var/www/html/phpMyAdmin/vendor/phpmyadmin
/var/lib/phpmyadmin
/var/lib/mysql/phpmyadmin
I see there’s a file themes.php in phpmyadmin.bak so I did a find on that to see if there’s another copy of the old version elsewhere where it’s being run from, but there’s only that one copy.
It seems to be loading from phpmyadmin.bak, not phpmyadmin
Any suggestions, please?
Thanks
Raspberry Pi running Pi OS, which is, like Ubuntu, a version of Debian, php 7.3.33, Apache/2.4.54 (Raspbian)
Great guide, thanks! 5.2.1 is out, so people can update the commands if needed.
Thanks. Guide updated π
Thanks! It’s working for me.
Tutorial worked great, thank you very much !
thanks a lot for this tutorial. It worked at perfection !
Perfect, thank you! π
Perfect!! F$#*&$ Awesome guide, Thank you!!
Well written and flawless. Thanks
thanks. This worked like a charm.
obrigado… ajudou muito php 8.2
thanks bro very helpful the docs is very helpful keep it up
You are the best!!!!!
merci beaucoup pour ce tutoriel
Thanks
Thanks Bro!
I can’t tell you how long I was searching for this detailed tutorial!!!
Keep it up bro!!!
Thank you, very helpfull and excellent explanations.
Thanks a lot, very easy to follow and excellent explanations!
Thank you for the guide! That was helpful and I think it will help to a lot of newbies like me
Worked 100% with no fuss and no re-trying. Thank you a million times for this clear and concise contribution.
Very clear tutorial!
Thank you for sharing
the only tutorial that actually works! thank yoU!
Thanks a ton
Awesome guide! Thank you
FOR THEOSE WHO has the error “The phpMyAdmin configuration storage is not completely configured” and NOBODY here helped:
ubuntu – log in console server root
and type these comands one by one:
mysql
GRANT ALL PRIVILEGES ON *.* TO ‘you.user.witch.you.use.in.phpmyadmin.log.in.page’@’localhost’ WITH GRANT OPTION;
FLUSH PRIVILEGES;
DONE – it will give permission to user to create the missing tables for the user in cause!
Works like a charm!
Thank you very much.
Outstanding, perfect, thank you.
Great, my latest phpmyadmin working!!!!!!!!11
You’re my hero, thank you! Ubuntu 20.04 and PHP 7.3 (still =P)
Thanx bro, it’s work with me on ubuntu 20.04 php8.0 and php8.1
wonderfull! thanks for your documentation
Thank you for the guidance! It is helpful!
Great, it’s work for me. ubuntu 22.04
Good stuff!
Instead of 777 for the tmp directory, I’d suggest:
sudo chown root:www-data /usr/share/phpmyadmin/tmp
sudo chmod g+rwxs /usr/share/phpmyadmin/tmp
Assuming www-data is the apache system user, and root is the current owner, this adds apache as a the group and gives it permission to create and manage its own files there without giving access to everyone on the system.
Perfect, thank you! π
Great and complete tutorial!!! Congrats!
You’ve saved my life, thanks heaps!
Simply saying thank you, sir!
Hi,
Upgrading worked, thanks for the nice how-to.
Perhaps any idea how I can change my Server charset from cp1252 West European (latin1) to UTF-8 Unicode (utf8mb4)?
Cheers!
Try:
Paste in
Save and exit (press CTRL + X, press Y and then press ENTER)
Restart MySQL
Great. helped
I’ve upgraded and within phpmyadmin it’s showing as 5.2 however when running dpkg -l phpmyadmin is says:
ii phpmyadmin 4:4.6.6-5ubuntu0.5 all MySQL web administration tool
any ideas?
Well, this is why this article exists. The repositories often do not have the latest versions of packages such as phpMyAdmin, so instead we install it manually. In doing this, we bypass
apt
anddpkg
is “dumb” to any version changes. Hope that makes sense?Just came here to say thank you π
Great job!
Hi, Bro
Thanks for your great post! You are the tech God. π
And hope you can keep going for sharing more great posts in future.
I am your Fans.
Best
Hi,
I am very grateful for this description. Everything works fine.
Probably, I cannot count up to 32, because I always got the message ” The secret passphrase in configuration (blowfish_secret) is not the correct length. It should be 32 bytes long.”
Found this entry after I had to realize that php 8.1.7 requires phpmyadmin version 5.2 and higher.
Regards,
Dietmar
Thank you, I was in php8 and phpmyadmin 4.9 with errors, this helped.
wow, Thanks so much. That tutorial not only walked me through the process of installing phpmyadmin but also anticipated error. Thanks so much.
Working perfectly! Thank you very much!
Thank you for dong this HowTo Saves me a lot of Research today π <3
π
This webpage for upgrading phpmyadmin is great!! Thank you.
I also encountered the same issue when installing v.5.2.0.
“The configuration file now needs a secret Passphrase (blowfish_secret).
CONFIG_DIR no longer exists in the vendor_config.php file.
I have not tried what was documented here as mention below by Chris.
https://docs.phpmyadmin.net/en/latest/setup.html#quick-install-1
Also have this new warning: The phpMyAdmin configuration storage is not completely configured, some extended features have been deactivated. Find out why.
Or alternately go to ‘Operations’ tab of any database to set it up there.
Otherwise, it seems to be working fine.
Any updated suggestions would be great….and thanks again.
Thanks for the link, Marty. I have updated the guide on the recommendations from phpMyAdmin.
As for your storage error, I have never seen that before and cannot test for it. There’s plenty of comments about it over on Stackoverflow if your search. Good luck.
Thanks for the quick response on this issue. Worked great.
I’ll check into the other issue on Stackoverflow. Best regards.
Hello! Just tried to install phpMyAdmin 5.2.0 and I have ‘The configuration file now needs a secret passphrase (blowfish_secret)’ error. There is no ‘CONFIG_DIR’ variable in vendor_config.php. What should I do?
Guide has been updated!
I don’t have any mention of CONFIG_DIR in the vendor_config.php file
I’m using php 8.1.5 and phpMyAdmin 5.2.0
Can someone tell me what the new procedure is?
Guide has been updated!
For 5.2.0 CONFIG_DIR is not used so amend the configFile line instead, eg:
‘configFile’ => ‘/etc/phpmyadmin/config.inc.php’,
Taken from phpmyadmin/doc/html/setup.html#quick-install
You may like to add this to your documentation.
Aparently you have to create config.inc.php in directory that contain index.php:-
<?php
// use here a value of your choice at least 32 chars long
$cfg['blowfish_secret'] = '1{dd0`<Q),5XP_:R9UK%%8\"EEcyH#{o';
$i=0;
$i++;
$cfg['Servers'][$i]['auth_type'] = 'cookie';
// if you insist on "root" having no password:
// $cfg['Servers'][$i]['AllowNoPassword'] = true;
Blowfish no longer works in 5.2.0
Any ideas?
Fixed now.
Very usefull and working perfectly fine with all above steps.
Thank you! The best guide!
Change to Raspberry Pi OS 64-Bit with:
Apache2 –> PHP8.1 –> MariaDB –> phpMyAdmin5.1.3
aca te dejo mis dieses
Thank you, you saved my bacon
Thank you! This is the best guide ever.
Thanks it’s all good now ! Good Job
Working very well. Thank you so much.
Thanks!! Very good!
Best guide out there, painless upgrade when following your description!
As requested, I let you know that phpmyadmin is at version 5.1.3 now. Thanks for updating your guide!
And thanks for providing these instructions, much appreciated!
Thanks π
Thank you! God bless you!
This post has always worked flawlessly for me when upgrading. However, I just downloaded 5.2.0-rc1 and it appears that the contents of vendor_config.php have changed. For instance the lines containing ‘TEMP_DIR’ and ‘CONFIG_DIR’ are different and the instructions no longer work. You may want to update the post to include new instructions since the changes will likely be applicable to future official releases.
Correct! There have been some fundamental changes in this new release. I have updated the guide. Let me know if it works ok.
This tutorial worked perfectly for me! Thank you so much.
Leaving a comment, hopefully it’ll help the recommendation of this post throughout the Internet π
Have a nice one.
π
Thank you! Finally working
Great tutorial.. !!
Thank you very much.
Thanks – saved me a ton of research.
thank you so much!
This is a really good tutorial. Thanks a lot
Many thanks! Updated and works and I’m veryyy happy.
What I get is a 404 error. I can see all the files are there so it looks like a permissions issue, had to run CHMOD, CHOWN and create a tmp folder. Works now.
What I get is a 404 error. I can see all the files are there so it looks like a permissions issue
Saved my life, thank you!
Excellent tutorial! Worked perfectly! Thank you!
Thanks!
Great guide! Thanks so much!
Thank you very much! Excellent tutorial!
5.1.1 is now available
and thank you!
π
Thank you very much for your tutorial that helped me a lot. Upgrade from Ubuntu 18 to 20 make a mess, but is sorted
Thank you:
I’ve just followed the instructions and used the latest version 5.1.1 and all is now fixed
I did have to make the changes in the vendor_config.php to remove the warnings.
PRETTY_NAME=”Raspbian GNU/Linux 10 (buster)”
NAME=”Raspbian GNU/Linux”
VERSION_ID=”10″
VERSION=”10 (buster)”
VERSION_CODENAME=buster
Work ! thank you
———————————————————————-
2021 — CentOS 7 and Php 7.4 Phpmyadmin 5.1.1
———————————————————————–
sudo mv /usr/share/phpMyAdmin/ /usr/share/phpMyAdmin.bak
sudo mkdir /usr/share/phpMyAdmin/
cd /usr/share/phpMyAdmin/
sudo tar xzf phpMyAdmin-5.1.1-all-languages.tar.gz
sudo mv phpMyAdmin-5.1.1-all-languages/* /usr/share/phpMyAdmin
sudo mkdir /var/lib/phpMyAdmin/tmp/
sudo chown -R apache:apache /var/lib/phpMyAdmin/tmp
sudo chmod -R 0755 /var/lib/phpMyAdmin/tmp/
sudo nano /usr/share/phpMyAdmin/libraries/vendor_config.php
define(‘TEMP_DIR’, ‘/var/lib/phpMyAdmin/tmp/’);
define(‘CONFIG_DIR’, ‘/etc/phpMyAdmin/’);
Save
Flawless! Thanks.
Awesome – Thank You
It’s Still working on Ubuntu 16.04.7 LTS
I installed phpMyAdmin 4.9.7
Excellent article, Thank you.
If anyone found some error after doing every step in this article, you may found a message like “The phpMyAdmin configuration storage is not completely configured, some extended features have been deactivated. Find out why. Or alternately go to ‘Operations’ tab of any database to set it up there.”
Don’t panic, first, you should log in as root and scroll down to found the message that I mentioned and then click find out why and click create a database for configuration like something like that, and waiting for creating some table, it shows OK, finally, you can use phpMyAdmin normally. π
Thanks. All worked.
Awsome!
This worked out like good for PHP 8.0.5 May – 2021
Thanks.
Awesome, this worked for me. Thank you!
Excelent thanks!
Excelent tutorial thanks!
bro, you are really save my time.. running flawlesly, thanks a lot.. I was implement it on my dev and production server..
Excellent instruction – works perfect on a Pi!
Awesome instructions, thanks.
I particulary like the way you give us both the exact syntax and a clear explanation about what we’re doing.
EXCELLENT, yes all in caps. It worked perfectly. Thank you so much
Thanks so much! Worked flawlessly.
Afte I make all the steps , I got connection refused to all my users
LIFE SAVER !!!!
Thank you a lot :+1:
Thank you so so much, you are a life saver and I wish you all the best π
I never comment on stuff I read, but damn! Thanks dude.
Thank you, works every time!
OMG! Thank you so much for this, i can finally use phpmyadmin!
this works amazingly every time. thank you very much!
You should also consider to delete the default setup UI, it is a security risk.
Just delete the directory: /usr/share/phpmyadmin/setup/
There is a new version of phpmyadmin (5.1.0) released on 2021-02-24 π
Thankin you. π
Thanks a lot, it worked perfectly for me!
Thank you very much for that tutorial!
This is the first How-To I have followed to the letter that worked the first time in a long time! Thank you for the effort.
Fantastic. Did the job perfectly.
Fantastic instructions!
Thanks very much – worked a treat on Raspberry Pi OS (Buster).
upgrade process worked great, been fighting this for a while, and you saved me! well done!
Muchas gracias por el turorial!!
Funcionou perfeitamente
aqui o phpmyadmin nem carrega mais
just perfect
And really well detailed! Great Job
Awesome.
Worked and works like a charm.
Efficient tutorial.
JUST AWESOME OMG THANKS. ahah, sorry.
Thanks a lot!
That is a great tutorial. But in my case when trying to open phpMyAdmin, it gave me a Permission denier error. So I had to run chmod 777 /var/lib/php/session/ then it worked.
Very good. Thank you very much!
error
The $cfg[‘TempDir’] (/usr/share/phpmyadmin/tmp/) is not accessible. phpMyAdmin is not able to cache templates and will be slow because of this.
Very nice guide! Thanks a lot!
Kudos and greetings from Germany!
This is the best tutorial ever I’ve followed online.
Thanks for the clear explaination..
Some Kudo’s for you!
Thanks a lot. This is great and life-saving for me.
Great walkthrough, thanks!
Thank you
This is just brilliant!
Thank you soo much.
Awesome! Case does matter though in centos it’s /usr/share/phpMyAdmin/
Worked all great! Thanks.
Thanks. Worked perfectly once I found MY typo!
Followed all steps and now phpmydamin just opens to a blank page. Rebooting made no difference.
Resolved – it was a typo
Awesome tutorial!
Thank you so much!
I had some trouble, but after copying the old “config.inc.php” over, everything runs perfect.
Great Tutorial ! I don’t know what exactly happened but after closely following the instructions to install phpmyadmin I get the infamous 4O4 ERROR – URL not found on this server. Every other thing worked as per the instructions.
Thanks for the awesome tutorial
New Version of phpMyAdmin π
Thanks for this complete tutorial ^^
Updated π
There is again a new version (5.0.4) ^^
Updated, thanks.
Great article. Very professionnal. Thanks.
Hello, I have a question, I really don’t know if you can help me, but if you do, I would appreciate it too much! The problem is the following: I have a VPS, in it I put the Phpmyadmin, mysql, etc …, I also installed the OGP (Open Game Panel), the fact is that when I create the database of one of my server games, everything is fine, it connects well and everything, but when I enter the game and try to register, it does not let me, I get that the account “supposedly already exists”, but in reality it does not exist, a table must be created in the table ” users ” with the user’s data, but it is not like that, I get that error, if you could help me I would appreciate it, I know it does not have much to do with what you published, but I am new to this and I do not know how to fix it .
Postscript: It is not the game, since the game is called “SAMP” (San Andreas MultiPlayer) and actually in other VPS if it works well, but not in mine, then the problem must be with MySQL or PhpMyAdmin, but I really don’t know.
Thank you you saved my installation and my life.
Great tutorial – Thank you !
very good
nice job bro
One problem with 5.0.2 was I had no tmp directory under /var/lib/phpMyAdmin (it is phpMyAdmin not phpmyadmin). Created the tmp directory, changed ownership as apache:apache, made sure it had write permissions. Had to restart httpd for these config changes. Then errors went away.
When I set tmp pointer, site stopped working (did not exist – I did not confirm first).
Centos7
5.5.65-MariaDB – MariaDB Serve
Apache/2.4.6 (CentOS) PHP/7.3.22
phpMyAdmin: 5.0.2
Great. I hate it when they keep updating shit so fast, and compatibility errors start occurring, but I love it when guys like you give us an simple fix.
Perfect Article! Thank you mate π
Thank you! Perfecto!
Perfection, the smoothest process I have ever experienced. Well done on this tutorial.
Thank you so much for this AWESOME tutorial! Every step was worked perfectly.
wow, just fantastic steps, every step was described, even how to save and exit editor in linus, Thank you
Good tutorial
This is one of the best support pages I have experienced in my entire coding life span. I am 80 years old, I started learning how to code 5 years ago and in my humble opinion it is not easy, however it becomes easier to understand each day I continue to learn. This particular page was extremely helpful with your detailed and specific instructions/guidelines. They (instructions/guidelines) were easy to understand and follow, I did not have to go to another page to get explanations for anything. THANKS, I really like your style.
T.R.E.B.
Thanks for the comment. Never too old to code! π
Great post!
Thank you so much!
Unfortunately your tutorial seems to have made things worse, with an error coming up:
Error during session start; please check your PHP and/or webserver log file and configure your PHP installation properly. Also ensure that cookies are enabled in your browser.
session_write_close(): write failed: No space left on device (28)
session_write_close(): Failed to write session data (files). Please verify that the current setting of session.save_path is correct (/var/lib/php/sessions)
If anyone has any answers, then would be much appreciated!
What disitrubtion of Linux are you using and version?
i always look at digitalocean for good tutorial for this kind of job. now i found another one.
truly thanks
Thanks!!!
Works on Ubuntu 18.04 php7.2 and phpmyadmin 5.0.2
Muchas Gracias el phpmyadmin me tenia sufriendo y no sabia porque era pero gracias a tu
pagina lo pude soluciona un saludo esta muy completa la explicacion.
Hola realice los camnios y todo funciono perfecto, pero Edite vendor_config.php y dejo de funcionar y ya no puedo hacer inicio en phpmyadmin.
Que puedo hacer para corregir.
gracias
Thanks. Works on Ubuntu 18.04 php7.2 and phpmyadmin 5.0.2
Thank you so much. It works like a charm!!!
Thank you very much.
This tutorial is very helpful with all the details and commands we need to fix the problem.
Hello .. I am Using Google Cloud..I Just Updated Php Version to 7.3 and followed your process but after doing that when i try to log in phpmyadmin it says..PHP 7.1.3+ is required.
Currently installed version is: 7.0.33-0+deb9u7….But When i check through SSH It says 7.3 ..Please Help what to do..
You may have updated the CLI PHP version that runs in command line only. Ensure you have also updated PHP for Apache or Nginx.
To find out which PHP version the web server is using, create a new PHP file in your document root called
info.php
with the following:Load that in the browser and it will report which PHP version you are using.
thank you!
thanks a lot, it works
Thank you so much !!
Wonder Full, hardly a 5 min job. Thanks A TON!
This is perfect! But if you’re running NGINX or Apache2 and you assign these services to a user, you’ll need to change the ownership of /var/lib/phpmyadmin/tmp && /var/lib/phpmyadmin/blowfish_secret.inc.php && /var/lib/phpmyadmin/config.inc.php to your user.
Where user == Your User Name
Perfect Tutorial!
Upgraded in a couple of minutes.
Thanks!
A solução mais simples e rÑpida que encontrei até agora. Parabéns.
E, para quem se interessar e tiver o mesmo problema, utilizao Ubuntu 18.04 em WSL (Windows 10 Home), PHP 7.4, Apache2 e Mysql.
Muito obrigado e sucesso!
Receba um abraço deste brasileiro.
Luiz Vidaum
SΓ£o Paulo/Brasil
Perfect tutorial. I have upgraded in 2 minutes. No issues at all. I didnt get that blowfish warning too.
Fantastic. Thanks you very nuch
Uhll! I think I’m close! 90% of my bugs disappeard. The only issue (new one) is “Failed to read configuration file!”
define('CONFIG_FILE', '/etc/phpmyadmin/');
I was trying to find a solution before reaching you. The problem is that there is a message “This usually means there is a syntax error in it, please check any errors shown below.”, but the field bellow is empty. Any idea what could be? Thx in advance.
Hi, after doing everything you told me to do, I still got the exact same two errors… can you help me?
Can you copy and paste me the information under “Web server” and “phpMyAdmin” on this page?
GΓ©nial…bravo et merci…
Djimel
Fantastic!
Very good! Thanks man…
Great!! Thank you…
Hi sorry for this, everything works and I can clearly see the latest 5.0.2 version, but I have the issue that if I run “apt update” it tells me that my installed version is 4.6.6 and fails to upgrade to the proposed 4.9.5. Is there a way to fix my apt in a way that it will understand that my version is now 5.0.2? many thanks
Yes, I have exactly the same issues here. After manually updating PMA to 5.0.4 I was surprised to see that it was downgraded to 4.6.6deb5ubuntu0.5 again.
There is a new update that overwrites /usr/share/phpmyadmin
https://ubuntu.pkgs.org/18.04/ubuntu-updates-universe-arm64/phpmyadmin_4.6.6-5ubuntu0.5_all.deb.html
2020-11-17 – Mike Salvatore
phpmyadmin (4:4.6.6-5ubuntu0.5) bionic-security; urgency=medium
thank you so much!
hello i have this error which is displayed at the bottom of my page how to fix it please
$cfg[‘TempDir’] (/var/lib/phpmyadmin/temp/) is not accessible. phpMyAdmin is unable to cache models and therefore will be slow.
The directory is /tmp, not /temp.
Thanks you very mush!
thanks!
It worked like a charm! Many thanks. Great post and great site!
Superb – you anticipated all the hiccups I would find. I never had to look anywhere else for once! lol
Thanks mate.
Hello… Many thanks for this, it help perfectly. Very good job.
Perfect! Thanks for sharing this!
thanks alot, I was about to go back to selling drugs….. but then again it happens with every bump in the way
Thank you! This saved me a lot of grief
I’ve installer Php FPM 7, 7.1 , 7.2, 7.3 but phpmyadmin still uses php5.6 so I can’t upgrad to v5.xx . How can I change the version of php that phpmyadmin uses? Thanks
Is it Nginx? You might need to change your server block to use the PHP7 socket.
This article might be of use: Installing PHP for Nginx
Thank you sir!
If possible suggest to audience to wget to a different directory, maybe home but not /usr/share/phpmyadmin.
Well done. I appreciate this!
Thank you. Sorted out my Raspberry Pi install. Nice easy to follow instructions.
Appreciated.
Thanks a lot for your support!.
Regards!
Small correction is about caps.
On CentOS, phpmyadmin = phpMyAdmin on all folders.
sudo mkdir /var/lib/phpMyAdmin/tmp/
sudo chown -R apache:apache /var/lib/phpMyAdmin/tmp
sudo chmod -R 0755 /var/lib/phpMyAdmin/tmp/
All working great
Many thanks for this. The guide has been tested on Debian distributions but not CentOS.
Thank you so much
Hi, I update to phpmyadmin-5.0.1 in centos 8, but the 2 errors doesn’t disappear… this dir /etc/phpmyadmin/ don’t exist and my server can’t create it..
cd /var/lib/phpmyadmin/tmp/
-bash: cd: /var/lib/phpmyadmin/tmp/: No such file or directory
sudo mkdir /var/lib/phpmyadmin/tmp/
mkdir: cannot create directory ‘/var/lib/phpmyadmin/tmp/’: No such file or directory
what can I do?
I think the default phpMyAdmin directories are different on CentOS. Try searching for the directories.
find / -type d -name 'phpmyadmin'
You may have to manually list some directories until you find
/tmp/
and the install directory.Very Well!!!
Thanks, it worked, eh fixed the error
Thank You
You have saved me countless hours. Thank you.
Thank you π
Thank you devanswe.rs!
Honestly, The Best Tutorial about Ubuntu I’ve seen before , Specially for beginners . Thanks for this beginner friendly How To .
muchas gracias por el aporte
Perfect Tut! Thx!
thanks alot, works like a charm
niceοΌperfectοΌthank you very much.
the count() error was really frustrating. Thank for great help.
Thanks a lot, works like a charm.
Awesome – thank you!
Very cool. All that red was annoying.
Thank you. Works great! And for the all lazy men as myself you can use something like this bash script for automatic upgading to latest version:
Good idea. Thanks!
sed -ri βs/(.)TEMP_DIR(.)/define(βTEMP_DIRβ, β\/var\/lib\/phpmyadmin\/tmp\/β)\;/gβ
-bash: syntax error near unexpected token `(‘
Great tutorial, works like a charm! Thanks for the help!
it works like a charm,
thanks.
very Helpful
thank you so much π
Version 4.9.4 is now available π
Thanks
Great tutorial but version 4.9.3 is now available.
Thanks.
Great! Working!!
Great Tutorial !!! Thank you, Works flawlessly and saved me a lot of work
Hey, that was an absolute piece of cake! Worked great exactly as following your instructions. I have my own server i performed these instructions on. Thanks so much.
Awesome job. Many people would give a solution like this without the step-by-step commands required (since they’re mostly simple), but you went that extra mile and it makes things just that much easier. This method of upgrading phpmyadmin worked perfectly – thanks!
Spot on flawless instructions. Thanks!
Thanks!
phpMyadmin upgraded to 4.9.2.
Tutorial continues to work perfectly.
Thanks a lot !!! It works perfectly sir
Hi – looks like version 4.9.2 is now available – thanks for this guide! I plan to use it this week!
Thanks. Updated.
Genial
Funciona Perfecto
Awesome.. Solved my issue in a jiffy.. Thanks a ton for this guide π
Perfect!!!
Concise!!!!
Works Great The First Time!!!
Didn’t cause any additional errors or issues!!!!!
Thanks!!!!
Clearly Well Explained. Thank you very much.
Thanks worked perfect on my Raspberry 4 w/Debian Buster.
Do I need to say more than has already been said below – a great and very worthy resource, thank you.
Many thanks indeed
Nice, it works for me. Thank you so much!
Great Job ! Clear and efficient. Thx π
Really easy and clearly explained. Great job ! Thanks for this !
Easy ! Super ! Thanks a lot !
I never read such an easy and clear description! Thanks a lot! Frank
Hello
After i did the above I get a 403 in the browser π Any ideas?
Wow great tutorial, helped a lot, clear and concise
bookmarked… thanks!
Absolute Legend!! Thank you for this!
Anything that ends with “hurrah” gets my vote. Problem sorted. Ta.
Wonderful. I clean case of “damn, wonder if anyone else has… google … working solution”.
Extra good to cover those possible errors and explain them. Saved me time and was educating too. Thanks!
I works like a charm! Thanks alot!
You’re awesome, as usual. Enjoy the good karma, and ty for taking the time, it is appreciated.
nice work ! it works without issues thank you very much
worked like a charm ubuntu18 and deleted the error, nice leave a reply section also.
Worked perfectly with Ubuntu 19.04 and phpMyAdmin 4.9.1. Thank you.
thank you! …. now is ok!
Simply, the best tut!!!
Thanks! That helped me learning things!
You deserve a hurrah for creating a simple direct useful answer.
Fantastic. Worked exactly as described. Was able to update from 4.6.6.5 to 4.9.0.1 on Ubuntu 18.04 LTS.
Works flawlessly. This is by far the best article on this topic! Thank you
Peope were looking for this solution on other websites, a lot of wrong or temporary answers that leads to other errors, but this article… Awesome, thanks!
Oh and, I needed to update it to the latest alpha version.
Nice! Thank’s bro! =]
Glad i made a backup.
the new phpmyadmin is only giving me a white screen (even tried copying the config.sample.inc.php did not help)
so change the dir to phpmyadmin.new and renamed the backup folder back to phpmyadmin
but with the old one i also had a blowfish error
this define(‘CONFIG_DIR’, ‘/etc/phpmyadmin/’); is giving an error 500 when changed in the vendor config file
Thanks for this.
Do you also have a solution where, once logged out, you can’t immidiately log-in again? I have to wait some time like an hour or so. I can’t find a good solution for that.
Thanks!
found it on your site
Thank you!
Perfect, Thanks. Works on Raspi!!!
Thanks
This runs!
Exactly well done.
Thank you,
this is really helpful and clear. I appreciate the clean-up part π
PERFECT! Thank you so much – it solved my problem.
Amazing!!! Thank you soo much. Very clear and easy to follow.
This was excellent – clearly written and bang up to date and all worked smoothly and well. Thank you so much!
Everything is perfect, thank you very much !
Thank you very much! not one hicup!
GOD THANK YOU
Thanks a lot for the time you spent helping us!
THANK YOU!! I have seen and tried to follow so many TUT’s, and too often they’re missing some final step, or outdated, or just not helpful. Within minutes my annoying MYSQL server has morphed into an error free and comfortable environment in which we can work.
Really, excellent job!
Thanks, worked without a hitch on a Linode Ubuntu.
This worked like a charm, thanks!
I encountered multiple errors after installing the default PhpMyAdmin version 4.6.6.deb5 that came with my Ubuntu 18.04 distribution. Your guide solved them all in one fell swoop. Excellent instructions and many thanks!
It would have been absolutely possible to figure that out, but this fine turn-by-turn manual sped up the whole operation in the most pleasant way.
T H A N K _ Y O U very much
Clear, precise, and extremely useful. Great work!
How to automate this on a simple script:
$ nano phpmyadmin_update.sh
For future reference, this is the updated script to download the last stable version of PHPMyAdmin:
`echo
echo “Backing up”
mv /usr/share/phpmyadmin/ /usr/share/phpmyadmin.bak
echo “Getting lastest PHPMyAdmin version…”
mkdir -p /usr/share/phpmyadmin/
cd /usr/share/phpmyadmin/
wget https://www.phpmyadmin.net/downloads/phpMyAdmin-latest-all-languages.tar.gz
tar xzf phpMyAdmin-latest-all-languages.tar.gz
mv phpMyAdmin-/ /usr/share/phpmyadmin
echo “Updating vendor_config”
sed -i -r “s/(‘TEMP_DIR’\s,)[^)]/\1 ‘\/var\/lib\/phpmyadmin\/tmp\/’/” /usr/share/phpmyadmin/libraries/vendor_config.php
sed -i -r “s/(‘CONFIG_DIR’\s,)[^)]/\1 ‘\/etc\/phpmyadmin\/’/” /usr/share/phpmyadmin/libraries/vendor_config.php
echo “Cleaning up…”
rm /usr/share/phpmyadmin/phpMyAdmin-latest-all-languages.tar.gz
rm -rf /usr/share/phpmyadmin/phpMyAdmin-*
rm -rf /usr/share/phpmyadmin.bak
echo “Done!”
echo
`
Best Tutorial I’ve ever seen before !
Thanks for the good and comprehensive Explanation π
Muchas gracias!!!
thanke you so much
thank you very match brada π
Gracias, funciono perfecto.
thank’s a lot … it works perfectly !
great post!! congratulations!!
thank you very much
phpMyAdmin 4.9.0.1 is now available π
Thank you. Guide updated π
Works smoothly! Thanks!
Thank you. Worked perfectly.
It didn’t work for me.
Getting this work
The $cfg[‘TempDir’] (./tmp/) is not accessible. phpMyAdmin is not able to cache templates and will be slow because of this.
This was happening to me too. I figured out it was a permissions problem. Here’s what solved it for me, use at your own risk (make sure not to include the $, it just shows the line is a command):
$ cd /var/lib/phpmyadmin
$ sudo chmod 775 tmp
wonderful!
Thank you. Worked perfectly.
It works. Thank you very much for detailed instruction. π
This really helped me out. I was struggling with this issue for hours. Thanks
Perfect solution! Thanks! You might mention that, for Steps 2 and 4, the substring “all-languages” can be replaced with “english” in any command with that substring. The installation will then be a bit lighter, without the several MB of language files that are not needed when it’s known that only the English interface will be used.
Thanks. it. Works for me.
Thank you! Works like a charm!
You are awesome! Thank you!
Works like charm. Thanks buddy
Thanks, perfect!…. Valeu …..
Excelente, me funciono completamente, muchas gracias!!!!!
Worked like a charm, thank you very much!
Yus!
Thanks, perfect!
Thanks, perfect!
Thank you DevAnswers! π
π€
Works a treat π Thanks!
Merci, thanks a lot for your perfect tutorial
works perfectly on ubuntu 18.10.
It seems that the phpmyadmin package on ubuntu isn’t tested before it released on apt.
Yet another reason for me to move to Arch..
It works perfectly well. Kind regards.
Worked great! For some reason the copy past of the wget command did not work. I had to copy the URL from the website to download it. Same version you used though.
Thanks!
Thank you. Excellent post.
Thanks!!
Works perfectly, thanks so much!
Great !
Excelente Gracias……
These are some of the most complete instructions I have ever read. They worked perfectly.
It was annoying and now it’s all perfectly working.
You are the champ
Thanks
Impeccable, merci !
El mensaje ya lo tengo solucionado.
Thank you so muuuuuuch
very easy to apply, works like a charm on Ubuntu 18.04.1 LTS
Great man Thanks!
Excellent tutorial, you saved me from a ton of errors!!!
You save me man! kkkkkkkkkkkkk Thank you so mach.
Todo el tutorial ha funcionado muy bien ; pero tengo este mensaje:
El almacenamiento de la configuraciΓ³n de phpMyAdmin ha sido desactivado.
the error still exists.
Brilliant, zero errors. Thanks man
Awesome!
Hola muchas Gracias !!!
Perfect! This works like a freakin’ charm.
Juste 2 mots : PARFAIT et MERCI !!!!!!!
Straight to the point, worked perfectly. Thank you!
Great tutorial, worked a treat. Thanks.
Excellent, clair, concis et prΓ©cis
Awesome Post! Worked Perfectly!
You solved the problem.
Thank you.
Great job!
Zero error, the perfection…
Congrats and thank you!
TKS!!!!!!!!!!!!!
Thank you!!
Thank you very much for this excellent article.
An absolutely perfect article. Very easy to follow and works flawlessly.
Perfect tutorial! Thx
Thank you very much!
It was easy to follow, clean, and it corrected the problem.
Save my time!!!!
Shame that we need this overkill approach these days, but hey, thumbs up bro’
Very well, for my part, step 3 is not to do it is she who created the problems. so I cancel the 3.
Ubunut Budgi 18.04.2 LTS
Thanks a lot for this clear and excellent tutorial ! π
Yes! worked perfectly. Thanks!
Easy, thanks to you buddy
Wow! Clear and accurate steps. This is the best resource ever!!
Thanks a lot!! worked!!
easy easy, Thanks a lot!!
Excelente guia! Todo funciona perfecto. Muchas gracias
That was so easy! Thanks dude!
Thanks a lot. Solved it!
So nice when every single step works. Thank you!
Thank you bro!
I get an error about blowfish.
The secret passphrase in configuration (blowfish_secret) is too short
Open the file
/var/lib/phpmyadmin/blowfish_secret.inc.php
Search for
blowfish_secret
and generate a random string at least 40 chars long.$cfg['blowfish_secret'] = 'your_long_string';
Save and exit.
Very very thx!!!
Perfeito! deu tudo certo. Obrigada:)
Thanks.
Just for future visitors, to me it said newer version is 4.8.5 at current date.
I did the same operations using 4.8.5 instead of 4.8.4 and it worked like a charm.
Thanks for your help really!
Brilliant! now I can use my localhost properly again.
Excellent, works perfect
Thank you. worked finally
Thanks bro!
thanks man… love you
The best guide. I like the step by step as I’m noob in this server setting.
My PHPMyAdmin is working now! Yeay! Thanks a lot!
Great!!!
Possibly the best explanation guide I’ve seen in my life, great.
Accurate, simple and straight to the point. This is how every guide should be done. A very good job, mate! Thanks a lot!
Thanks for this guide! Now I can do the next step, upgrading PHP to 7.2/7.3 on Debian 9!
Genial: Ha funcionado de maravilla y sin ningΓΊn error. Eres un artista.
Muchas GRACIAS. Saludos
gracias eso fue de mucha ayuda
Perfect guide!
Thanks
Fantastic, worked great.
Great, Thanks
Nice guide!
thanks for work.
i hav got a warning after proccess this guide:
” Auf das $cfg[‘TempDir’] (./var/lib/phpmyadmin/tmp/) kann nicht zugegriffen werden.”
=> access denied.
But i hav chown usr “www-data” & grp “www-data”.
Fantastic guide!
It worked like a charm – thank you! π
Worked perfectly, thanks!!
Worked like a champ. Excellent directions. This is Jan 1, 2019 and they still haven’t updated the repositories! Thanks for putting this together.
Still? It’s no wonder this article is pulling so much traffic. π
Perfect !!
Thanks
Worked perfectly π
super tuto.
merci, thanks you
Just what I needed. Thank you very much.
Excellent post! Very well explained, and gets the job done efficiently. Thanks ^_^
Great post, works perfectly and exactly what I was looking for! Thank you!
Wieder mal alles bestens…
Vielen Dank!
Hello. This worked perfectly. Thank you for posting this, it’s the only real answer to this that I’ve been able to find.
it works !!! thanks !!
Thx worked nicely but is still get :
The secret passphrase in configuration (blowfish_secret) is too short.
Any tips?
You probably missed the second edit :
where he changes:
define(‘CONFIG_DIR’, ‘ ‘);
to:
define(‘CONFIG_DIR’, ‘/etc/phpmyadmin/’);
Check the Comments above.. has a solution for that as well.. Worked like a Charm..
Superbly done !
Thx, working also 4.8.4
Stilll working for phpmyadmin 4.8.4
Excelente Funciono Gracias.
De lujo, Gracias
funcionΓ³ perfecto
A big thanks for this detailed guide, worked like a charm !
best guide to solve the problems! thank you very much!
Awesome thank you for this solution , kudos to you sir
this worked perfectly thanks heaps
Thanks for publishing a really clear and concise procedure. I’m a fan!
π
Π‘ΠΏΠ°ΡΠΈΠ±ΠΎ!
Thanks, It worked like a charm π
Thank you .=)
Thank you, works very well!
Danke!
Big Thank You
Perfecto, Gracias!!!!
Awesome… perfect first time.
thanks buddy, it worked, less than a minute
Clear, concise & accurate instructions.
Great use of the command line and a ‘workflow’ process.
And it worked π
thank you
I did reinstall mysql and phpmyadmin multiple times in my raspberry pi ubuntu 18.04 server. phpmyadmin still had issues, but this manual totally helped. Many thanks
oHHHH SO GOOD, THANKS A LOT WORKS!
thanks a lot works great π
Very neat explanation.. thank you!
Excellent! Thank you!
Excellent tutorial!! Thank you!!
Worked!
Thank you!!! Hero level. Direct, to the point, and top of search results. BRAVO.
Bravo!
Impeccable work, big thanks!
Thank you, sir!! Very helpful
thaks a lot man u r legend
sank you for tutorial. really great work!
Thank you very much
Thank you for helping me resolved issue.
Spot on. Thanks for the help!
perfect. thanks.
clean, understandable and perfectly
Perfecto
Fantastic thanks
great- Thank you
it fix the issue
Thank you!
Thank you very much
Duuuuuude….[Chandler voice], you are awesome!
Thank you
Perfect! <3
awesome… thanks alot
Wow, thank you so much. I am error free!
Thank you, now there is no error. Mantaff
Perfect! Thank you
Works like a charm, thank you a lot!
Many thanks! No more errors! It works!
After a few months of aggravating error messages you solved the problem! This worked just as you said and is wonderful!!!!!! Can’t thank you enough.
Thank you very much, it worked well for me.
Linux Mint 19
hello,
please help, i have mysql 8, php 7.2.7
i installed phpmyadmin 4.6.6 and i had this errors, so i upgraded to 4.8.3 like you did but the errors still exists.
please help
The phpMyAd*min configuration storage is not completely configured,
some extended features have been deactivated. Find out why. Or
alternately go to ‘Operations’ tab of any database to set it up
there. Open new phpMyAdmin window.
mysqli_real_connect(): (HY000/1045): Access denied for user
‘phpmyadmin’@’localhost’ (using password: YES).
Connection for controluser as defined in your configuration failed.*
Extra fine, Thanks (Merci beaucoup)
all worked very well and very easy
work like a charm.
finally i can sleep tonight π
Thx a lot.
Worked perfectly! Thank you very much for solving my problem!!
Thanks, excellent. Just a problem : the automatically generated blowfish secret phrase was too short : 24 chars, yet 32 needed. Modified in var/lib/phpmyadmin/blowfish_secret.inc.php (Raspbian)
grt, worked for me am on ubuntu 18.04
Fixed. This is how tutorials should be. Thank you.
Excellent tutorial! Simple straightforward steps π
thank you very much
I have read tens of guides for Linux and no one was so simple and useful. I’d want to all guides was like this. Thank you.
(sorry for my English, i’m not a native speaker)
Thanks for the comment π
Awesome! This was extremely easy to do and it fixed my problem!
Thank you! it worked! π
Thanks a lot, it worked perfectly!
Works perfect! Thank you so much!
Super! Straight to the point, clear tutorial… Worked like a charm!
Perfect, worked flawlessly, thanks.
Thanks. Worked without any error message.
Thank You! This article resolve my problem!
Excellent! A great help! Thx!
Very thorough tutorial with a successful outcome for me. BOOKMARKED!
Thanks very much all working fine now.
Thank you ! Excellent tuto :o)
Thank you, i really appreciate your tutorial. The errors have been bugging me for a while, now all is fixed. Best regards and keep up the good work.
Within the created DIR
"/usr/share/phpmyadmin"
is a file calles “config.sample.inc.php”.Open it, add a 32char alphanumeric string as value of “cfg[blowfish_secret]” and safe it as “config.inc.php”.
While in the editing of
"/usr/share/phpmyadmin/libraries/vendor_config.php"
DO NOT replace
"define('CONFIG_DIR', '');"
by"define('CONFIG_DIR', '/etc/phpmyadmin/');"
.Instead take the path to the just altered “config.inc.php”. Take care, (maybe) because of the updating-process, there are minimum 2 other “config.inc.php” on your system under
1) “/var/lib/phpmyadmin” (is empty)
2) “/etc/phpmyadmin/” which will load the “blowfish”-file from “/var/lib/phpmyadmin”.
In my case it was just possible to satisfy the error-message when pointing to “/usr/share/phpmyadmin/config.inc.php” with filled “blowfish_secret” as “CONFIG_DIR”.
Finally, thank you very much for this guide.
Why not just set
define('CONFIG_DIR', '/etc/phpmyadmin/');
?This gets rid of the blowfish error.
Hello,
It was working till yesterday, Now i cant find config.inc.php and setting up blowfish_secret in this blog
There is an easier method to get rid of that error. Open
/usr/share/phpmyadmin/libraries/vendor_config.php
, search forCONFIG_DIR
and change it to:define('CONFIG_DIR', '/etc/phpmyadmin/');
A quicker fix for the blowfish_secret :
sudo nano /usr/share/phpmyadmin/libraries/vendor_config.php
Press CTRL + W and search for CONFIG_DIR
Change line to:
define(‘CONFIG_DIR’, ‘/etc/phpmyadmin/’);
Thanks for the tip, Dimitar. Post updated.
Thank you for this article, very clear.
Wonderful straight forward, easy to follow write up. Very well done. And most importantly, thank you for posting this tip to fix this issue for Ubuntu 18.04 users! (Not that it matters as it’s the same Ubuntu as in pure Linux, but implemented this fix in Windows Subsystem for Linux – Ubuntu 18.04)
Many thanks for the kind words.
π
sir im new to this why is it after following this steps my localhost/phpmyadmin/ is blank page now?
All I can recommend is that you restore your backup.
sudo mv /usr/share/phpmyadmin/ /usr/share/phpmyadmin.del
sudo mv /usr/share/phpmyadmin.bak/ /usr/share/phpmyadmin
Check that phpMyAdmin is working again.
Perfect tutorial many thx
Glad it helped π
thank u so much
You’re welcome!
Thank you!
Works like a charm π
ππ
Thanks!
π
Thank you
No probs!
works Fine For Me π
π
Thank you very much for this accurate tutorial. Everything works fine.
Have a nice day.
Glad it helped π
Yo realice todos los pasos pero me dejo un warning que dice
El archivo de configuraciΓ³n ahora necesita una frase secreta (blowfish_secret).
Buscando como arreglaro, edite el archivo config.default.php y en la linea $cfg[‘blowfish_secret’]=’ColocarValorAleatorio’
QUEDANDO DE ESTA FORMA
$cfg[‘blowfish_secret’] = ‘a0sfo49nadf89fa3s8f789sf78asb7p1587balz’
segun esto se tiene que colocar un valor aleatorio, no se si sea correcto esto, sin embargo a mi me funciono.
NOTA: para buscar la ubicacion del archivo
sudo find / -name config.default.php
Gracias por la respuesta.
Sort out my issue. God bless you.
π
Thanks for the tutorial, it helped me a lot.
π
Thanks, nice tutorial! It’s works.
Great!
in my vps server, i havenot found phpmyadmin in usr/share path..could anyone please help