Introduction
Kali Linux is a specialized Linux distribution for ethical hacking, penetration testing, and digital forensics. A Kali Linux Live USB lets you run Kali on almost any computer without permanent installation.
This guide shows how to build a Kali Linux Live USB that can save changes between sessions (persistence), plus optional LUKS encryption for extra security.
Recommended USB Drive & Persistence Size
- Capacity: For basic use, 8–16GB is often enough. If you plan to store larger files or use more tools, aim for 32GB+.
- Persistence Partition: If you want a large persistence partition (e.g., 16GB+), ensure your USB has enough space for both the Live image and that partition.
- Performance: Huge partitions can slow down read/write speeds on older USBs. Encryption also adds overhead—larger partitions take longer to format and open.
- Optional Extra Partition: You could leave space for a FAT/NTFS partition if you need cross-platform file sharing.
1. Download Kali Linux ISO
Grab the latest Kali Linux Live ISO from the official Kali website. Choose the correct architecture for your system:
- x86_64 (Intel/AMD) for most PCs and older Intel Macs
- Apple Silicon (ARM64) for M1/M2 Macs
For stability, use the “Point Release Live Image” (e.g., Kali 2024.4). Weekly images are more up-to-date but less tested. If possible, use torrents for faster downloads.
Optional (Recommended): Verify the ISO
Because Kali is a security-focused distribution, it’s good practice to verify the downloaded ISO. Check the official Kali docs for details on validating checksums or GPG signatures to ensure the image hasn’t been tampered with.
2. Create a Kali Live USB
After downloading the Kali Linux ISO (and optionally verifying it), the next step is to write it to a USB drive. This creates a bootable “Live” environment that you can run on most PCs or Macs without installing Kali permanently. Below are methods for Windows, macOS, and Linux.
2.1 Windows: Rufus
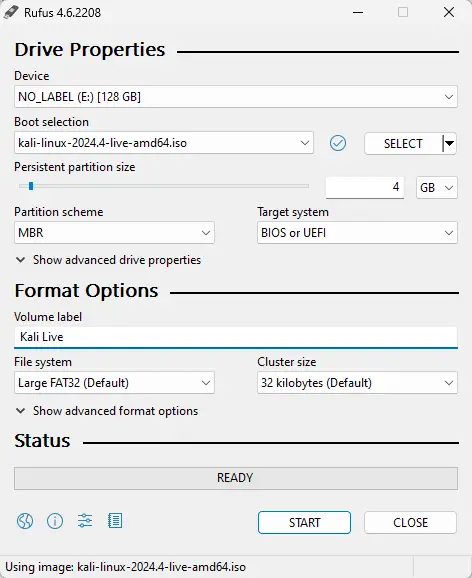
Rufus is a user-friendly tool for Windows that can create a Kali Live USB. If you want persistence, Rufus can set that up automatically during this step.
- Download and open Rufus.
- Select your USB under “Device.”
- Click SELECT and choose the Kali Linux Live ISO.
- If desired, set a “Persistent partition size” (e.g., 4GB) for automatic persistence.
- Click START and confirm any prompts.
- When Rufus finishes, eject the USB.
If you forgot to set persistence or used another tool, see Step 4 to add or fix persistence later.
2.2 macOS & Linux: Balena Etcher (GUI)
Balena Etcher is a cross-platform tool for flashing OS images. On macOS and Linux, Etcher does not create a persistence partition automatically, so you’ll need to set it up manually (see Step 4).
- Download/install Balena Etcher.
- Insert your USB drive (8GB or larger).
- Open Etcher and choose “Flash from file”, selecting the
Kali Live ISO. - Pick your USB drive as the target, then click Flash.
- When done, safely eject the USB.
2.3 macOS & Linux: dd (CLI)
If you prefer the command line, you can use dd to write the ISO directly to the USB. This also doesn’t create persistence automatically, so you’ll need to add it later (see Step 4).
- Identify your USB (e.g.,
/dev/sdbor/dev/disk2) vialsblk,fdisk -l(Linux), ordiskutil list(macOS). - Unmount the USB (
sudo umount /dev/sdb*on Linux ordiskutil unmountDisk /dev/disk2on macOS). - Write the ISO:
sudo dd if=/path/to/kali.iso of=/dev/sdb bs=4M status=progress
(Adjustof=as needed.) - Finish & Eject:
Runsyncthen remove the USB.
3. Boot and Test Your USB
Now that you’ve created your Kali Live USB, the next step is to boot from it and confirm it works. This usually involves changing your system’s boot order or using a one-time boot menu. Below are general guidelines for both PCs and Macs.
3.1 Windows & Linux: BIOS/UEFI
- Power on or restart your PC. During startup, press the key for your system’s boot menu or BIOS/UEFI settings (often F2, F12, Esc, or Delete).
- In the boot options, select your USB drive. It may be listed by its brand or as “USB HDD.”
- Save and exit. Your system should reboot from the USB and show the Kali boot menu.
- Alternate (Windows 10/11): Hold Shift while clicking “Restart” to open Advanced Startup. Then go to Use a device → USB.
- Tip: Some PCs have a dedicated one-time boot menu key (e.g., F9 on HP). Use that to boot from USB without permanently changing BIOS settings.
3.2 macOS Boot
- Insert the USB drive.
- Reboot your Mac. Immediately press and hold the Option (Alt) key.
- Select “EFI Boot” or “Windows” (the name can vary) when the boot options appear.
Apple Silicon (M1/M2): Shut down your Mac, then press and hold the power button until the startup options screen appears. Choose your USB drive to boot from it.
3.3 Test Persistence (If Configured)
When Kali’s boot menu appears, you’ll typically see:
- Live system (amd64)
- Live system (amd64) fail-safe mode
- Live system (amd64) forensic mode
- Live system with USB persistence
- Live system with USB encrypted persistence
- Start installer
- Advanced install options
- Utilities
If you used Rufus to create a persistence partition, select “Live system with USB persistence.” Once on the Kali desktop, create a test file (e.g., on the Desktop), then reboot and pick the same persistence option. If the file remains, persistence is working!
If you did not set up persistence yet, just choose “Live system (amd64)”.
Default Credentials: The default username is kali, and the password is kali. To become root, use sudo su.
4. Manually Adding Persistence
Some tools—like Rufus on Windows—can create a persistence partition automatically, but others (Etcher, dd, etc.) do not. If you didn’t enable persistence or used a tool that lacks this feature, you can still manually add persistence to your existing Kali USB. The basic idea is to create a second partition labeled persistence, format it to ext3 or ext4, and add a configuration file so changes are saved across reboots.
4.1 Key Requirements
1. You generally cannot modify a USB while you’re booted from it if the main partition is read-only (e.g., the Kali ISO partition). You’ll need a second environment—a different USB, a VM, or another computer—so your target USB isn’t in use.
2. You need a tool that can shrink the main partition and create an ext3 or ext4 partition labeled persistence. Windows Disk Management and macOS Disk Utility generally cannot do this because of the read-only ISO partition and lack of native ext3/ext4 support.
4.2 Windows Users
Option A: Rufus (Automatic)
If you created your USB in Windows using Rufus, you can select a “Persistent partition size” during the initial setup. That way, Rufus automatically creates persistence.
Option B: Manual Creation with MiniTool Partition Wizard
If you forgot to enable persistence in Rufus or used another tool, you can still add persistence manually. A popular free option is MiniTool Partition Wizard Free:
- Install MiniTool Partition Wizard (Free edition).
- Shrink the main partition (the one containing Kali) to free up space.
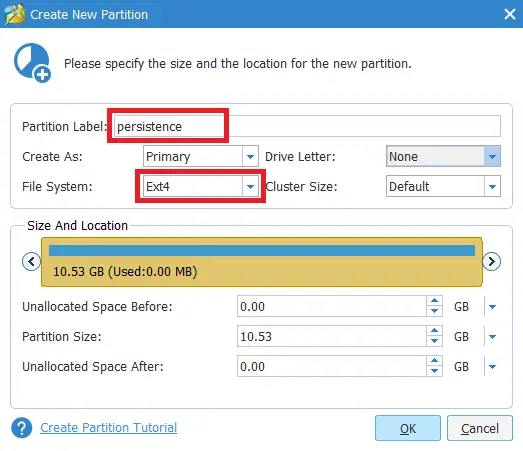
- Create a new partition in the unallocated space:
- Partition Type: Primary
- File System: Ext4
- Partition Label:
persistence
- Apply the changes, then safely remove the USB once it’s done.
After creating the partition, you’ll finalize it in Kali Live (see 4.6 Configure the Persistence Partition).
4.3 macOS Users
macOS Disk Utility generally can’t resize the read-only ISO partition nor format ext3/ext4. To add a persistence partition, you must use a Linux environment—for example, boot from another Linux USB, or use a Linux VM (e.g., VirtualBox or VMware) and pass the USB through to it. Then follow the steps in 4.5 Resizing/Creating a Partition to shrink and create the persistence partition.
4.4 Linux Users
If you have another Linux system (installed or a second Live USB), you can use GParted or parted to shrink the main Kali partition and create an ext3/ext4 partition labeled persistence. You’ll then configure that partition (see 4.6) so Kali saves data across reboots.
4.5 Resizing/Creating a Partition
Regardless of your operating system, the main steps to add persistence are:
- Shrink the existing Kali partition (the read-only ISO partition).
- Create a new
ext3orext4partition labeledpersistence.
Below are two common methods on Linux. For Windows, see MiniTool Partition Wizard (See 4.2 above), and for macOS, you’ll need a Linux environment or VM with GParted or parted.
Method A: GParted (GUI)
- Boot into a Linux environment where your target USB isn’t mounted.
- Run
sudo gpartedand select the USB (e.g.,/dev/sdb). - Shrink the existing partition, then create a new
ext3/ext4partition labeledpersistence. - Apply the changes. Note the partition name (e.g.,
/dev/sdb2).
Method B: parted (CLI)
If you prefer the command line:
sudo parted /dev/sdb(parted) print
(parted) resizepart 1 <new_end>
(parted) mkpart primary ext4 <start> <end>
(parted) set 2 lba off
(parted) quitExample Steps:
- Identify your USB device (e.g.,
/dev/sdb). printshows current partitions.resizepartshrinks the main partition.mkpartcreates a new partition for persistence.quitto apply changes.- Note your new partition name (e.g.,
/dev/sdb2).
4.6 Configure the Persistence Partition
Note: If you plan to encrypt this partition, you can skip this step and go straight to Step 5.
After creating the partition, label it persistence (if you haven’t already), then format it and add the persistence.conf file:
sudo mkfs.ext3 -L persistence /dev/sdb2
sudo e2label /dev/sdb2
sudo mkdir -p /mnt/my_usb
sudo mount /dev/sdb2 /mnt/my_usb
echo "/ union" | sudo tee /mnt/my_usb/persistence.conf
sudo umount /mnt/my_usb
Note: Adjust /dev/sdb2 if your partition name differs (e.g., /dev/sdb3 or /dev/sdc2).
4.7 Reboot and Use Persistence
Reboot your system and choose “Live (amd64) USB Persistence”. If everything is set up correctly, any changes you make will now persist across reboots.
5. (Optional) Encrypt the Persistence Partition (LUKS)
Important: This will wipe data in your persistence partition, so back up any important files first.
5.1 Identify the Correct Partition
If you already know the persistence partition (e.g., /dev/sdb2), skip to Step 5.2.
Otherwise, run:
sudo fdisk -lYou’ll see one larger FAT32 partition for the “Live” system and a smaller 83 Linux partition for persistence. For example:
Output:
Disk /dev/sdb: 115.7 GiB, 123480309760 bytes
...

Device       Boot  Start     End   Sectors   Size Id Type
/dev/sdb1           2048 34603007 34600960 16.5G  c W95 FAT32 (LBA)
/dev/sdb2       34603008 42969087  8366080     4G 83 Linux
Here, /dev/sdb2 is the persistence partition. If you don’t see it, go back to Step 4 and create one first.
5.2 If the Partition Is Currently Mounted (e.g., Rufus)
If you created this USB with Rufus and booted “Live system with USB persistence,” the persistence partition is auto-mounted, so cryptsetup will fail (“device in use”). To fix this, you need to prevent Kali from mounting it on reboot:
- Rename the partition label (e.g.,
sudo e2label /dev/sdb2 old_persist). This stops Kali from recognizing it as a persistence partition on reboot. - Reboot into a non-persistent session (e.g., “Live system (amd64)”) so the partition is not in use.
- Now the partition is free. Proceed to Step 5.3 to encrypt it.
5.3 LUKS Format & Configuration
Step 1: Initialize LUKS, where /dev/sdb2 is your own persistence partition:
sudo cryptsetup --verbose --verify-passphrase luksFormat /dev/sdb2Type YES (in capitals) to confirm, then pick a secure passphrase. (If needed, generate a passphrase here).
Step 2: Open the container:
sudo cryptsetup luksOpen /dev/sdb2 my_usbEnter your passphrase.
Step 3: Format & create persistence.conf:
sudo mkfs.ext3 -L persistence /dev/mapper/my_usb
sudo mkdir -p /mnt/my_usb
sudo mount /dev/mapper/my_usb /mnt/my_usb
echo "/ union" | sudo tee /mnt/my_usb/persistence.conf
sudo umount /mnt/my_usb
sudo cryptsetup luksClose my_usb
Reboot and choose “Live system with USB encrypted persistence.” Enter your LUKS passphrase on boot. Your data is now protected.
User Feedback & Common Issues
Over time, this guide has received many comments—some for older Kali versions. Below are common issues and tips:
- Partition Label Must Be “persistence”
Ensure the partition label is exactlypersistence. - Password/Keyboard Layout
LUKS passphrases can fail if you switch keyboards. Use a simple passphrase with lowercase/numbers only to avoid issues. - Stuck at “Please unlock disk /dev/sdb2”
Some older builds had encryption bugs. Update Kali or try another USB brand. - “Failed Unmounting /run/live/medium” or “/tmp”
Disabling Secure Boot or using Legacy BIOS can help. Some USB sticks are incompatible. - Resize Errors/“Invalid Config File”
Some Windows tools fail on certain USBs. Wiping partitions withdiskpartor GParted can fix it. - Data Only Saves in Persistence Partition
Make sure you’re booting “(Encrypted) USB Persistence.” Thepersistence.confmust have/ union. - Sluggish Performance on Large USBs
Use USB 3.0 or consider a full Kali install on USB if speed is critical.
Conclusion
You now have a Kali Linux Live USB that supports persistence and optional LUKS encryption. Whether you’re on Windows, macOS, or Linux, you can create a portable pentesting environment. If you get stuck, consult the official Kali docs or leave a comment below!
Let me know if this helped. Follow me on Twitter, Facebook and YouTube, or 🍊 buy me a smoothie.
you guys are awesome, after so much searching and testing only yours idea and code, works like a charm…thanks guys.
God bless you.
Great, you’re welcome! God bless.
Two huge thumbs up!!! Spot on.
🙂
Thanks alot, worked perfectly on the first go!
Good to hear!
Failure. Went step by step, smoothly and flawlessly until time for saving. Nada, zero, zip, nothing. thx
What’s the output for
fdisk -l?Hi, Thanks for the tutorial.
I am getting an error in following command:
mount /dev/sdb2 /mnt/my_usbFollowing is the error:
mount: /mnt/my_usb: wrong fs type, bad option, bad superblock on /dev/sbd2, missing codepage or helper program, or other error.Can you please help me out?
Sounds like the USB wasn’t partitioned properly. Is
sdb2definitely the USB drive?What’s the output for
fdisk -l /dev/sdb2?Hello.
First Thanks for the posting this tutorial, secondly ; Can resizing the disk partion 1 makes my left storage (i have 16 gb data traveler usb) unreadble ? Can i undo all tasks such partitionning and resizing and make my usb normal again? i mean if something goes wrong can i get back to the moment which i did not mess with my usb storage ?
Thanks for responding, i am new to partitionning stuff
If you have any important files on the USB drive you must back them up elsewhere because the partitioning and ISO writing will wipe the drive clean.
To restore the USB back to a 16GB drive, you must delete all the partitions you created in Partition Wizard and then create a new 16GB FAT32 partition in the unallocated space.
Thank you very much! Perfect instructions.
Work like a charm.
You’re welcome. Happy cracking!
Hi.
I´ve followed the guide exactly, but this still dosent work for me. I also tried it in ext3.
When im creating a “Test” folder and reboot, it dosent work, the folder has been deleted.
So what to do now?
Hi there. I’ve gone through this guide again from scratch using a Sandisk 16GB USB drive and it worked fine for me. What is your output when running
fdisk -l?It´s now working just fine. The issue semed to be with my USB drive. Apperently it wasnt formated and prepared correctly.
I did that and followed the guide exactly, and now its working just fine.
Thx m8 😉
Great!
im sure i followed the exact same steps, same commands but still no persistence.
Good guide, very easy to follow but no persistence for me 🙁
Hi there. Well, I’ve gone through this guide again from scratch using a Sandisk 16GB USB drive and it worked fine for me. What is your output when running
fdisk -l?Same here.
Same with me
Im 100% sure i followed to exact instruction but it doesnt work.
When i create an empty folder, after reboot ia not there.
Good tutorial, explicit and easy to follow but for me it doesnt work
What is your output when running
fdisk -l?k1tweeked:
OUTPUT FOR
fdisk -l /dev/sdb2My USB is not a Sandisk and it’s 32g. HP Thin Client Pro T520 clean install Boot Nuke, Kali lite. Where did i go wrong? BTW same sentiments as above, good tutorial , easy to follow, or at least i thought it was…
It might be this:
sdb1is formatted as NTFS whereas it should be FAT32. Look at Step 1, did you check the right file system in Universal USB Installer? I haven’t tested this guide with NTFS, not sure if it makes a difference.ps. I’ll download Kali Lite today and run through the guide again in case there are any issues.
When I enter your second command,
/dev/sdc2 /mnt/my_usbIt gives me the following readout
Bash: /dev/sdc2: permission deniedPlease help.
Try running it with
sudoI have a multi-boot external hard drive, with kali-2017.2 and a luks encrypted persistence drive. I just added kali-2018.1 to the bootloader and want to know how I reformat the drive to work with kali-2018?
really, really the most thorough and complete instructions I’ve found. My usb was a 32gb so I created 2- 4gb partitions (boot and persistence), then formatted the remaining space with NTFS and labeled it storage.. Naturally i won’t read that storage partition in windows, but that’s all right. Thanks again
Glad it helped 🙂
After having difficulties with the official documentation that seems to be outdated concerning actual Kali Linux 2018 distribution this solution worked fine for me. Thanks a lot!
I would still be interested in a solution for Linux tools, especially openSUSE’s partitioner (seems to be different from gparted), alternatively with Knoppix.? Had some issues with this.
Thanks for the feedback. Yes, a guide for Linux is on the list of things to do.
Followed guide to the letter however when I try to apply changes in MiniTool I get “Invalid configuration file”
Any comment appreciated
What USB drive are you using? You may need to format it using the manufacturer’s recommend tools. Also make sure another application isn’t using it.
For me , the persistant partition was mounted in an other place by default so i had to unmount it and then do the rest of the tuto
This process works with Kali 2018 as well
There is an updated guide for Kali 2018 available now.
Persistence
Hi. i did all steps but unfortunately did not work. After reboot everything disappear.
What is your output when running
fdisk -l?Can I use ext3?
Yes, you can!
I found with system Ext3 would work most 2 boots and then total mess. Ext4 not a single problem and that’s all I changed was the Ext.
This issue has as many answers as there are USB drives maddingly attempting persistent storage. Thank you for providing clear, succinct and accurate instructions! Now if you could only address the LUKS encryption I would be set.
Hi. Did you try this guide for LUKS encryption?
worked perfectly. thanks. and it’s ext4.
That’s great. Thanks John.
After surfing dozens of sites, I finally found a perfect guide for USB live persistence with encryption. Thanks! really helped a lot.
Great!
aye, great tutorial bro but i got an error when i try to running “cryptsetup –verbose –verify-passphrase luksFormat /dev/sdb2” command which give me “cannot format device /dev/sdb2 which is still in use” how to solve this? thank you in advance.
It shouldn’t be in use at all. Are you sure
sdb2is the correct device?using the sudo command worked for me
When i finish the process and boot from the usb it ask me to unlock a difirente partition (mint linux encrypted), any tips?
Hmm, not sure. I haven’t tested this on anything other than Kali.
that’s a great tutorial. However as soon as you you do an update terminal stops working and kali is buggy. Anyway to fix this?
What command did you enter when it went buggy?
Didn’t worked, had to make the partition ext3.
I’ve just followed this guide again using a brand new 16GB SanDisk Ultra USB drive and EXT4 worked fine for me.
Did you follow this guide exactly? Did you write using Universal USB Installer and set up partitions using MiniTool? Are you using 32bit or 64bit Kali? What USB drive is it?
Thanks it worked for me first time. In the previous guide (non-encryption) you format the persistence partition with EXT4 in Windows but in this guide you format with EXT3 in Ubuntu. Is there any reason for that? Thanks.
The official Kali guide says to use EXT3 but I think they haven’t updated the guide in a while. I haven’t tested with EXT4 yet but I don’t see why it wouldn’t work.
Tested with ext4 and appears to work without any issues.
Great, thanks.