Before you begin…
It’s surprising how many web developers are still unaware of SFTP and the advantages over FTP/FTPS. SFTP comes with Linux Server preinstalled and works just like normal FTP, but is more secure and less hassle to set up. If your FTP client supports SFTP, you should use it!
1. Install vsftpd
Let’s begin by updating the package lists and installing vsftpd on Ubuntu 20.04/20.10.
Below we have two commands separated by &&. The first command will update the package lists to ensure you get the latest version and dependencies for vsftpd. The second command will then download and install vsftpd. Press y and ENTER when asked to continue.
sudo apt update && sudo apt install vsftpdOnce installed, check the status of vsftpd
sudo service vsftpd status<span class="green">●</span> vsftpd.service - vsftpd FTP server
Loaded: loaded (/lib/systemd/system/vsftpd.service; enabled; vendor preset: enabled)
<span class="green">Active: active (running)</span> since Mon 2020-04-27 19:35:30 IST; 13s ago
Main PID: 54532 (vsftpd)
Tasks: 1 (limit: 1137)
Memory: 652.0K
CGroup: /system.slice/vsftpd.service
└─54532 /usr/sbin/vsftpd /etc/vsftpd.conf
Apr 27 19:35:30 ubuntu systemd[1]: Starting vsftpd FTP server...
Apr 27 19:35:30 ubuntu systemd[1]: Started vsftpd FTP server.Above we can see our FTP server is now up and running.
2. Configure Firewall
If you haven’t already done so, it is recommended that you enable the ufw firewall for Ubuntu 20.04/20.10. Before enabling ufw firewall, make sure you add a rule for SSH, otherwise you may get locked out of your server if you’re connected remotely. If you don’t want to set up a firewall, skip to Step 3.
sudo ufw allow OpenSSHLet’s open ports 20 and 21 for FTP, and ports 40000-50000 for passive FTP. We’ll also open port 990 for TLS, which we will set up later.
sudo ufw allow 20/tcpsudo ufw allow 21/tcpsudo ufw allow 40000:50000/tcpsudo ufw allow 990/tcpNow, enable the firewall if it isn’t already. Press y and ENTER if warned about disrupting the SSH connection.
sudo ufw enableTo check the status of the firewall, run:
sudo ufw statusIf the firewall is running, you should see Status: active and the firewall rules we just added.
Status: active

To                         Action      From
--                         ------      ----
OpenSSH                    ALLOW       Anywhere
Apache Full                ALLOW       Anywhere
3306                       ALLOW       Anywhere
20/tcp                     ALLOW       Anywhere
21/tcp                     ALLOW       Anywhere
40000:50000/tcp            ALLOW       Anywhere
990/tcp                    ALLOW       Anywhere
OpenSSH (v6)               ALLOW       Anywhere (v6)
Apache Full (v6)           ALLOW       Anywhere (v6)
3306 (v6)                  ALLOW       Anywhere (v6)
20/tcp (v6)                ALLOW       Anywhere (v6)
21/tcp (v6)                ALLOW       Anywhere (v6)
40000:50000/tcp (v6)       ALLOW       Anywhere (v6)
990/tcp (v6)               ALLOW       Anywhere (v6)
3. Create FTP User
We will now create a new user that we will use to log into FTP. In this example, we will create a new user called ftpuser.
sudo adduser ftpuserGenerate a strong password and keep it safe.
You may also be asked to enter some contact information. You can just press ENTER to each of these.
If you only want ftpuser to log in via FTP, you should disable their SSH access by blacklisting their username in the SSH config file. Otherwise, skip to Step 4.
Open the SSH config in nano.
sudo nano /etc/ssh/sshd_configAdd the following to the bottom of the file replacing ftpuser with the user you want to deny SSH and SFTP access. You can add multiple users here separated by a single space. (To paste in nano, press the right mouse button). /etc/ssh/sshd_config
DenyUsers ftpuserTo save file and exit, press CTRL + X, press Y and then press ENTER.
Restart the SSH service.
sudo service sshd restart4. Directory Permissions
You now need to decide where this new FTP user is allowed to view and upload files.
vsftpd uses chroot jails to restrict users to their home directories and requires that the home directory is not writable. For that reason, we have to set up some directories and permissions.
If you plan on using this FTP user account to upload files to a web server, continue to Step 4.1. If you just want to upload to a home folder, skip to Step 4.2.
Method 1. Upload to a Web Server
In many cases, you want to be able to upload files to the document root on the web server.
If you followed a previous guide here for setting up multiple domains, your document root may be located in somewhere like /var/www/test1.com/public_html – in that case, you would need to set the home folder for ftpuser to the folder above the document root: /var/www/test1.com (substituting test1.com for your own domain).
If you are not using multiple domains, we will assume you are using the default document root /var/www/html for both Apache and Nginx in Ubuntu 20.04/20.10. In this scenario, we have to make /var/www/ the home directory for our user ftpuser.
Let’s set the folder above the document root as the home directory for ftpuser.
sudo usermod -d /var/www ftpuserNow set ownership of the document root directory to ftpuser. (The default is /var/www/html, though it may be /var/www/test1.com/public_html on your server.)
This will allow our FTP user to write and alter files in the document root directory.
sudo chown ftpuser:ftpuser /var/www/htmlNow skip to Step 5 to configure vsftpd.
Method 2: Upload to a Home Folder
If instead you want this user to upload files to the home directory, create a new directory called ftp in the user’s home directory and another within it called files. In this example below our user is called ftpuser.
sudo mkdir /home/ftpuser/ftpSet the ownership of the ftp directory to no nobody:nogroup.
sudo chown nobody:nogroup /home/ftpuser/ftpSet permissions for the ftp directory using chmod so that it is not writable by anyone, otherwise vsftpd will not allow you to log in. a-w means a = all/everyone - = remove w = write permission, so, remove write permissions for everyone.
sudo chmod a-w /home/ftpuser/ftpNext we will create a new directory within /ftp where the user can view and upload files.
sudo mkdir /home/ftpuser/ftp/filesAssign ownership of this directory to our new FTP user otherwise they will not be able to write to it.
sudo chown ftpuser:ftpuser /home/ftpuser/ftp/files5. Configure vsftpd
There are a few changes we have to make to the vsftpd configuration file before you can start using FTP on Ubuntu 20.04/20.10.
Rename the config file.
sudo mv /etc/vsftpd.conf /etc/vsftpd.conf.bakCreate a new config file with nano editor.
sudo nano /etc/vsftpd.confPaste in the following:
listen=NO
listen_ipv6=YES
anonymous_enable=NO
local_enable=YES
write_enable=YES
local_umask=022
dirmessage_enable=YES
use_localtime=YES
xferlog_enable=YES
connect_from_port_20=YES
chroot_local_user=YES
secure_chroot_dir=/var/run/vsftpd/empty
pam_service_name=vsftpd
force_dot_files=YES
pasv_min_port=40000
pasv_max_port=50000
If you followed Method 2 previously and only want this user to upload files to the home folder, we must tell vsftpd that the local_root is the /ftp folder we created earlier. Don’t add these two lines if you want the user to upload to the web document root!.
user_sub_token=$USER
local_root=/home/$USER/ftp
We are done with vsftpd.conf
To save file and exit, press CTRL + X, press Y and then press ENTER.
Restart vsftpd.
sudo systemctl restart vsftpd6. Test FTP
We can now test vsftpd to see if we can log in as the user we created earlier. We recommend FileZilla, which works on Windows, Mac and Linux.
Enter your server’s IP, your FTP username and password you created earlier, and click Quickconnect.
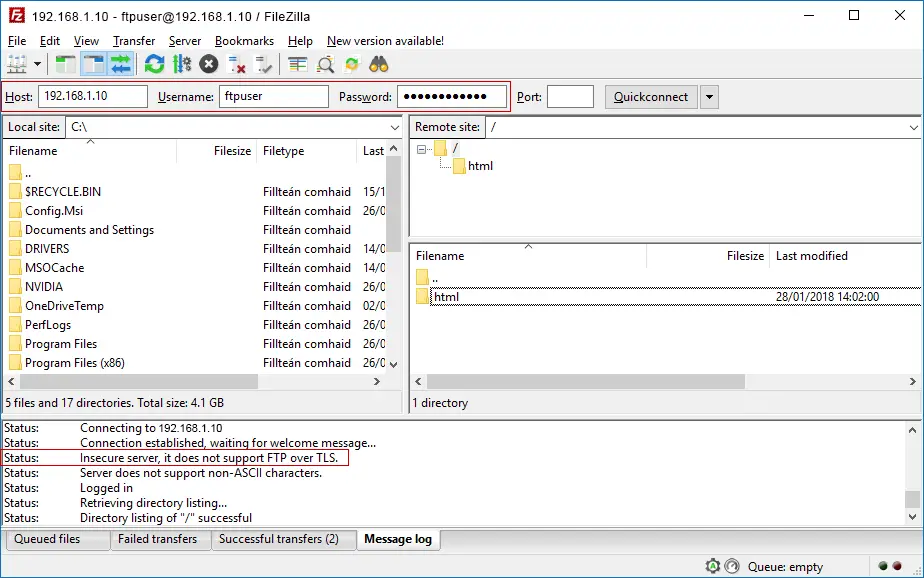
Above we can see we have connected successfully and the web root directory html is displayed, though this may be different on your server.
Try uploading, creating and editing folders and files within the web root directory to ensure permissions are working correctly.
You will notice we have a warning in FileZilla “Status: Insecure server, it does not support FTP over TLS.” It is highly recommended that you now configure TLS so that login credentials and traffic are encrypted over the FTP connection.
If you are having problems logging in to the FTP server, try checking the vsftpd log. To view the last 200 entries using tail:
sudo tail /var/log/vsftpd.log -n 2007. Secure FTP with TLS (Recommended)
It’s important to keep a few things in mind when using FTP – it is not encrypted by default meaning your credentials and files that you send are vulnerable to interception. To address this you should connect to vsftpd using FTPS (FTP over SSL/TLS).
Let’s begin by creating a new certificate with the openssl tool.
sudo openssl req -x509 -nodes -days 365 -newkey rsa:2048 -keyout /etc/ssl/private/vsftpd.pem -out /etc/ssl/private/vsftpd.pemYou will be asked to enter some details like country, etc. You don’t have to fill these in. You can just press ENTER for defaults.
Now that your private key has been created, there are a few changes we have to make to the vsftpd configuration file.
Open the config file in nano editor.
sudo nano /etc/vsftpd.confPaste in the following beneath it.
ssl_enable=YES
rsa_cert_file=/etc/ssl/private/vsftpd.pem
rsa_private_key_file=/etc/ssl/private/vsftpd.pem
allow_anon_ssl=NO
force_local_data_ssl=YES
force_local_logins_ssl=YES
ssl_tlsv1=YES
ssl_sslv2=NO
ssl_sslv3=NO
require_ssl_reuse=NO
ssl_ciphers=HIGH
Save and exit (press CTRL + X, press Y, then press ENTER)
Restart vsftpd.
sudo systemctl restart vsftpd8. Testing TLS with FileZilla
We can now test TLS. We recommend FileZilla, which works on Windows, Mac and Linux.
Enter your server’s IP, your FTP username and password you created earlier, and click Quickconnect.
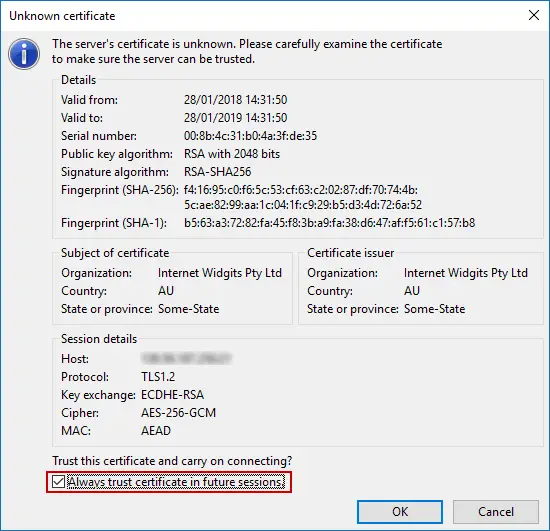
You may be presented with an Unknown Certificate warning. Click Always trust this certificate in future sessions and click OK.
If you are connected over TLS, it will tell you in the connection log. You will also see a padlock in the bottom right corner.
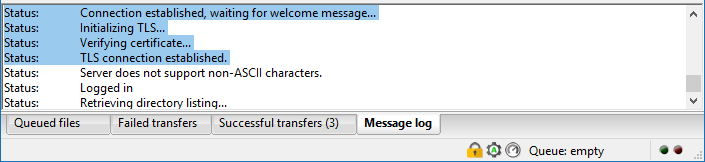
You’re all done!
Let me know if this helped. Follow me on Twitter, Facebook and YouTube, or 🍊 buy me a smoothie.
Great job working perfectly
Bro, Every time I setup new server I come on this tutorial and follow.. Thank you so much.
Thank you very much for this great Job.
Thank you very much for this great tutorial.
It was a big help for my current project!
Thank you for this Tutorial, I did as you said step by step and have been able to pass files between my windows 7 computer to my server Ubuntu 20.04 server. my next question is how do my mates connect to my server via FileZilla to download or upload to and from my server like I can on my LAN???
Good question! If you have followed this tutorial, you need to forward ports 20, 21, (22 ? ), 990 and the port range 40000 – 50000 in your modem to the IP address of your server.
Let your modem/router always provide the same IP address to the server. (fixed IP address). Then forward the above mentioned ports to that fixed IP address. How to do this, can be found in your modem/router manual.
Filezilla.
Once your friends fill in the IP address that you are connected to the internet, (thus not the IP address from your computer), it will be the same as if you doing it at home. Fill in the username and password and port number 21 and it should work. Happy FTPing ! ;-))
Excellent tutorial. I followed it step by step, always works
please help me with this issue tried active as well as passive mode
Response: 500 Illegal PORT command.
Error: Failed to retrieve directory listing
Thanks a lot for such a detailed tutorial. It just saved me. Will that vsftpd.conf file work on RHEL 8.2? I have a redhat server but i failed to configure vsftpd. ftp always connects to home folder. I need to change the default directory to /var/www. Thanks!!
Un très bon tuto ,
je l’ai appliqué sur mon serveur Ubuntu 20.04.2 LTS et cela a parfaitement fonctionné sans que je n’ajoute quoique ce soit.
Bravo et merci pour ce partage.
By following this I am getting this error.
500 OOPS: cannot change directory:/var/www
Can you please help me on this issue?
Add in vsftpd.conf
allow_writeable_chroot=YES
I tried this but for some reason it’s not working in order to chmod files after restarting the vsftpd service.
Thank you. This was quite descriptive.
Could you please tell me exactly why do we need passivemod for http://ftp.. since it is not safe? I ‘m sorry I couldn’t get implimentation of unsafe thing!.
Thanks a lot, I watched some videos to create Sftp and user creation but this document make me to do it clearly..Thanks for this documentattion
hello and thanks a lot for the perfect step by step tutorial, quick question if anyone can reply, if i need to make another user to be able to view and upload files to same location how this can be done as now the second user created cannot access the ftp
regards
charles
Your tutorials are very good. Thanks so much!
Thanks, worked perfectly, not like other tutorials I tried.
I’m running Ubuntu 20.10 64 bit on a Raspberry Pi 4 with 8gig of memory which I want to use as a web server (Node.js with Express and MongoDB) to test my web development. As a windows user I’m a complete newbie when it comes to Linux.
I therefore really appreciate clear and easy to follow tutorials like this.
Thank you so much really apreciate you content!
Thanks! Very clear! Well done!
Thank you, once again.
Hi, this guide is very useful, but by trying to access with filezilla, I’m getting below error
Error GnuTLS -15 in gnutls_record_recv: An unexpected TLS packet was received
May you help me to figure out why it happens?
Thank you in advance
I figured out the problem.
I added in /etc/vsftpd.conf below lines:
chroot_list_enable=YESchroot_list_file=/etc/vsftpd.chroot_listthen I made the file vsftpd.chrootlist by adding my ftp user.
I restarted the vsftpd service and the problem has been fixed.
Thank you anyway
Carlo
This worked for me also. Thank you!!
Can you help me do this I am trying hard but no luck so far
You may need to configure your firewall in your host machine to allow ftp port 21, so that you can conenct to the server and be able to communicate between the two. I hope that helps
can you help me to make that file please?? thanks