If you are creating a new Droplet, you do not have to do any manual configuration. Instead, just check the IPv6 box when you are creating a new Droplet.
If you are trying to enable IPv6 on an existing DigitalOcean Droplet, you should now shutdown the Droplet and create an image/backup.
WARNING: It’s very important that you have a complete backup of your server because if you mess up the network settings, you may never be able to log back in again.
Shutdown Ubuntu
sudo shutdown -h nowNow you can go the the Networking tab for your Droplet and enable Public IPv6 network
After a minute, you will be presented with your new IPv6 addresses
Turn on your Droplet again and log in to SSH.
Use nano to edit the file /etc/netplan/50-cloud-init.yaml
sudo nano /etc/netplan/50-cloud-init.yamlThe config with no IPv6 settings will look similar to below:
network:
    version: 2
    ethernets:
        eth0:
            addresses:
            - 167.99.223.163/20
            - 10.18.0.6/16
            gateway4: 167.99.208.1
            match:
                macaddress: aa:9e:5c:98:97:e4
            nameservers:
                addresses:
                - 67.207.67.2
                - 67.207.67.3
                search: []
            set-name: eth0
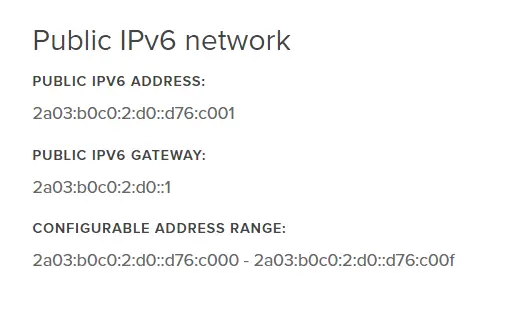
You will need to add your IPv6 address, IPv6 gateway and IPv6 nameservers to this configuration. These details should be in your Droplet’s networking tab.
- PUBLIC IPV6 ADDRESS:
2a03:b0c0:2:d0::d76:c001 - PUBLIC IPV6 GATEWAY:
2a03:b0c0:2:d0::1
We also need the Google Public DNS nameservers
- Google Public DNS nameserver 1
2001:4860:4860::8844 - Google Public DNS nameserver 2
2001:4860:4860::8888
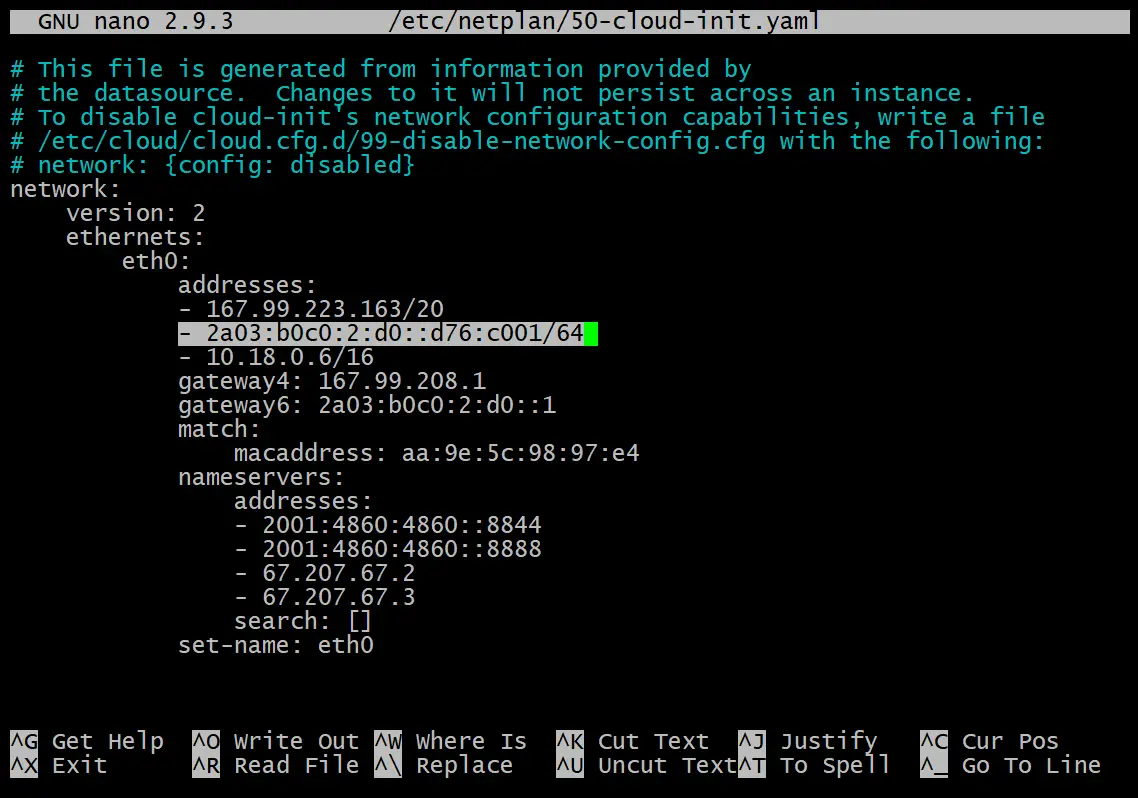
With this information, add them to the config:
Warning reminder: Did you backup or make an image of your server? Because if the settings are wrong, you may get locked out permanently!
network:
    version: 2
    ethernets:
        eth0:
            addresses:
            - 167.99.223.163/20
            - 2a03:b0c0:2:d0::d76:c001/64
            - 10.18.0.6/16
            gateway4: 167.99.208.1
            gateway6: 2a03:b0c0:2:d0::1
            match:
                macaddress: aa:9e:5c:98:97:e4
            nameservers:
                addresses:
                - 2001:4860:4860::8844
                - 2001:4860:4860::8888
                - 67.207.67.2
                - 67.207.67.3
                search: []
            set-name: eth0
Save file and exit. (Press CTRL + X, press Y and then press ENTER)
Now apply these settings using netplan.
sudo netplan applyNow do a test IPv6 ping to Google’s Public DNS server
ping6 2001:4860:4860::8888If IPv6 is working correctly, you should see some ping responses.
PING 2001:4860:4860::8888(2001:4860:4860::8888) 56 data bytes
64 bytes from 2001:4860:4860::8888: icmp_seq=1 ttl=61 time=0.897 ms
64 bytes from 2001:4860:4860::8888: icmp_seq=2 ttl=61 time=0.562 ms
64 bytes from 2001:4860:4860::8888: icmp_seq=3 ttl=61 time=0.607 ms
64 bytes from 2001:4860:4860::8888: icmp_seq=4 ttl=61 time=0.613 ms
64 bytes from 2001:4860:4860::8888: icmp_seq=5 ttl=61 time=0.541 ms
If you have access to another machine, try pinging your server’s IPv6 address. Just keep in mind that if your client or ISP does not yet support IPv6, the ping will fail.
Let me know if this helped. Follow me on Twitter, Facebook and YouTube, or 🍊 buy me a smoothie.


Thanks for that. Both gateway4: and gateway6: commands have been deprecated. It is recommended to now use the routes: command.
Thanks, I love you. I spent so long trying to figure this out. Have any idea what that private IPv4 address is? Doesn’t seem to match the private IP of my droplet.
Thank you. This helped me a lot!
Thanks so much!! The “official” DigitalOcean guide didn’t work for me but this did!
Great!